background image

E N G L I S H

63

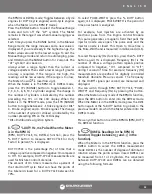
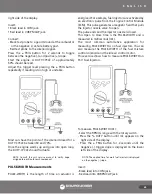
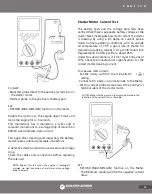
In this case, use the Hz of RPM IG mode to get the 
correct readings.

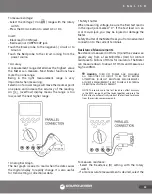
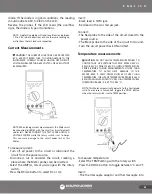
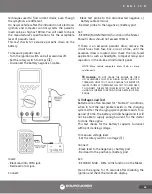
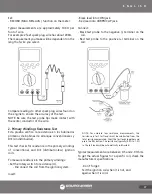
To measure frequency (Hz):
• Select the Hi-Sen Hz setting with the rotary switch.

Insert:
- Black lead in COM jack.
- Red lead in VΩRPM CAP jack.

Connect:
- The Black test probe to GROUND side.
- The Red test probe to the “SIGNAL OUT” wire of the 

object to be tested.

NOTE: The display will show 00.00Hz for frequencies below 
0.5Hz. 

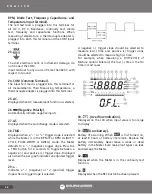
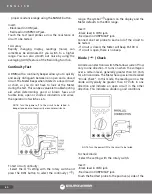
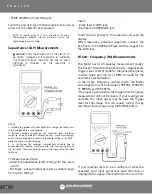
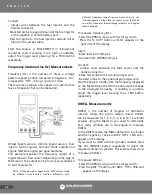
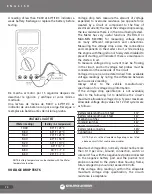
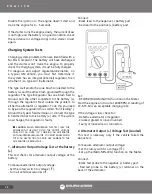
Connect the inductive pickup to a spark plug wire and 
start the engine. If no reading is received, unhook the 
pickup, turn it over and connect again.
If the reading is too high or unstable, adjust the 
trigger level.

NOTES:
1. Position the pickup as far away from the distributor and 
the exhaust manifold as possible.
2. Position the pick up within six inches of the spark plug 
or move it to another plug wire if no reading or an erratic 
reading is received.

RPM Measurements Using the Inductive Pickup 
(RPM IP mode)

RPM refers to Revolutions Per Minute. Using the 
inductive pickup, which comes with the Meter, RPM 
can be measured by clamping it around any spark plug 
wire of a two or four stroke automotive engine. The 
inductive pickup takes the magnetic field generated 
by the current flown in the spark plug wire and 
converts it to a pulse that triggers the Meter’s RPM 
measurement.
Using the inductive pickup allows you to make RPM 
measurements on any 2 or 4 stroke automotive engine 
with any number of cylinders without physically 
touching any wires.

 WARNING: THE IGNITION SYSTEM CAN GENERATE A 

POTENTIAL SHOCK HAZARD. ENSURE THAT THE ENGINE 
IS TURNED OFF BEFORE CONNECTING OR REMOVING THE 
INDUCTIVE PICKUP.

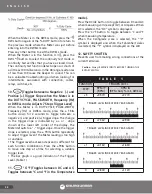
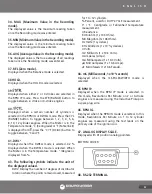
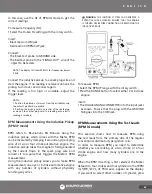
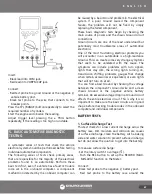
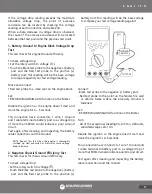
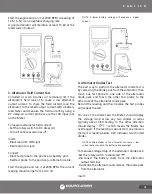
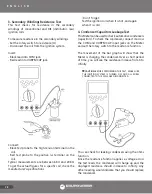
To measure RPM:
• Select the RPM IP range with the rotary switch.
• Press the RANGE button to select either 2 or 4 stroke 

engine.

Insert:
• The DUAL BANANA CONNECTOR into the input jacks 

as shown. Ensure that the plug with the GROUND 
TAB goes into the COM jack.

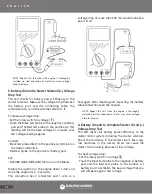
RPM Measurements Using the Test Leads 

(RPM IG mode)

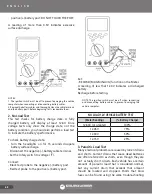
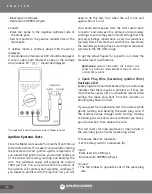
This exercise shows how to measure RPM using 
the test leads from the primary side of the regular 
conventional distributor type ignition coils.
In order to measure RPM, you need to determine 
whether you are looking at a two stroke or a four 
stroke engine and how many cylinders are in the 
engine.

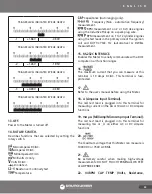
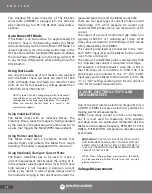
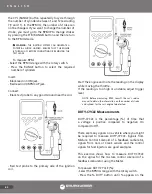
When the RPM IG setting is first selected, the Meter 
defaults to four strokes and four cylinders so that RPM 
IG,  STR,  CYL, AT, TRIG and – appear on the display. 
If you want to select other number of cylinder, press 

Summary of Contents for UD88

Page 1: ... entienda y siga las instrucciones de seguridad contenidas en este documento antes de operar esta herramienta WARNING Read understand and follow the safety rules in this document before operating this tool Manual de Usuario y Garantía User s Manual and Warranty ...

Page 2: ...OS 35 7 MANTENIMIENTO Y PARTES DE REEMPLAZO 41 8 INTERFACE RS 232 OPCIONAL 42 9 ESPECIFICACIONES 46 ADVERTENCIA ONDAS COMO LAS DE PEQUEÑOS RADIOS PORTÁTILES TRANSMISORES TRANSMISORES DE ESTACIONES DE RADIO Y TELEVISIÓN TRANSMISORES DE RADIO DE VEHÍCULO Y DE TELÉFONOS CELULARES GENERAN RADIACIÓN ELECTROMAGNÉTICA QUE PODRÍA INDUCIR VOLTAJES EN LAS PRUEBAS PRINCIPALES DEL MULTÍMETRO EN ESOS CASOS LA ...

Page 3: ...pre debe hacerse en una área bien ventilada o utilizando un conducto de gas de descarga externo Ponga el freno de mano y bloquee las ruedas antes de probar o reparar el vehículo a menos que haya sido instruido de otra manera Es especialmente importante bloquear las ruedas en los vehículos de tracción delantera El freno de mano no sostiene las ruedas delanteras La ignición o sistema de combustible ...

Page 4: ...tiladores Blindado para probar los motores marinos Medición de capacitancia y frecuencia no automotriz Luz trasera e interfase RS 232C Símbolos internacionales ADVERTENCIA Voltaje peligroso Riesgo de descarga eléctrica Corriente Alterna CA Corriente Directa CD CD ó CA Tierra Rango de Voltaje aplicado permitido entre la terminal de entrada y tierra PRECAUCIÓN Doble aislamiento Protección de clase I...

Page 5: ...turas digitales en una pantalla de 4000 cuentas con indicación de polaridad y colocación del punto decimal automática Cuando este multímetro es arranque todos los segmentos y símbolos de la pantalla aparecen brevemente durante una autoprueba La pantalla se actualiza cuatro veces por segundo 2 Barra análoga La barra análoga proporciona una representación analógica de lecturas y actualiza a 20 veces...

Page 6: ...o está en el modo RPM IP Presione el botón RANGE para seleccionar el modo de rango manual y apagar el símbolo AT El multímetro permanecerá en el rango que estaba cuando se hizo la selección de rango manual Cada vez que usted presione el botón RANGE en el modo de rango manual el rango aumentará y un nuevo valor se mostrará Si ya se encuentra el rango más alto el multímetro vuelve al rango más bajo ...

Page 7: ...TY Hz DWELL 9 Lecturas de DWELL en la función RPM IG cambia entre y en la función Cuando el multímetro está en la función RPM IG presione el botón DWL para seleccionar el modo de medición de DWELL DWELL es el número de grados rotación del distribuidor donde los puntos permanecen cerrados DWELL puede medirse para motores de 1 a 12 Cilindros La conversión entre DUTY CYCLE y DWELL puede obtenerse usa...

Page 8: ...ntre C y F al medir temperatura Cuando es seleccionada la escala de centígrados el símbolo C esmostradoycuandolaescalaFahrenheit esseleccionada semuestraelsímbolo F enlapantalla 12 Obturador de seguridad Safety Shutter Previene al usuario hacer conexiones inadvertidas en las terminales de corriente Precaución siempre QUITE LAS ENTRADAS ANTES DE ACCIONAR EL INTERRUPTOR ROTATIVO ROTARY SWITCH T A B ...

Page 9: ...peres de 4A o 10A CA o CD 19 mAμA Terminal de entrada de miliamperaje microamperaje La punta de prueba roja se conecta en este terminal para medir mA o μA en CA o CD en las funciones de amperes 20 El voltaje máximo que este multímetro puede medir es 1000V CD o 750V CA RMS 21 Sea sumamente cuidadoso al hacer las mediciones de alto voltaje NO TOQUE LAS TERMINALES NI LAS TERMINALES DE LAS PUNTAS DE P...

Page 10: ...en el LCD cuando el valor de entrada es demasiado grande para ser desplegado 31 Batería baja Advertencia de vida de batería Cuando se enciende primero se indica que restan por lo menos 8 horas de vida de la batería Reemplace la batería inmediatamente Nunca deje una batería con baja carga o descargada en el multímetro Incluso los modelos a prueba de fugas pueden fallar y dañar el equipo 32 Es mostr...

Page 11: ... 1 x10 6 Farads 44 mS Milisegundos 1x10 3 segundos Es mostrado cuando el modo de ancho de pulso mS PULSE WIDTH es seleccionada 45 RPM IP Es mostrado cuando el modo RPM IP es seleccionado En este modo las revoluciones por minuto en motores de 2 o 4 tiempos son medidas utilizando el colector inductivo en un cable de bujía 46 RPM IG Esmostradocuandoelmodo RPMIG esseleccionado En este modo las revoluc...

Page 12: ... efecto Hall que pueden medir corrientes CA o CD La salida del transformador de corriente con pinza es típicamente un 1000 a 1 o bien 1 mA por cada Ampere Un valor de 100 Amp se reduce a 100 miliamps que pueden ser medidos con seguridad por la mayoría de los DMMs 4 PRUEBAS ELÉCTRICAS BÁSICAS Y MEDICIONES Una de las herramientas de diagnóstico electrónicas más comunes es un DMM Un DMM es simplement...

Page 13: ...TORES EN EL CIRCUITO A PRUEBA ANTES DE INTENTAR REALIZAR LAS MEDICIONES DE RESISTENCIA DEL CIRCUITO INTERNO LA MEDICION EXACTA NO ES POSIBLE SÍ ESTA PRESENTE VOLTAJE EXTERNO O RESIDUAL NOTA la resistencia en las puntas de prueba puede afectar la precisión en el rango de 400Ω Ponga las terminales juntas en corto y presione el botón REL para sustraer automáticamente la resistencia de la punta de pru...

Page 14: ... Si es un circuito abierto no se emitirá ningún tono Prueba de Diodo Un diodo es un interruptor electrónico que permite el paso de corriente en una dirección solamente Se enciende cuando el voltaje está por arriba de un cierto nivel generalmente mayor que 0 3 Volts para un diodo de silicio El multímetro tiene un modo especial llamado Prueba de Diodo En este modo las lecturas a través del diodo ser...

Page 15: ... energía La punta de prueba negra en el extremo del circuito con conexión a tierra Encienda de nuevo la energía y comience la prueba Mediciones de temperatura PRECAUCIÓN NO PERMITA QUE LAS SONDAS DE TEMPERATURA TENGAN CONTACTO CON CUALQUIER VOLTAJE VIVO QUE PUEDA EXCEDER 30V CA RMS 42V CA EN LA CRESTA O 60V CD DESENCHUFE LA SONDA DE TEMPERATURA SI VA A REALIZAR UNA MEDICIÓN DISTINTA DE TEMPERATURA...

Page 16: ...de prueba roja en la terminal VΩRPM CAP Toque la punta de prueba con el capacitor y lea la pantalla Al medir los capacitores polarizados conecte el positivo a la terminal VΩRPM CAP y el negativo a la terminal COM Mediciones High Sen la frecuencia Hz El multímetro tiene dos modos de medición de frecuencia modo High Sen sensibilidad alta nivel del disparador aproximado 150mV para el modo de contador...

Page 17: ...erminales de entrada como se muestra Asegúrese que la punta marcada PUNTA DE TIERRA GROUND TAB entre en la terminal COM Conecte el colector inductivo a un cable de bujía y encienda el motor Si no se recibe lectura desenganche el colector gírelo y conecte otra vez Si la lectura es demasiado alta o inestable ajuste el nivel del disparador NOTA Posicione el colector lo más lejos posible del distribui...

Page 18: ...l porcentaje de tiempo de un voltaje es positivo comparado con uno negativo encendido comparado con apagado Hay muchas señales en un vehículo que pueden requerir la medición del ciclo de trabajo DUTY CYCLE Las señales del Solenoide de Control Mixto de un carburador de regeneración señales de leva o sensores del cigüeñal y señales del control para los inyectores de combustible son buenos ejemplos E...

Page 19: ...e de combustible de control mixto y el motor del control de vacío de aire Este ejercicio muestra cómo medir el ancho de pulso en el puerto de inyectores de combustible Para medir el pulso mS Seleccione RPM IG con el interruptor rotativo Presione el botón DUTY hasta que mS aparezca en el lado derecho de la pantalla Presione el botón TRIG durante 2 segundos hasta que la pendiente negativa del dispar...

Page 20: ...a en la terminal VΩRPM CAP Conecte El cable para puentear entre el sensor de MAF y el conector del arnés La punta de prueba negra al cable para puentear en tierra La punta de prueba roja a la señal de salida del cable para puentear Encienda el motor En reposo note la frecuencia desplegada en el multímetro Pise el acelerador y note el cambio en frecuencia la desplegada Si la lectura es inestable aj...

Page 21: ...de energía y las conexiones del circuito a tierra del chasís Los circuitos a tierra son poco comprendidos pero de los que causan problemas más frecuentemente en la electónica automotriz Uno de los problemas eléctricos más frustrantes que usted encontrará en un automóvil es una tierra de alta resistencia Esto puede generar extraños diagnósticos que parecen no estar relacionados con la causa Los dia...

Page 22: ...de la batería Desconecte la terminal del cable negativo de la batería Ponga el interruptor rotativo en el modo de medición de voltaje Conecte La punta de prueba negra al poste negativo de la batería La punta de prueba roja al poste positivo de la batería Ponga La función RECORD MAX MIN AVG en el multímetro Una lectura menor a 12 4V indica una batería con baja carga Recargue antes de probar NOTA el...

Page 23: ... hasta localizar la corriente parásita excesiva También verifique las aplicaciones no protegidas por fusible como los faros del automóvil relevadores de la computadora y capacitores en el tablero de instrumentos NOTA Muchas computadoras de vehículo generan 10mA o más de manera continua ADVERTENCIA NO ENCIENDA EL MOTOR NI ACCESORIOS QUE EN CONJUNTO GENEREN MAS DE 10A YA QUE PODRÍA DAÑAR EL MULTÍMET...

Page 24: ... conexiones La medición de la caída de voltaje a través de las conexiones y componentes en el circuito de inicio mientras da marcha a la máquina con la ignición o el sistema de combustible desactivado para prevenir el arranque indicará si hay alguna resistencia en el circuito de ignición Para medir la caída de voltaje la corriente debe estar fluyendo en el circuito y deben conectarse ambas sondas ...

Page 25: ...la lectura de su voltaje de prueba Mueva y conecte La punta de prueba a un espacio limpio en el bloque del motor Seleccione Función RECORD MAX MIN AVG en el multímetro Desactive la ignición para que el motor no se encienda y dé marcha durante 4 y 5 segundos Esta conexión tiene 2 conectores 1 cable 1 tierra y 1 terminal del cable al poste de la batería por lo que un caída de voltaje de más de 500mV...

Page 26: ...de la batería al solenoide de arrarnque Mide la caída de voltaje entre el poste de la batería y el cable de conexión el poste del solenoide y el cable que se una a él Para verificar la caída de voltaje Ponga el interruptor rotativo en medición de voltaje Toque la punta de prueba negra al poste negativo de la batería y la punta de prueba roja al positivo esta lectura será el voltaje base contra el ...

Page 27: ...caída de voltaje mayor a 800mV indicaría un circuito pobre Pruebe de nuevo después de limpiar e inspeccionar la batería cables de arranque solenoide y conexiones del cable Un solenoide de encendido defectuoso causa un caída de voltaje excesiva Verifique los cables y conexiones antes de reemplazar el solenoide NOTA Repita esta prueba cuando el motor se caliente completamente La expansión del metal ...

Page 28: ...primero si el sistema cuenta con un regulador integral interno después si es un alternador tipo A o B El alternador tipo A cuenta con una escobilla conectada a la batería y otra escobilla conectada a tierra a través del regulador El regulador tipo B cuenta con una escobilla atada a tierra y una más conectada a la batería a través del regulador Luego aísle el problema bien sea del alternador o regu...

Page 29: ... Conecte La punta de prueba negra al poste negativo de la batería La punta de prueba roja a la terminal de la batería en la trasera del alternador Encienda el motor y llévelo a 2000 RPM Una lectura de 13 5 15 5V es una proporción de carga aceptable Un alternador bueno mantendrá 13 6V por lo menos en la salida de corriente 3 Prueba del campo de corriente en el alternador Las escobillas terminales c...

Page 30: ...ar totalmente la batería durante la noche Un paquete de diodos en el alternador contiene dos diodos en serie Para medir la caída de voltaje en el paquete de diodos del alternador Ponga el interruptor rotativo en la prueba del diodo Desconecte el cable de la batería de la terminal de salida del alternador Desarme el alternador y remueva el paquete de diodos del alternador Inserte La punta de prueba...

Page 31: ...y un cable dañado pruebe su resistencia torciendo suavemente y doblando el cable de la bujía Si los valores de resistencia cambian mientras esté en movimiento torciendo o doblando el cable y está usted seguro de tener una buena conexión entonces reemplace el cable Esta prueba verifica la resistencia alta o los circuitos abiertos en los cables de la ignición secundarios cables de la bujía Para medi...

Page 32: ... típicas oscilan entre 0 5 ohms y 2 0 ohms Para conseguir las figuras reales para una bobina específica cheque las especificaciones del fabricante No olvide probar la bobina de ignición cuando esté caliente y de nuevo cuando esté fría 3 Prueba de resistencia en los bobinados secundarios Esta prueba verifica la resistencia en los bobinados secundarios de las bobinas de ignición convencionales y DIS...

Page 33: ...ito Cualquier otra lectura indicaría que debe reemplazar el capacitor Para verificar la fuga en el condensador Ponga el interruptor rotativo en medición de resistencia Ω Inserte La punta de prueba negra en la terminal COM La punta de prueba roja en la terminal VΩRPM CAP Conecte La punta de prueba negra en la terminal negativa del capacitor La punta de prueba roja en la terminal positiva del capaci...

Page 34: ... inyectores en sistemas de inyección de combustible secuencial Para verificar el sensor de Efecto Hall usted debe verificar el voltaje de referencia proveniente de la batería en el conector para el sensor debido a que estos sensores requieren energía dónde los sensores magnéticos no la requieren 5 Prueba del sensor de posición magnético pulsos Esta prueba verifica los pulsos del colector magnético...

Page 35: ...efrigerante sensor de vacío el sensor de posición de acelerador sensor de RPM sensor barométrico y el sensor de oxígeno etc Módulo de control del motor Engine Control Module ECM Computadora del vehículo que procesa la retroalimentación proporcionada por los sensores y envía una señal electrónica a los actuadores del componente adecuado Actuadores Estos son dispositivos de salida que pueden ser mec...

Page 36: ...ie del área que rodea el componente Para medir la temperatura Conecte la sonda de temperatura al multímetro Ponga el interruptor rotativo en medición de temperatura TEMP Seleccione RECORD MAX MIN AVG en el multímetro Toque El extremo de la sonda de temperatura directamente en área de la superficie cerccana a la entrada del radiador Compare sus lecturas con las especificaciones del fabricante La te...

Page 37: ...e utiliza por la computadora del vehículo para determinar la posición y dirección de movimiento de un dispositivo dentro de un componente Las aplicaciones del potenciómetro típicas son sensor de posición de acelerador TPS sensor de recirculación de válvula de recirculación de gas EVP y multímetro del flujo de hélices VAF etc Un sensor de posición de acelerador Throttle Position Sensor TPS analógo ...

Page 38: ...y el sensor Ponga el interruptor rotativo en medición de resistencia Ω Conecte La punta de prueba negra a la Tierra del circuito La punta de prueba roja a la línea de señal Refiérase al esquema del fabricante Seleccione Función RECORD MAX MIN AVG en el multímetro Rote el TPS moviendo el acelerador y observe el movimiento de gráfico de barras conforme el TPS gira Las lecturas de resistencia deben c...

Page 39: ... escape Este voltaje es utilizado por la computadora del vehículo para cambiar la proporción de mezcla aire combustible Esta prueba verifica las salidas de voltaje de los sensores O Para medir el voltaje de la señal de salida Ponga el interruptor rotativo en medición de voltaje de CD Conecte La punta de prueba negra a una buena tierra La punta de prueba roja al cable de voltaje de la señal de sali...

Page 40: ...abricante Consulte el manual de servicio del fabricante del vehículo para el esquema especificaciones y procedimientos de prueba Los dispositivos de salida primarios generan una forma de señal electromagnética ON OFF que por lo general será una de las siguiente tres señales ON u OFF únicamente Ej Interruptor Para verificar un interruptor realice pruebas de continuidad con el interruptor en posició...

Page 41: ...ento general ADVERTENCIA LAS REPARACIONES O SERVICIOS NO CUBIERTOS EN ESTE MANUAL DEBEN REALIZARSE ÚNICAMENTE POR PERSONAL CALIFICADO PARA EVITAR UNA DESCARGA ELÉCTRICA NO REALICE EL SERVICIO A MENOS QUE USTED ESTÉ CALIFICADO PARA ELLO Periódicamente limpie el estuche con una tela húmeda y detergente no use abrasivos o solventes El agua suciedad o contaminación en las terminales de salida de A o m...

Page 42: ...e RS 232C con una computadora WINDOWS utilizando el cable de interfaz serial bidireccional RS 232C y su software para WINDOWS proporcionados como accesorios opcionales junto con este multímetro Sincronizando el multímetro con una computadora personal Siga los siguientes pasos para llevar a cabo la interfaz del multímetro con una computadora WINDOWS 1 Conecte los cables RS 232C al puerto serial de ...

Page 43: ...IAR ENTRE FLANCO DE DISPARADOR DC AC C F CAMBIAR ENTRE CD CA CAMBIAR ENTRE C F Un tono beep se emite cuando una función disponible es seleccionada Dos tonos beep se emiten cuando una función no disponible es seleccionada USO DEL MENÚ ARCHIVO FILE MEDICIÓN Muestra STOP MEASUREMENT en el menú presionando ESC se habilita al multímetro a empezar a medir cuando el menú desplegable desaparece DETENER LA...

Page 44: ...guno SINTAXIS DE ARCHIVO UA MODO MICRO AMPERES MA MODO MILI AMPERES A MODO 10 AMPERES MV MODO MILI VOLTS V MODO VOLTS OHM MODO RESISTENCIA BEE MODO BEEP DIO MODO DIODO TEC MODO C TEF MODO F CAP MODO CAPACITANCIA FRE MODO FRECUENCIA RPP MODO RPM IP RGA MODO RPM IG RGB MODO CICLO DE TRABAJO RGC MODO ANCHO DE PULSO RGD MODO HERTZ AUTOMOTRICES RGE MODO DWELL Formato de transmisión de datos STX ID POSI...

Page 45: ...ter Parameters to bioscom function define DATABIT7 0x02 Data bit define DATEBIT8 0x03 define STOPBIT1 0x00 Stop bit define STOPBIT2 0x04 define NOPARITY 0X00 Parity bit define ODDPARITY 0X08 define EVENPARITY 0x18 define BAUD1200 0x80 Baud rate define BAUD2400 0xa0 define BAUD4800 0xc0 define BAUD9600 0xe0 8259 PIC Programmable Interrupt Controller define IMR 0x21 I O address of 0CW1 IMR of 8529 P...

Page 46: ... a 19 999 RPM Ancho de pulso 2µS Función DWELL 0 0 356 4 30 RPM a 19 999 RPM Ancho de pulso 2µS Función Ancho de Pulso 0 002 1999 9 mS 30 RPM a 19 999 RPM Ancho de pulso 2µS El rango de Ancho de pulso es determinado por la RPM Para elevar 1μs La precisión de Ciclo de trabajo Dentro de 0 2 por KHz 0 1 La precisión de Ancho de pulso La precisión de Ciclo de trabajo 1 dígito El modo de frecuencia Hz ...

Page 47: ...C a 10 C 40 F a 14 F 0 1 C 0 1 F 3 0 C 1 digt 3 0 F 1 digt 10 C a 20 C 14 F a 88 F 0 1 C 0 1 F 3 0 C 3 0 F 20 C a 400 C 68 F a 400 F 0 1 C 0 1 F 1 0 2 C 1 0 2 F 400 C a 1 370 C 400 F a 2 498 F 1 C 1 F 3 0 de lectura 3 0 de lectura Esta especificación sólo es efectiva a una temperatura ambiental equivalente a 23 Promedio de grabación Max Min Tiempo de respuesta 250mS a 80 Precisión 20 dígito para c...

Page 48: ...ón 5 4cm x 10 3cm x 20 8cm Peso multímetro solo 380 g Con la protección Pistolera 655 g Normas de seguridad multímetro diseñado para ambos IEC1010 1 y Directiva EMC UL 1244 CSA C22 2 No 231 e ISA DS82 Certificado CE Vibración e Impacto Diseñado a MIL T 28800 para Instrumento clase II Colector Especificado para su uso con cables de bujía únicamente Limites de Medición Voltaje CA 0 a 750V Voltaje CD...

Page 49: ... COMPONENT TESTING 80 7 MAINTENANCE AND REPLACEABLE PARTS 86 8 RS 232 INTERFACE OPTIONAL 87 9 SPECIFICATIONS 91 WARNING SOURCES LIKE SMALL HAND HELD RADIO TRASCEIVERS FIXED STATION RADIO AND TELEVISION TRANSMITTERS VEHICULE RADIO TRANSMITTERS AND CELLULAR PHONES GENERATE ELECTROMAGNETIC RADIATION THAT MAY INDUCE VOLTAGES IN THE TEST LEADS OF THE MULTIMETER ACCURATE READINGS CAN NOT BE GUARANTEED D...

Page 50: ... testing vehicle with engine running testing should be always done in a well ventilated area or route exhaust gas outside Set the parking brake and block the wheels before testing or repairing the vehicle unless instructed otherwise It is especially important to block the wheels on front wheel drive vehicles the parking brake does not HOLD the drive wheels The ignition or fuel system must always b...

Page 51: ...t DC Either DC or AC Ground Allowable applied voltage range between the input terminal and Ground CAUTION Refer to the user s manual before using this Meter Double Insulation Protection Class II Fuse WARNING EXCEEDING THE LIMITS OF THIS METER IS DANGEROUS IT WILL EXPOSE YOU TO SERIOUS OR POSSIBLY FATAL INJURY CAREFULLY READ AND UNDERSTAND THE CAUTIONS AND THE SPECIFICATION LIMITS OF THIS METER Do ...

Page 52: ...the back light Back light turns off automatically after 60 seconds to extend battery life To turn off the back light even before 60 seconds press the HOLD button for 2 seconds again 4 Fix HOLD Automatically captures a stable reading beeps to acknowledge and holds it on the LCD But simply freezes a reading when the Meter is in the Recording Compare Relative or Percentage mode 5 Maximum Minimum and ...

Page 53: ...ample DUTY CYCLE measurements are used for Mixture Control Solenoids The amount of On time is measured as a percent of the total On Off cycle Most cars have the points of the Solenoid closed for a DUTY CYCLE between 50 70 To select PULSE WIDTH press the DUTY button again mS is displayed PULSE WIDTH is the period of time an actuator is energized For example fuel injectors are activated by an electr...

Page 54: ...e lower left corner of the display The Meter defaults to a trigger slope Once the trigger slope is selected press the TRIG button repeatedly to adjust trigger level if the Meter reading is too high or unstable The Trigger level has Seven steps and is different for each function combination Press the TRIG button to move one step at a time for selecting a suitable trigger level The bar graph is a go...

Page 55: ...e test leads in the primary side of the ignition coil and DUTY CYCLE Hz automotive DWELL measurement 15 RS 232C INTERFACE Enables this Meter to serially communicate with a DOS computer in all function ranges 16 The maximum current that you can measure at this terminal is 10 Amps DC AC This terminal is fuse protected 17 Refer to the user s manual before using this Meter 18 A Amperes Input Terminal ...

Page 56: ... slope is selected while the Meter is in the RPM IP or RPM IG DUTY CYCLE PULSE WIDTH or DWELL mode The Meter defaults to a negative trigger slope Press the TRIG button for 2 seconds to toggle between a negative and positive trigger slope Displayed also when the bar graph indicates an adjusted trigger level 29 Indicates a negative or positive trigger slope when a trigger slope is selected A negativ...

Page 57: ...ELL mode is selected 42 Displayed when the DWELL mode is selected When the Meter is in the Temperature mode Degree is displayed from 43 The following symbols indicate the unit of the displayed valued DWL Display the number of degrees of distributor rotation where the points remain closed measured for 1 to 12 cylinders Percent used for DUTY CYCLE measurement C F Centigrade or Fahrenheit temperature...

Page 58: ... 10A where high accuracy is not needed a clamp on current probe is very useful A current probe clamps around the conductor carrying in the current and converts the measured value to a level the Meter can handle There are two basic types of current probes Current transformers CT which measure AC current only and Hall Effect probes which can measure AC or DC current The output of a current transform...

Page 59: ...afety Shutter When measuring voltage be sure the Red test lead is in the input jack marked V If the test lead is in an A or mA μA jack you may be injured or damage the Meter Safety Shutter of the Meter frees you from inadvertent connection to the current terminals Resistance Measurements Resistance is measured in Ohms Ω and the values can greatly vary from a few MilliOhms mΩ for contact resistance...

Page 60: ...rily mean zero resistance To test circuit continuity Select the setting with the rotary switch and press the DWL button to select the continuity range The symbol appears on the display and the Meter defaults to the 4KΩ range Insert Black lead in COM jack Red lead in VΩRPM CAP jack Connect one test probe to each end of the circuit to be tested If circuit is closed the Meter will beep 100 Ω If circu...

Page 61: ...or unsolder the circuit creating a place where the Meter probes can be inserted Select the AMP A mA or μA range with the rotary switch Press the DC AC button to select DC or AC Insert Black lead in COM jack Red lead in the A or mA μA jack Connect The Red probe to the side of the circuit closest to the power source The Black probe to the side of the circuit to Ground Turn the circuit power back ON ...

Page 62: ... input terminals To measure capacitance Select the Capacitance CAP setting with the rotary switch The Meter will automatically select a suitable range from 1μF to 1000 μF Insert Black lead in COM jack Red lead in VΩRPM CAP jack Touch the test probes to the capacitor and read the display When measuring polarized capacitors connect the positive to the VΩRPM CAP jack and the negative to the COM jack ...

Page 63: ... The inductive pickup takes the magnetic field generated by the current flown in the spark plug wire and converts it to a pulse that triggers the Meter s RPM measurement Using the inductive pickup allows you to make RPM measurements on any 2 or 4 stroke automotive engine with any number of cylinders without physically touching any wires WARNING THE IGNITION SYSTEM CAN GENERATE A POTENTIAL SHOCK HA...

Page 64: ...he primary side of the ignition coil Start the engine and note the reading on the display while moving the throttle If the reading is too high or unstable adjust trigger level NOTE Before measuring RPM consult the car s service manual to obtain the information on the number of stroke and cylinder for the car s engine to be tested DUTY CYCLE Measurements DUTY CYCLE is the percentage of time that a ...

Page 65: ...an actuator is energized For example fuel injectors are activated by an electronic pulse from the Engine Control Module ECM This pulse generates a magnetic field that pulls the injector nozzle valve to open The pulse ends and the injector nozzle is closed This Open to Close time is the PULSE WIDTH and is measured in milliseconds mS The most common automotive application for measuring PULSE WIDTH i...

Page 66: ...ltage level of square waves should be consistent Frequency should change smoothly with engine load and speed To measure frequency Hz Select the RPM IG range with the rotary switch Press the DUTY button until Hz appears on the right side of the display Insert Black lead into COM jack Red lead into VΩRPM CAP jack Connect Jumper wires between the MAF sensor and the harness connector Black test probe ...

Page 67: ...t understood but potentially most troublesome areas of automotive electronics One of the most frustrating electrical problems you will encounter in an automobile is a high resistance Ground This can create some very strange symptoms that seem to be unrelated with the cause The symptoms can include problems with turn signals lights that stay dim the wrong lights turning on transmission shifting pro...

Page 68: ...gative battery cable terminal Set the rotary switch to voltage Connect Black test probe to the negative battery post Red test probe to the positive battery post Set RECORD MAX MIN AVG function on the Meter A reading of less that 12 4V indicates a discharged battery Recharge before testing NOTE The ignition switch must be off when connecting or disconnecting battery cables to prevent damaging the v...

Page 69: ...so check the non fused applications such as headlights computer relays and capacitors in the on board instrument panel NOTE Many vehicle computers draw 10mA or more continuously WARNING DO NOT CRANK THE ENGINE OR TURN ON ACCESSORIES THAT WILL DRAIN MORE THAN 10A COMBINED SINCE YOU COULD DAMAGE THE METER OR INJURE YOURSELF TO PERFORM THIS TEST YOU WILL NEED TO CONNECT THE METER IN SERIES WITH THE B...

Page 70: ...uel system disabled to prevent starting will indicate if there is a resistance in the starter circuit To measure voltage drop current must be flowing in the circuit and both voltage test probes must be connected on the same side of the circuit Voltage drop can also be determined from available voltage readings by noting the difference between each successive reading Always refer to the vehicle man...

Page 71: ...re than 500mV would indicate a poor Ground circuit Test again after cleaning and inspecting the battery cable connections and the Ground NOTE Repeat this test when the engine is thoroughly warmed up Heat expansion of metal may cause voltage drop to increase 2 Negative Chassis Ground Efficiency Test This test checks for chassis Ground efficiency To check voltage drop Set the rotary switch to voltag...

Page 72: ...tion on the Meter Disable the ignition so the engine doesn t start and crank the engine for 4 5 seconds This connection has 2 connectors and 1 wire so a voltage drop of more than 300 mV would indicate a poor circuit Test again after cleaning and inspecting the battery cable connections and the Ground NOTE Repeat this test when the engine is thoroughly warmed up Heat expansion of metal may cause vo...

Page 73: ...otor Current Test The battery tests and the voltage drop tests have verified that there is adequate battery voltage at the starter Next investigate how much current the starter is drawing by using a DC clamp on current probe Under normal operating conditions with an outside air temperature of 70 F a good rule of thumb for calculating cranking current is 1A per CID Cubic Inch Displacement for 60A p...

Page 74: ...nal or connect the type B field terminal to the battery side If the system now charges the regulator is faulty CAUTION WHEN PERFORMING THIS TEST IDLE THE ENGINE WITH THE LIGHT ON SO THE OUTPUT VOLTAGE DOES NOT GO OVER 15V CHECKING AN ALTERNATOR WITH AN INTEGRAL REGULATOR YOU MUST KNOW WHICH TYPE YOU ARE TESTING TO AVOID ANY DAMAGE TO THE ALTERNATOR OR REGULATOR 1 Alternator Output Voltage Test at ...

Page 75: ...ould range from 3A to 7A NOTE A lower battery voltage will produce a higher current 4 Alternator Diodes Test The best way to perform the alternator diode test is by removing the diode pack from the alternator then touch one test probe to one side of the alternator diode pack and touch the other test probe to the other side of the alternator diode pack Record the reading and then reverse the test p...

Page 76: ...een the primary and secondary windings to ensure they are not shorted together The primary windings should have a very low resistance typically from a few tenths of an Ohm to a few Ohms the secondary windings have a much higher resistance typically in the 10k Ohm range To get the actual figures for a specific coil check the manufacturer s specifications WARNING ALWAYS DISCONNECT THE IGNITION COIL ...

Page 77: ...f conventional and DIS distributor less ignition coils To measure resistance in the primary windings Set the rotary switch to resistance Ω Disconnect the coil from the ignition system Insert Black lead into COM jack Red lead into VΩRPM CAP jack Connect Black test probe to the negative terminal on the coil Red test probe to the positive terminal on the coil NOTE For accurate low resistance measurem...

Page 78: ... is hot and again when it is cold 4 Condenser Capacitors Leakage Test ThisMetercanbeusedtocheckautomotivecondensers capacitors To check the condenser connect it across the COM and VΩRPM CAP input jacks on the Meter and set the rotary switch to the resistance function The movement of the bar graph will show that the Meter is charging the condenser Over a short period of time you will see the resist...

Page 79: ...uces a voltage The voltage produced by the Hall Effect sensor is proportional to the strength of the Magnetic field passing through it This magnetic field may come from a permanent magnet or an electric current Hall Effect sensors can also be used to measure current since the magnetic field strength is proportional to an electric current which enables the Hall Effect clamp on current probe to meas...

Page 80: ...e to Ground terminal Red test probe to the Output signal terminal Insert Thin metal blade or steel feeler gauge between Hall device and magnet while watching the bar graph move and the display change The output signal should vary from 12V to 0V because inserting the metal blade blocks the magnetic field from getting to the Hall Sensor and removing the metal blade allows the magnetic field to reach...

Page 81: ... the fault codes using the digital clock on the dash others user the tachometer and many use a blinking light to signal the fault codes However today s most vehicles require a code reader or scan tool that plugs into the computer s serial communication port to read the trouble codes NOTE For specific instructions on how to retrieve trouble codes from any vehicle computer system you should consult ...

Page 82: ...the temperature of the sensor NOTE consult the manufacturer s specifications for the temperature of the sensor Voltage Change Test To measure voltage change Connect jumper wires between the connector and the sensor Set the rotary switch to voltage Connect Black test probe to the negative circuit from the sensor Red test probe to the circuit coming from the power source Set RECORD MAX MIN AVG funct...

Page 83: ...ts off fuel in some engines when vacuum is high and throttle is at idle Therefore the computer must know when the throttle is at idle Throttle position information is a variable resistance from a potentiometer attached to the throttle shaft Wide Open throttle signal and closed throttle signal come from switches attached to the TPS The TPS is really just a potentiometer or variable resistor As you ...

Page 84: ...signal sweep The bar graph should increase without jumping if the TPS is good Refer to the manufacturer s specifications If the voltage change is not within the specifications check sources of resistance Poor connectors connections or breaks in the wiring NOTE Do not insert the test probe tips into the TPS as they will damage the smaller type plug on the TPS connector 4 Oxygen O Sensor Test The Ox...

Page 85: ...the sensor in place of sweeping the sensor In all cases refer to the vehicle manufacturer s service manual for the correct testing procedures NOTE Resistance Ω test is impossible for pressure sensors because all pressure sensors have voltage or frequency output Output Devices Actuators Tests The electrical tests for output devices vary greatly depending upon type and manufacturer Consult the vehic...

Page 86: ...iodes Transmissions Used with a DC current clamp 7 MAINTENANCE AND REPLACEABLE PARTS General Maintenance WARNING REPAIRS OR SERVICING NOT COVERED IN THIS MANUAL SHOULD ONLY BE PERFORMED BY QUALIFIED PERSONNEL TO AVOID ELECTRICAL SHOCK DO NOT SERVICE UNLESS YOU ARE QUALIFIED TO DO SO Periodically wipe the case with a damp cloth and detergent do not use abrasives or solvents Water dirt or contaminat...

Page 87: ...ace with a Windows DOS computer by using its bi directional RS 232C serial interface cable and its Windows DOS software supplied as optional accessories along with this Meter Synchronize the Meter with a Personal Computer Synchronize the Meter with a Personal Computer 1 Connect the RS 232C cable to the computer s 25 pin serial port Plug the D9 male connector into the RS 232C terminal on the back o...

Page 88: ...e when the pull down menu disappears STOP MEASUREMENT Enables the Meter to stop measurements and the initial picture appears again when the pull down menu will be disappeared by pressing ESC DATA VIEW Shows the measured data EMPTY DATA Is displayed if there are no data DATA PRINT Prints the data displayed in DATA VIEW EMPTY DATA Is displayed if there are no data PRINTER IS NOT READY is displayed w...

Page 89: ...E FRE FREQUENCY MODE RPP RPM IP MODE RGA RPM IG MODE RGB DUTY CYCLE MODE RGC PULSE WIDTH MODE RGD Hz automotive MODE RGE DWELL MODE Transmit Data Format STX ID POSITION RANGE STATUS DATA EXT STX 1 BYTE F2H ID 1 BYTE 16H POSITION 1 BYTE RANGE 1 BYTE STATUS 7 BYTE DATA 6 BYTE ETX 1 BYTE F3H Example Position Data Format Receive Data Format STX ID DATA EXT STX 1 BYTE F2H ID 1 BYTE 16H DATA 6 BYTE ETX ...

Page 90: ... define DATABIT7 0x02 Data bit define DATEBIT8 0x03 define STOPBIT1 0x00 Stop bit define STOPBIT2 0x04 define NOPARITY 0X00 Parity bit define ODDPARITY 0X08 define EVENPARITY 0x18 define BAUD1200 0x80 Baud rate define BAUD2400 0xa0 define BAUD4800 0xc0 define BAUD9600 0xe0 8259 PIC Programmable Interrupt Controller define IMR 0x21 I O address of 0CW1 IMR of 8529 PIC define 0CW2 0x20 I O address of...

Page 91: ...PM PULSE WIDTH 2µS Function PULSE WIDTH 0 002 1999 9 mS 30 RPM to 19 999 RPM PULSE WIDTH 2µS PULSE WIDTH range is determined by RPM For rise 1μs Duty Cycle accuracy Within 0 2 per KHz 0 1 PULSE WIDTH accuracy Duty Cycle accuracy 1 digit The frequency Hz or RPM DUTY Hz DWELL mode has only these 2 range specifications Function Voltage DC Range Resolution Accuracy Imput Impedance 4 V 40 V 400 V 1 mV ...

Page 92: ...2 498 F 1 C 1 F 3 0 of reading 3 0 of reading This specification is effective at the ambient temperature of 23 C only Max Min Average Recording Response Time 250 mS to 80 Accuracy 20 digits for changes 250 mS in duration 60 digits in AC Function Capacitance Autorange 516 Only Range Resolution Accuracy 1 µF 10 µF 100 µF 1000 µF 0 001 µ 0 01 µF 0 1 µF 1 µF 1 7 5dgts Remarks The accuracy is for capac...

Page 93: ... IEC1010 1 and the EMC Directive UL 1244 CSA C22 2 No 231 and ISA DS82 CE mark Certified Vibration Shock Designed to MIL T 28800 for a Class II instrument Pickup Specified for use with spark plug wire only Measurement Limits AC Voltage 0 to 750V DC Voltage 0 1 mV to 1000V RPM IP 30 to 9000 RPM RPM IG 60 to 12000 RPM AC Amperes 0 1μA to 10A DC Amperes 0 1μA to 10A Frequency 0 5Hz to 200KHz Resisten...

Page 94: ...94 NOTAS NOTES ...

Page 95: ...95 NOTAS NOTES ...

Page 96: ...tes casos a Cuando la herramienta se haya utilizado en condiciones distintas a las normales b Cuando el producto hubiera sido alterado de su composición original o reparado por personas no autorizadas por el fabricante o importador respectivo This product has 1 year warranty by Urrea Herramientas Profesionales S A de C V against any manufacturing defect with its repair or replacement during its li...

Reviews: