www.uponor-usa.com • www.uponor.ca
22
Uponor Climate Co˘ntrol™ Zoning System Installation Guide
23
Attaching the Interface to Bracket
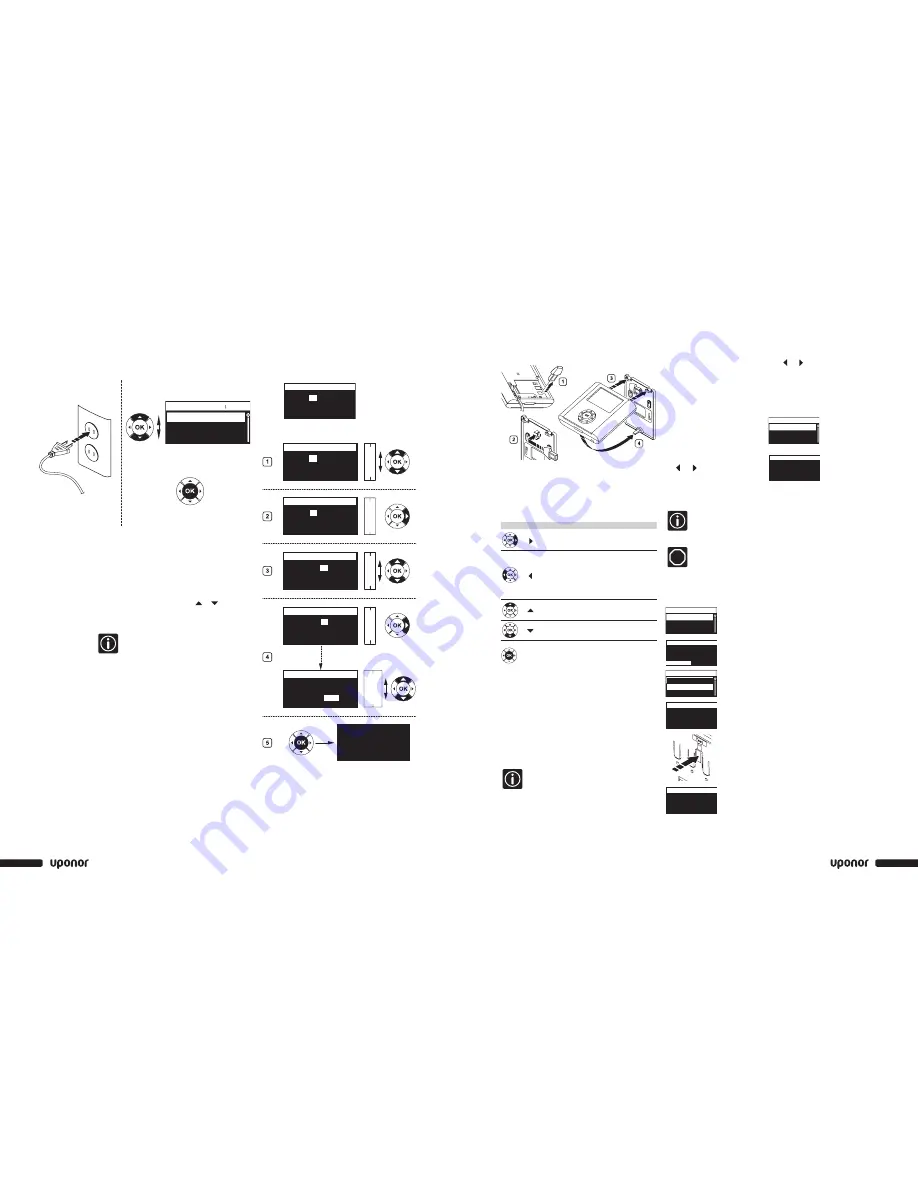
1. Remove the language data stick from the interface.
2. Attach the language data stick on the bracket.
3 and 4. Position the interface on the bracket.
Interface Setup
Setting Installation Parameters for Multiple
Base Units
If more than one base unit is used together, select heat
demand management (i.e., one common pump relay
or one pump relay per base unit). By default, the heat
demand and valves are exercised once a week.
Change this setting if needed.
Note:
If only installing one base unit, go to
Section 7:
Thermostat Operation
.
To set these parameters, run the Installer Level
as described in the next column.
Access to the Installer Level
1. On the Uponor screen, simultaneously press and
for 10 seconds to reach the Advanced Level.
The Advanced display appears.
2.
>
Press OK.
The Uponor screen is shown.
3. Go to the Advanced level via:
Uponor screen
>
Main Menu
>
Settings
>
System Parameters
>
Access Level
4. Simultaneously press
and for 10 seconds.
Installer display appears.
5.
>
Press OK.
The Uponor screen is shown.
The system will automatically return to
Advanced mode after 10 minutes.
Setting Base Unit Identification
STOP
The default identification of the base unit is
always #1. If more than one base unit is
connected to the interface, all base units
must be identified.
1. Uponor screen
>
Main Menu
>
Settings
>
System
Parameters
>
Base Unit ID
2. Reset Base Unit ID.
>
Press OK.
3. Select: Yes.
>
Press OK.
4. Press (down) key to move cursor
to set controller ID.
>
Press OK.
5. The message
>
1. Base Unit
<
flashes: Press the Test button on
base unit #1 (the one connected
to the interface).
6. Repeat the operation for base
units 2 and 3.
Interface Keys
Displays the next
menu
or
Goes to next field
Displays the
previous menu
Press button longer
than five seconds
to return to display
the Uponor screen
or
Goes to previous
field
Moves to line above
or
Increases the value
Moves to line below
or
Decreases the
value
Press
OK
Displays the next
screen
or
Confirms selection
and displays the
screen of the
current menu
1
Uponor screen > Main Menu > Settings > System
Parameters > Controller ID
2
Reset Controller ID.
>
Press OK.
3
Select: Yes.
>
Press OK.
4
Press (down) key to move cursor
to set controller ID.
>
Press OK.
5
The message >1.Controller<
flashes: Press the Test
button on base unit #1
(the one connected to the interface).
6
Repeat the operation for the
controllers 2 and 3.
>
Press OK
(end of the identification).
Advanced
Basic
Access Level
Installer
Access Level
OK
Installer
OK
Set Base Unit ID
Reset Base Unit ID
Base Unit
Reset all controller
addresses?
Base Unit ID
Yes
No
Reset Base Unit ID
Base Unit ID
Set Base Unit ID
>1. Base Unit <
2. Base Unit
3. Base Unit
Base Unit ID
>1. Base Unit <
>2. Base Unit <
>3. Base Unit <
Base Unit ID
Connecting Base Unit Power Source and Selecting
Programming Language
1. Check that the wiring is complete.
2. Ensure power compartment is closed.
3. Connect base units #2 and #3 to the power.
4. Check that the language data stick is connected at the
back of the interface.
5. Ensure power compartment is closed. Connect base
unit #1 to the power.
6. Select a language by pressing the or keys to
select the language.
7. Press OK to confirm.
• If the language data stick is inserted, the
language screen will automatically appear at
first installation.
• The language setting is saved in case of
power failure.
• The language can be changed after first
installation by re-inserting the language stick.
Time and Date Setup
This screen will open automatically when the language
has been set.
Select time and date with the keys.
1. Select hours.
2. Set the hour.
3. Select minutes.
4. Set the minutes and continue until the date is set.
5. Press OK to confirm.
Svenska / Sedish
German / Deutsch
English
Language
12 :
24
Set Date/Time
01 Jan 2008
12 : 24
2010
2009
2008
2007
2006
26
25
24
23
22
02
01
00
59
58
02
01
00
23
22
14
13
12
11
10
Set Date/Time
01 Jan
2008
12
: 00
Set Date/Time
01 Jan 2008
00
: 00
Set Date/Time
01 Jan 2008
12 :
00
Set Date/Time
01 Jan 2008
Uponor
17 Mar 2008 12 : 24
00
: 00
Set Date/Time
01 Jan 2008


