


Max Size Button
Selecting the Max Size button restores the width and height to the maximum values your laser system
can accept.
Center image
This selection allows you to force jobs to always be centered in the processing area.
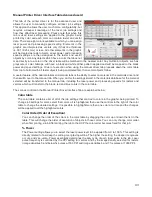
Merge Pages
This setting allows you to treat multipage documents in different ways. By default, multipage documents
are treated as separate jobs with each page having to be selected in the UCP and run individually. This
setting allows you to change that behavior. Selecting this setting once will merge the pages with auto-
start, meaning the pages will all be printed one after another as one job. This is useful if you want all the
graphic images to print on one piece of material, but you want to control the order in which they are
applied. Selecting this setting again will merge the pages with manual start, meaning the pages will all be
printed one after another as one job, but with the laser system pausing in between each page. This is
useful if you need to load new material in between each page.
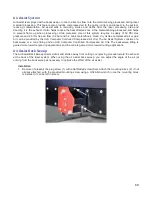
Rotary
A rotary fixture option is available for all models. Please contact Universal Laser System for more details.
Diameter
If a rotary fixture is installed in your laser system, the diameter of the cylindrical object being processed is
entered in this field. A correct diameter must be entered for the graphics being printed to be scaled
properly.
Rotation Factor
This factor allows you to calibrate your fixture if your application requires you to engrave or cut completely
around the cylinder (360 degrees). Print a vector line or raster graphic that extends from the top of the
page to the bottom of the page. If the fixture comes up short or overlaps by a few degrees, you can
compensate for this. If short, increase the factor; and if long, decrease the factor. The factor is a ratio, so
if you can measure the object and image circumference, you can calculate the scale. If you do not have
the equipment to measure this, you can use trial and error.
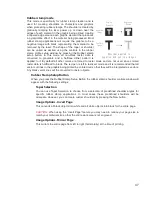
Pin Table (enable)
This switch tells the system a pin table is installed which compensates for the height of the pin table when
using the auto Z feature.
56
Summary of Contents for VLS2.30
Page 1: ...VLS Desktop User Guide VLS2 30 VLS3 50 www ulsinc com Revision 2012 08...
Page 5: ...Chapter 1 Specifications 5...
Page 8: ...Chapter 2 Safety 8...
Page 9: ......
Page 15: ......
Page 16: ......
Page 19: ...Chapter 3 Installation 19...
Page 36: ...Chapter 4 Operation 36...
Page 62: ......
Page 68: ...Chapter 5 Accessories 68...
Page 80: ...Example Connection for PNP mode Example Connection for NPN mode 80...
Page 92: ...Chapter 6 Maintenance 92...
Page 99: ...www ulsinc com...


