
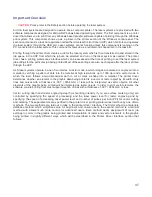
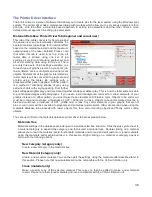

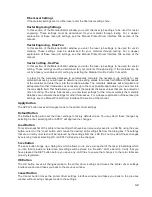


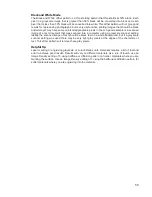


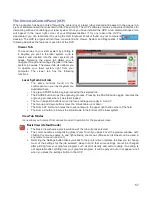
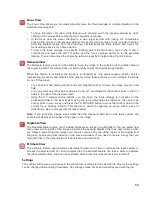


Rubber stamp mode
This mode is specifically for rubber stamp creation and is
used for creating shoulders on characters and graphics
when processing rubber stamps. The shoulder is created by
gradually ramping the laser power up or down near the
edges of each element in the graphic being printed creating
a tapered edge around each graphic element that produces
a pyramid-like effect in the material being processed. Most
rubber stamp applications will require the graphic to be a
negative image with black representing the material to be
removed by the laser. The shape of the taper or shoulder
can be varied as desired using the controls in the rubber
stamp profile setup window by pressing the Rubber stamp
setup button. In this mode all non-black raster data is
converted to grayscale and a halftone dither pattern is
applied to it. By default all other colors are forced to raster mode and are not used since colored
raster data is halftoned to black. The red pen is left in rast/vect mode and it is recommended that all
vector cut lines in the graphic being printed be colored red so that they will be interpreted as vectors.
Any black vector lines will the converted to raster objects.
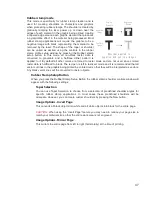
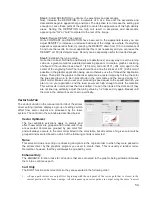
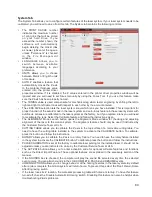
Rubber Stamp Setup Button
When you press the Rubber Stamp Setup Button the rubber stamp shoulder controls window will
appear with the following settings:
Taper Selection
You can use Taper Selection to choose from a selection of predefined shoulder angles for
specific rubber stamp applications. In most cases these predefined shoulders will be
adequate. However, you can create custom shoulders by pressing the New button.
Image Options - Invert Page
This converts all black objects into white and all white objects into black for the entire page.
CAUTION:
When using the “Invert Page” feature you may need to reduce your page size to
match your material size so that the entire work area is not engraved.
Image Options - Mirror Page
This mirrors the entire page from left to right (horizontally) at the time of printing.
47
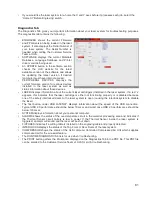
O r i g i n a l
G r a p h i c
N e g a t i v e
I m a g e
P o s i t i v e
I m a g e
E n g r a v e d
R e s u l t
S h o u l d e r a p p l i e d t o
n e g a t i v e a n d p o s i t i v e i m a g e s
Summary of Contents for VLS2.30
Page 1: ...VLS Desktop User Guide VLS2 30 VLS3 50 www ulsinc com Revision 2012 08...
Page 5: ...Chapter 1 Specifications 5...
Page 8: ...Chapter 2 Safety 8...
Page 9: ......
Page 15: ......
Page 16: ......
Page 19: ...Chapter 3 Installation 19...
Page 36: ...Chapter 4 Operation 36...
Page 62: ......
Page 68: ...Chapter 5 Accessories 68...
Page 80: ...Example Connection for PNP mode Example Connection for NPN mode 80...
Page 92: ...Chapter 6 Maintenance 92...
Page 99: ...www ulsinc com...


