


Material Editor (Only available for customer materials - New or Cloned)
This section of the driver allows you to edit new or cloned custom materials you have added to the materials
database. Please note that you cannot edit any of the standard materials that come with the printer driver.
They are read only. You can create new materials in one of two ways. Right clicking on a category and
selecting
New Material
creates a blank material record that you can fill in. Right clicking on an existing
material and selecting
clone
allows you to make a copy of an existing material and then edit it. Creating or
editing materials records requires knowledge of the Manual Control features. Learn more about the Manual
Control Tab in the Manual Control section of the User Guide.
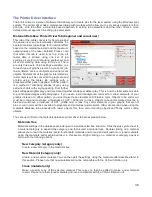
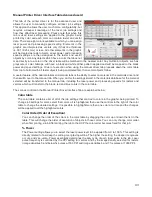
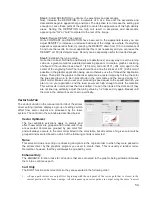
Material Editing Window
When you clone or create a new material the material editing windows appears with the following
controls:
Material Name
Enter a name for your new material here.
Category
Select the category you want your new material to appear under from this pull down menu.
Options
Material Enabled
This switch controls whether the material is visible or not in the materials tree. If you hide a
material this switch is set. To restore materials that are disabled (hidden) Press CRTL F2.
Fiber/CO2 laser support
Select one or more of the lasers offered by ULS (the laser must be compatible with your particular
laser system) either Fiber (1.06 micron), CO2 (10.6 micron) or CO2 (9.3 micron) to make the
material record available when that particular type of laser is installed in your laser system.
3D Support
Select this switch if the material supports 3D mode and adjust default 3D power levels for this
material using the 3D Power button. For more information about 3D mode see the manual driver
section.
Can be Vector Cut
Select this switch if the material can be cut and enter information in the vector cut section.
Fixed Thickness
Select this switch if the material being added is only available in a particular thickness and you
want to lock the thickness to one value.
Stamp Support
Select this switch if the material supports rubber stamp mode.
Can Be Rastered
Select this switch if the material can be raster marked or engraved and enter information in the
Raster engraving section
Con
fi
guration Laser Mode
Use this section to select the laser type that the material settings you are editing apply to. There are
three types of lasers offered by ULS (not all lasers are compatible with a particular laser system)
either Fiber (1.06 micron), CO2 (10.6 micron) or CO2 (9.3 micron).
41
Summary of Contents for VLS2.30
Page 1: ...VLS Desktop User Guide VLS2 30 VLS3 50 www ulsinc com Revision 2012 08...
Page 5: ...Chapter 1 Specifications 5...
Page 8: ...Chapter 2 Safety 8...
Page 9: ......
Page 15: ......
Page 16: ......
Page 19: ...Chapter 3 Installation 19...
Page 36: ...Chapter 4 Operation 36...
Page 62: ......
Page 68: ...Chapter 5 Accessories 68...
Page 80: ...Example Connection for PNP mode Example Connection for NPN mode 80...
Page 92: ...Chapter 6 Maintenance 92...
Page 99: ...www ulsinc com...


