


Realtime Rack Manual
Chapter 4: Realtime Rack Application
97
Plug-In Categories
Available plug-in categories are listed in the table below.
Note: Some plug-ins are in multiple categories (when applicable).
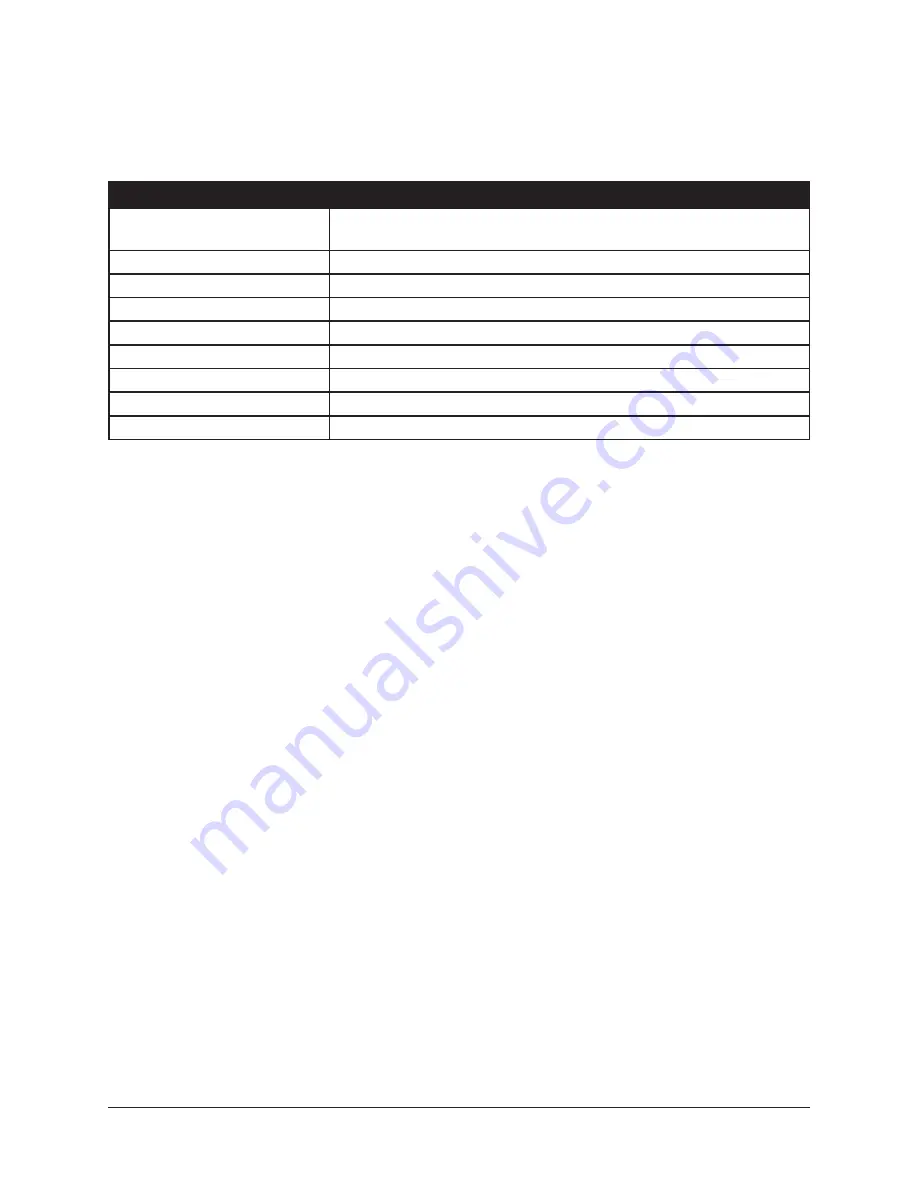
CATEGORY
CONTENTS
NONE
Indicates that no plug-in is assigned. If a plug-in is already assigned,
the button can be used to unload the plug-in.
CHANNEL STRIPS
Single plug-ins featuring multiple modules, such as EQ and dynamics
COMPRESSORS & LIMITERS
Dynamics plug-ins
DELAY & MODULATION
Delay, echo, chorus, modulation, phaser, and doubler plug-ins
EQUALIZERS
EQ plug-ins
GUITAR & BASS
Guitar and bass amplifiers and tuners
MASTERING
Mastering plug-ins
REVERBS
Digital reverb, analog reverb, and room emulation plug-ins
SPECIAL PROCESSING
Tape machine, enhancement, transient designer, and phase tools
How To Assign Inserts
Follow these instructions to assign (load), reassign (change), and de-assign (remove)
plug-ins from any insert in Channel View.
Note: These operations can only be performed in EDIT mode.
Assign Insert
1. Single-click any empty insert button in any View screen to switch into Channel
view and select the insert. The ASSIGN tab and the CATEGORY buttons are dis-
played, with NONE as the currently selected category.
2. Single-click any CATEGORY button to select it. The plug-ins within the category
are displayed in the PLUG-IN column. Use the vertical scroll bar to view all the
plug-ins if necessary.
3. Single-click any plug-in the PLUG-IN column to assign it to the insert. The plug-in
is loaded with its default preset, it begins processing audio on the channel, and
the PRESETS column (and SUB-FOLDER column, if any) are displayed.
4. If desired, single-click any preset in the PRESETS or SUB-FOLDER columns to
load a different preset. Use the vertical scroll bar to view all the presets and/or
sub-folders if necessary.
Done. Exit assign mode by pressing enter or clicking a different element. Click the
PLUG-IN tab to view the plug-in’s interface and edit its parameters.


