


P O R T A L
Document Number:
PTL1028
Document Title:
Portal 3 Owners Manual
10.13.1
Replacing the Printer Paper
Replace printer paper when you see a red mark running down the side of the receipt or the unit is
reporting Paper low.
1.
Insert the new paper roll on the paper carriage at the bottom of the printer. The paper roll
should be oriented such that the end of the paper is at the top of the roll. The paper will
automatically feed into the printer when the power is on.
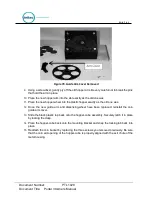
10.13.2
Clearing a Paper Jam
Follow the steps below to clear a paper jam.
1.
Open the Portal door.
2.
Locate the blue locking arms on the sides of the printer assembly, pull them out and remove
the main printer assembly by lifting it up and out.
3.
Locate and remove the paper jam.
4.
Once the jam has been dislodged, replace the main printer assembly and relock the blue
locking arms.
5.
Feed the paper
into the slot marked “Paper Insert.”
6.
Test the printer.
10.13.3
Manually Printing a Self Test
If you ever question whether the printer is functioning properly, you may have the system print a self-test
page. This printout will cycle through each available character. If the test prints completely and the
printing is legible, this is considered a passed result.
To test the printer through the software, open the Sentinel door and login to the Maintenance Mode.
Press the Test Hardware button then Test Printer. The printer will print a self test.
10.14
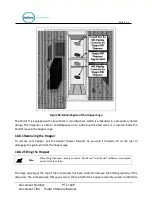
The Token Bucket
You can empty the bucket by grasping it firmly at the top and lifting it up and out of the Portal TI vault.
When returned to the vault, the bucket locks into an upright position using a bracket on the floor of the
Portal TI.