Uniden UWG700 Owner'S Manual Download Page 33

33

Additional Information

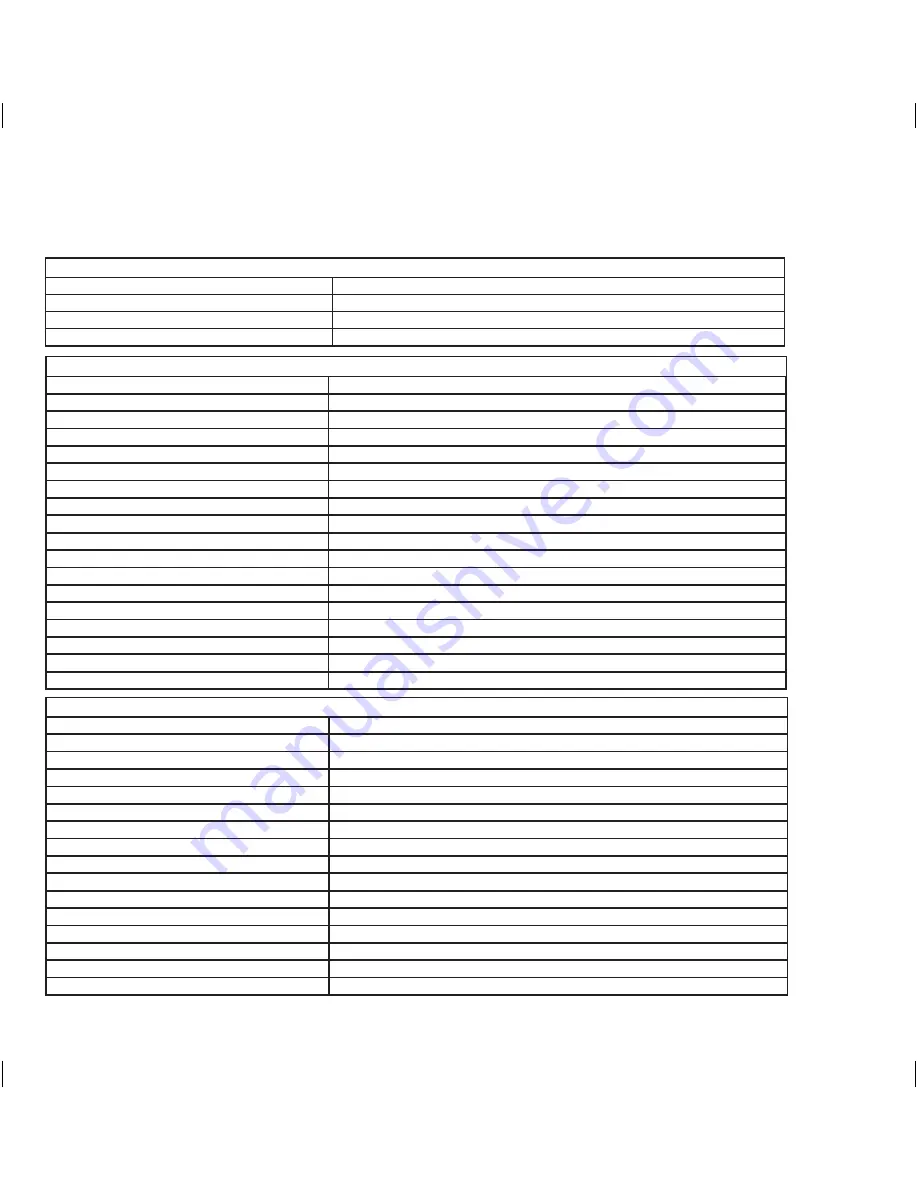
Product Specifications

WIRELESS FREQUENCY

Radio Frequency

2.400-2.485GHz Digital

Modulation

FHSS, GFSK

Data rate

2 Mbps

Service range

200M (Open Space)

CAMERA

Image sensor

1/4” color CMOS

Outdoor use

Yes

Resolution

640 X 480 Pixels

Night Vision

Automatic

Number of IR LEDs and Range

 9 PCS / 2 Meters

IR LED control

EDS

Viewing Angle

H= 92° / V = 66°

Focal Length

1.8 mm

Focus Type

Fixed Focus

Microphone

Yes

Sun Shield

Yes

Housing Material

ABS Plastic

Housing Color

Midnight Black

Camera Bracket

 Yes

Operating temperature

14° to 104° F

Dimensions

6.65” x 3.35” x 1.4”

Weight

 0.45 lbs

Vertical adjustment

20° + 20°

MONITOR

Display

7” Color LCD

Resolution

640 x 480

Video Outputs

Yes / 3.5mm Phone Jack to RCA

Audio Output

Yes / 3.5mm Phone Jack to RCA

LCD Profile Ratio

4:3

Sleep Timer

Yes

Adjustable Screen Settings

Brightness, High / Medium / Low Display Quality

LED Indicators

Power On / Battery Low

Housing Material

Plastic

Housing Color

Midnight Black

Power Adapter Input

AC 100-240V (Switching Adaptor)

Operating Temperature

14° to 104° F

Operating Humidity

>80%

Monitor Mount

Yes

Door Strike Compatible

Yes

Door Strike power output

15V Max

UWG700 OM.indd   33

28/9/11   9:42:01 AM

Summary of Contents for UWG700

Page 1: ...UWG700 Gate Keeper Video Intercom For more exciting new products please visit our website Australia www uniden com au New Zealand www uniden co nz UWG700 OM indd 1 28 9 11 9 41 33 AM...

Page 2: ...2 UWG700 OM indd 2 28 9 11 9 41 34 AM...

Page 3: ...www uniden co nz for New Zealand model What s in the box UWG700 Digital Wireless Gatekeeper System Owner s Manual 7inch LCD Colour Display monitor AC adaptor small Not shown Mounting hardware AV cable...

Page 4: ...re to leave some slack in the cord when placing your equipment and always use the plug to unplug cord from the wall outlet Never leave power cords where they can become crushed cut or frayed when runn...

Page 5: ...tional Information 33 One year Limited Warranty 34 For best results To avoid damage to your equipment follow these simple precautions Do not drop puncture or disassemble any part of the equipment Ther...

Page 6: ...or are facing outwards and the hooks are pointing up Important Make sure the mounting location is at an appropriate level for you to access the buttons easily view the LCD screen and is close enough t...

Page 7: ...N Note Make sure to connect the smaller of the two AC adaptors to the monitor as a safety measure only the smaller AC adaptor will fit Plug the other end of the power cable into a power source surge 4...

Page 8: ...h the flat mount first Using a flat head screw driver loosen the screws for the positive 4 and negative connection next to the words DC first and second connection Insert the black wire into the slot...

Page 9: ...te in a limited capacity using batteries for typical operation lasting 1 minute 5 times per day the system can last up to 3 months Remove the entire backing from the back of the camera by removing 1 t...

Page 10: ...an appropriate height for someone to be able to push the doorbell button down Once you have selected a height and location for the camera screw the 4 flat camera mount to the location you would like t...

Page 11: ...r strike Connecting Door Strike to Camera Using a flat head screwdriver loosen the screw to the door strike positive connection slot 2 Insert the positive wire from the door strike into the positive d...

Page 12: ...12 CONTROLS AND CONNECTIONS Camera Camera Front 1 2 3 4 7 8 5 6 Camera Back 9 12 10 11 Camera Backing 13 14 Camera Bottom 15 16 UWG700 OM indd 12 28 9 11 9 41 43 AM...

Page 13: ...ion 10 Black wire connects to the negative connection and the red wire connects to this positive connection to power the camera Door Strike Connection 11 Negative and positive connection to power the...

Page 14: ...14 3 Monitor Front 2 1 4 5 6 7 8 9 10 11 12 13 14 15 16 Monitor Back Monitor UWG700 OM indd 14 28 9 11 9 41 45 AM...

Page 15: ...ing it in the event list menu can delete a selection Open OK 8 If the camera is connected to an electronic door strike not included pressing this button will unlock the door This button also works as...

Page 16: ...a is on battery power Record Indicates that the displayed footage is being recorded SD card Indicates that there is an SD card inserted into the monitor The number next to it is the available space on...

Page 17: ...me will sound Answering the Doorbell Alert and Using Intercom Answering the doorbell To answer the door and stop the doorbell from ringing press TALK on the monitor momentarily Talk To talk outside th...

Page 18: ...ess OK This feature is not available if camera is using batteries Volume To turn the volume on off and up press Vol Each time you press the button the volume will go up until it reaches it highest lev...

Page 19: ...back section on the back of the camera 1 Within that small section on the back you will notice a button with the letter P next to it with a small 2 object such as a pen press this small button Once pr...

Page 20: ...ain Menu has four main options Camera Setup Event List Record Setup System Setup Note The menu will automatically time out and return to live screen mode if inactive for one minute UWG700 OM indd 20 2...

Page 21: ...reen will appear with an adjustment bar on the bottom of it 4 Using 5 turn the brightness up once fully up the brightness level moves to it s lowest setting again Once you have adjusted the brightness...

Page 22: ...3 OK Using 4 scroll between on or off and then press OK The word OK will appear momentarily on the screen 5 Press 6 Exit to save and exit Overwriting You have the option to record over old footage onc...

Page 23: ...D Card Format and press OK Using 4 highlight green O to format the SD card or highlight red X to exit without formatting your SD card and then press OK If you selected O the timing icon 5 will appear...

Page 24: ...be last Using 3 scroll to highlight the date you would like to watch the footage from and then press OK The footage recorded on the selected dates will then appear organized into times The oldest foot...

Page 25: ...list mode will give you an option to delete highlighted footage or all footage in list Use the side arrow key to select what you would like to delete SYSTEM SETUP This menu option allows you to set t...

Page 26: ...the two most common types of video standards adjusting this will effect video output The default setting is PAL To adjust which video standard you are using Press 1 Menu to open the main menu Using 2...

Page 27: ...Press 1 Menu to open the main menu Using 2 scroll to System Setup and press OK Using 3 scroll to the factory default icon and then press OK A cancel red X icon or continue green O icon will appear on...

Page 28: ...ded if your default player is Windows Media Player double click the footage and it will open and play through Windows Media Player If your default player is NOT Windows Media Player right click the fi...

Page 29: ...p try the camera in a pitch black setting The area that the camera is in may get too much light to activate the sensor No Audio Make sure the volume on the monitor is turned up and that nothing is int...

Page 30: ...the camera in a pitch black setting The area that the camera is in may get too much light to activate the sensor Monitor is reading No Signal Try pressing the doorbell button which will re sync the de...

Page 31: ...signal Avoid placing the camera and receiver where the signal path crosses a high traffic area or body of water For example place the camera on the same side of a hallway as the receiver or mount the...

Page 32: ...amera or receiver will erase any changes and set all values back to the default You should only reset your system under the following conditions Resetting the camera Resetting the receiver You are una...

Page 33: ...ght Black Camera Bracket Yes Operating temperature 14 to 104 F Dimensions 6 65 x 3 35 x 1 4 Weight 0 45 lbs Vertical adjustment 20 20 MONITOR Display 7 Color LCD Resolution 640 x 480 Video Outputs Yes...

Page 34: ...s and images that may be stored on your Product Statement of Remedy If the Product is found not to conform to this warranty as stated above the Warrantor at its discretion will either repair the defec...

Page 35: ...35 UWG700 OM indd 35 28 9 11 9 42 02 AM...

Page 36: ...2011 Uniden Australia Pty Ltd Uniden New Zealand Limited Printed in PRC UWG700 OM indd 36 28 9 11 9 42 02 AM...

Reviews: