background image

Your EXS 9995 stores up to 30 name/numbers in the handset.
Memory locations are shared by both lines.

On the Handset

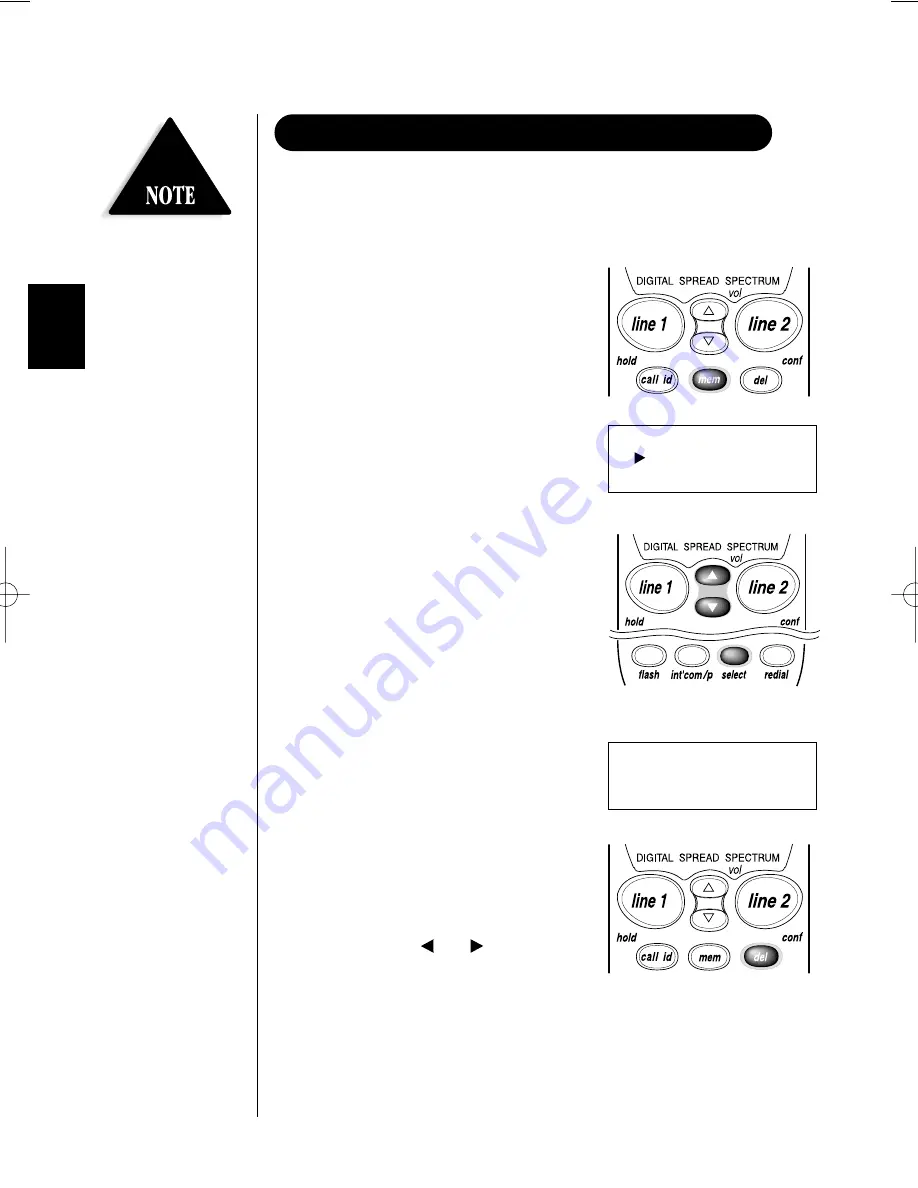
1. Remove the handset from the base.           

2. Press and hold 

mem

for two seconds.

The following screen appears:                  

3. Use the 

and 

keys, or enter a two

digit number (01-30), to choose the
memory location to store a
name/number.

4. Press 

select

The following screen appears:

5. Enter a name by using the 

and 

keys to scroll through the character
menu (up to 13 characters). Stop
scrolling when you see the desired
character. Use the 

and 

keys to

move right or left or to create a blank
space. (

The

del/conf

key deletes

characters as the cursor moves left

.)

26

STORING A PHONE NUMBER IN MEMORY

Whenever you are using a
menu screen, you must press
a key within 20 seconds or
the phone will return to
standby. You may also press

mem

to quit a memory

menu at any time.

Memory Store

01

02

Store Name

EXS9995  11/9/00  15:54  Page 26

Summary of Contents for EXS 9995

Page 1: ......

Page 2: ...CONTROLS AND FUNCTIONS EXS9995 11 9 00 16 05 Page ii ...

Page 3: ...sing the Page Feature 19 2 Line Operation 20 3 Way Conferencing 21 4 Way Conferencing 22 Using Your EXS 9995 Intercom 23 Transferring a Call 24 Traveling Out Of Range 25 Storing a Phone Number in Memory 26 Editing a Phone Number in Memory 28 Erasing a Number from Memory 30 Using Memory Dialing 32 Using Caller ID 34 Using your Answering System 42 Setting Your Greeting 43 Selecting the Message Recor...

Page 4: ... Locations 80 Number Caller ID Memory 3 Number Redial Memory 2 way Page Intercom Hearing Aid Compatible Redial Flash and Pause Pulse Tone Dialing 7 Day Standby Battery Time 4 Hour Talk Time 2 Line Integrated Telephone Answering Device ITAD Remote Message Retrieval and Room Monitor Toll Saver Selective Greeting Outgoing Message Conversation Recording Digital Spread Spectrum Technology utilizes a wi...

Page 5: ... 800 554 3988 Hours are from 8 30 a m to 5 00 p m Central Time Monday through Friday We can also be reached on the web at www uniden com You must have a two line subscription from your phone company to realize the capability of your two line phone This Owner s Manual Precautions and Important Safety Instructions Registration Card Handset Base AC Adapter Rechargeable Battery Short Telephone Cord Be...

Page 6: ...ch does not have a switch to interrupt its power Keep the base and handset away from sources of electrical noise such as motors and fluorescent lighting Be sure there is sufficient space to rotate the base antenna fully vertical The base can be placed on a desk tabletop or mounted on a standard wall plate You should charge your handset for 15 20 hours before connecting the phone line If your secon...

Page 7: ... the other end of the cord into the telephone jack on the wall 7 Set the base on a desk or tabletop Place the handset on the base with the keypad either facing up or down Raise the antenna to a vertical position 5 DESK TABLETOP INSTALLATION Before using your phone charge the Nickel Cadmium battery pack for 15 20 hours Place the power cord so that it does not create a trip hazard or where it could ...

Page 8: ...t 5 Plug one end of the short telephone cord into the TEL LINE 1 2 jack on the back of the base Plug the other end into a standard telephone jack If your second line has a separate jack plug the other cord into the base and wall jack 6 Align the mounting slots on the base with the mounting posts on the wall Push in and down until the phone is firmly seated 6 WALL INSTALLATION Place the power cord ...

Page 9: ...ing the screws into the wall Mount your phone near a working phone jack to avoid excessive cord lengths Make sure the wall material is capable of supporting the weight of the base and the handset 1 Insert two 10 mounting screws with 1 3 8 inches minimum length and the appropriate anchoring device into the wall 3 15 16 inches apart Allow about 3 16 of an inch between the wall and screw heads for mo...

Page 10: ...e Slide cover off 2 Install the nickel cadmium battery with the label down 3 Slide the battery cover forward until it snaps into place 8 INSTALLING THE HANDSET BATTERY PACK Use only Uniden Battery model BT 999 supplied with your phone ...

Page 11: ...ver of battery charger 2 Put the battery pack in the compartment with contacts facing down 3 Replace the charge cover 4 Charge the battery for 24 hours When charging is complete and spare battery is needed lift the latch to remove the battery pack To install the charged battery into the handset see Installing the Handset Battery Pack page 8 9 CHARGING THE BATTERY PACK Please visit your authorized ...

Page 12: ...RY CONTACTS SETTING THE PULSE TONE SWITCH Most phone systems use tone dialing Check with your local phone company if you re not sure whether your system is tone or pulse Low Battery To maintain a good charge clean all charging contacts on the handset and base about once a month Use a pencil eraser or other contact cleaner DO NOT use liquids or solvents you may damage your phone Be sure the PULSE T...

Page 13: ...lume settings for the handset earpiece loud high medium and normal The handset earpiece volume can be adjusted only during a call To lower the volume press vol key To raise the volume press vol key The handset displays Loud High Medium or Normal indicating the current volume setting Base ringer volume The ringer control for the base of your EXS 9995 allows you to turn the ringer OFF or to select L...

Page 14: ...oles on each side of the handset Press down until it clicks To remove the beltclip Pull both side of the tabs from the holes 12 INSTALLING THE BELTCLIP If you have wall mounted the base you must remove the beltclip to charge the handset with facing forward ...

Page 15: ...ties from making unauthorized calls on your phone line a digital code was added to the EXS 9995 Your phone s handset and base share this code If the phone experiences a power failure you must reset the digital security code by placing the handset in the base To reset the digital security code 1 Remove the handset from the base hold down page int com and you will hear the beep 2 Replace the handset...

Page 16: ...r or 1 Pick up handset 2 Dial number 3 Press line 1 or line 2 To make a call 1 Press line 1 or line 2 2 Listen for dial tone 3 Dial number or 1 Dial number 2 Press line 1 or line 2 Press line 1 or line 2 or return the handset to the base AutoStandby To hang up Press line 1 or line 2 1 Pick up handset 2 Press line 1 or line 2 3 Listen for dial tone 4 Press redial or 1 Pick up handset 2 Press redial...

Page 17: ... line 2 The same instructions apply to line 2 15 ANSWERING A CALL FROM THE BASE You must have a 2 line subscription from your phone company to use the 2 line features 1 The base rings The corresponding line 1 LED on the base flashes 2 Press the line 1 button and speak 3 When you finish the call press line 1 to hang up The base microphone is located under the phone Position yourself as near to the ...

Page 18: ...WERING A CALL FROM THE HANDSET MAKING A CALL FROM THE HANDSET AutoStandby automatically hangs up when you place the handset on the base There is no need to press line 1 or line 2 to hang up Call Line 1 Dialing from Talk Mode 1 Pick up the handset 2 Press line 1 3 Dial the number on the keypad or use one of the memory features See Using Memory Dialing page 32 4 When you finish the call press line 1...

Page 19: ... Mode The tone feature applies only when the base is set to pulse The flash feature does not function when line 1 and line 2 are on a conference call See the 3 WAY CONFERENCING and 4 WAY CONFERENCING pages 21 and 22 If you are dialing in the pulse mode and need to enter tone digits press tone then enter the digits Once the call has ended tone mode is canceled and pulse dialing resumes If you have ...

Page 20: ... redial is no longer available 18 USING REDIAL PLACING A CALL ON HOLD The EXS 9995 has last three Number Redial memories The redial memory is common to both lines When the base is powered by the spare battery the hold key base is disabled Use either the keypad on the handset or the keypad on the base 1 To place line 1 on hold at the base press hold The line 1 LED turns from green to red 2 To place...

Page 21: ...with the party on line 1 press mute again The line 1 LED changes to green 19 Do not press line 1 to take the phone off mute or you will disconnect the call When the base is powered by the spare battery the mute key is disabled USING THE MUTE FEATURE USING THE PAGE FEATURE To locate the handset when it is off the base press page int com on the base The handset beeps for 60 seconds The following scr...

Page 22: ...he base the LCD screen displays the following Extension In Use The Extension In Use feature prevents you from accidentally interrupting a call If another phone is In Use on line 1 the handset LCD displays In Use The line 1 LED at the base blinks If you press line 1 you will hear a beep This warns you the line is In Use To make your call you must use line 2 20 2 LINE OPERATION Base Line 1 If you wa...

Page 23: ...ack on the line 4 Press the del conf key to bring the original call back on line Conference appears on the display If the third person s number is busy or doesn t answer press line 2 to hang up Return to the original call by pressing line 1 5 To remove either caller from your conversation ask one of the parties to hang up Press the corresponding line key to end the call When you return the handset...

Page 24: ...ss int com p on the handset to contact the base 3 Press page int com on the base to answer the page 4 Press conference at the base to bring the party at the handset in on the call line 1 and line 2 LEDs turn green The following screen appears on the handset 5 To remove either call from your conversation ask one of the parties to hang up Press the corresponding line key to end the call 22 4 WAY CON...

Page 25: ...ss int com p on the handset If no answer press int com p to disconnect 2 At the base press page int com to answer the page Position yourself as near to the base as possible and speak clearly To hang up at the handset Press int com p To hang up at the base Press page int com 23 USING YOUR EXS 9995 INTERCOM When a call is on hold at the handset and the base is paged the base will ring even when the ...

Page 26: ...e call with the intercom 4 On the base press line 1 to talk If no one is available to take the call at the base return to the caller by pressing line 1 or int com p on the handset to take a message or complete the call From Base to Handset 1 To transfer a call on line 1 from the base to the handset press hold The line 1 LED turns red 2 On the base press page int com The status LED flashes on the b...

Page 27: ... is available to take the call at the handset return to the caller by pressing line 1 or page int com on the base to take a message or complete the call 25 TRAVELING OUT OF RANGE As you begin to move too far from the base you first hear a clicking sound As you travel further the noise increases If you travel out of range your call terminates ...

Page 28: ...t The following screen appears 5 Enter a name by using the and keys to scroll through the character menu up to 13 characters Stop scrolling when you see the desired character Use the and keys to move right or left or to create a blank space The del conf key deletes characters as the cursor moves left 26 STORING A PHONE NUMBER IN MEMORY Whenever you are using a menu screen you must press a key with...

Page 29: ...The following screen appears The cursor flashes indicating the display is ready for a number to be entered 7 Enter the phone number with the number keypad direct entry up to 20 digits Press del to erase the number if you entered a wrong number 27 Store Number Memory 01 Stored When entering name numbers you may press pause to enter a pause in the dialing sequence The display shows a P The pause fea...

Page 30: ...display 4 Press select The display shows the memory location you have selected 5 Press select again to enter the Edit Memory mode The following screen appears A cursor flashes indicating that the display is ready to edit the name number 6 Edit the name with the and keys Use the and keys to move the cursor left and right 28 EDITING A PHONE NUMBER IN MEMORY If you select Go Back at any time no chang...

Page 31: ...e an unwanted number Press and hold del conf to clear the entire number 9 Press select The handset beeps and displays the confirmation screen 10 The display then returns to the Memory Store screen You may select another number to edit return to step 3 or press mem to return to standby 29 Whenever you are using a menu screen you must press a key within 20 seconds or the phone will return to standby...

Page 32: ...o display either the name or the number stored in the location 4 Press select The following screen appears 5 Use the key to move the cursor to Delete Memory 6 Press select 7 Use the key to move the cursor to Yes 8 Press select There is a confirmation tone The following screen appears 30 ERASING A NUMBER FROM MEMORY If you select No no changes are made The handset shows the Memory Store screen Memo...

Page 33: ...9 The display then returns to the Memory Store screen You may select another number to delete return to step 3 or you may press mem to return to standby 31 ...

Page 34: ...Press mem The handset displays your programmed memory locations 2 Use the and keys to select the memory location you would like to dial Or you may enter a two digit number 01 30 The following screen appears 3 Press line 1 The number dials 32 USING MEMORY DIALING 01 02 JOHN SMITH 03 UNIDEN 01 02 JOHN SMITH 03 UNIDEN ...

Page 35: ... Talk Mode Dialing from the Handset 1 Press line 1 2 Press mem Using the keypad enter a two digit number 01 30 The number dials 33 ...

Page 36: ...ting performs the same as regular Caller ID on a call waiting number You must subscribe to CIDCW from your phone company to use this feature Area Code allows you to program your 3 digit area code number When reviewing Caller ID messages you will see only a seven digit number for calls received from inside your area code For calls from outside your area code you will see a full 10 digit number 34 U...

Page 37: ...umber keypad to enter or change the area code Press select again 4 After you have made your selections press call id hold and return the handset to the base Screening Your Calls Caller ID allows you to review caller information before answering your phone At the beginning of the second ring the display shows the line number that is being used name and phone number of the caller If your Caller ID s...

Page 38: ...have reviewed your oldest name number the following screen appears 5 Press call id hold to return to standby To review line 2 press call id hold Use or to select Line 2 Then press select Return to step 3 36 If you have no Caller ID name numbers then the total is shown as 00 Once a Caller ID message has been viewed it is no longer considered a new message If you have no Caller ID message No Calls a...

Page 39: ... Select the name number that you would like to dial 5 Press line 1 The number automatically dials 37 New Total Line 1 00 02 Line 2 01 01 12 21 12 30PM 03 Smith John 817 555 1212 Once you have viewed all of your Caller ID name numbers and reach the End of List display the message list does not cycle back to the beginning You must press to view your previous name numbers For long distance calling in...

Page 40: ...digit number 01 30 to select a blank memory location where you would like to store the number If you want to replace an existing number with the Caller ID number skip to step 7 6 Press select A confirmation tone sounds The number is programmed 7 If you choose to replace an existing number with the Caller ID number press select The following screen appears 8 Use the key to move the cursor to Yes Pr...

Page 41: ...er that you would like to delete Press to scan forward through the name numbers and to scan backwards 4 Press del conf The following screen appears If you select No the Caller ID screen returns 5 Press select or del conf A confirmation tone sounds The Caller ID screen returns with the next name number displayed 39 New Total Line 1 01 02 Line 2 01 01 12 21 12 30PM 03 Smith John 817 555 1212 Delete ...

Page 42: ...se or to move the cursor to Line 1 or Line 2 3 Press del conf to delete name numbers The following screen appears 4 Use the key to move the cursor to Yes 5 Press select or del conf 6 A confirmation tone sounds The following screen appears 7 To delete Caller ID locations on Line 2 repeat steps 2 through 5 40 If you select No then the Caller ID screen returns New Total Line 1 01 02 Line 2 01 01 Dele...

Page 43: ...call when you hear the Caller Waiting tone check the handset display for the name and number of incoming calls 2 Press flash to accept the incoming call See FLASH AND CALL WAITING page 17 for additional information 41 Call Line 1 Smith John 817 555 1212 ...

Page 44: ...42 USINGYOUR ANSWERING SYSTEM SETTING UP YOUR ANSWERING SYSTEM If you have not recorded a personal greeting when you turn the answering system on a prerecorded greeting is automatically selected To set a personal greeting see page 43 Press skip or repeat multiple times to scroll through days hours minutes etc Setting the clock The clock on EXS 9995 Answering System starts when power is applied to ...

Page 45: ...e clock within two minutes the system returns to standby When you receive a call the answering system plays either a prerecorded greeting or a personal user recorded greeting Prerecorded Greeting The following message is prerecorded Hello no one is available to take your call Please leave a message after the tone Recording your Personal User Greeting Press msg line select to select line 1 or line ...

Page 46: ...le the message is playing This switches between the prerecorded and user greetings If you choose a personal user greeting the selected line message counter LED displays U If you set a prerecorded greeting P appears 44 Position yourself as near to the base as possible and speak clearly when recording your greeting message ...

Page 47: ...er greeting the answering system announces your personal message twice 45 Press skip or repeat multiple times to scroll through numbers on the display SELECTING THE MESSAGE RECORD TIME SELECTING A PIN CODE To play your messages from a remote location you will need to enter a two digit Personal Identification Number PIN code 00 99 To select a PIN perform the following steps 1 On the base press and ...

Page 48: ... it when you pick up the call at the handset or base 46 SETTING RING RIME SWITCH If you answer at another phone extension and the greeting has started you cannot stop the message Wait until your greeting is complete before starting your conversation In the TS Toll Saver position the answering system picks up after two rings if you have new messages and after four rings if there are none This way i...

Page 49: ...nounces the number of new and old messages then the incoming messages are played The time and day each message was received is announced after the message is played and the message counter LED displays the number of the current message 2 When all new messages have played a long tone is heard The message counter LED stops flashing to indicate that all of the new messages have been reviewed 3 After ...

Page 50: ...from remote of the message has played causes the system to scan back one message If you have several messages press repeat until you return to the message you want to replay Each time skip is pressed the system scans forward one message If you have several messages press and hold skip to find the message you want to play 1 Press play stop to review your messages The number of messages is announced...

Page 51: ...re permanently deleting the message Once deleted the message cannot be replayed The voice memo function is completely independent of the outgoing message It s handy for leaving others a quick message A voice memo message will be stored as a typical recorded message on the selected line DELETING A MESSAGE VOICE MEMO Press msg line select to select line 1 or line 2 The selected line LED lights The v...

Page 52: ...memo or play stop 50 RECORDING A CONVERSATION A recorded conversation is stored and play back with typical recorded messages You cannot record a conversation while speaking on the base You can also record during 3 way 4 way conference If you are recording a conversation and you receive an incoming call the answering system cannot answer the call The conversation will be recorded on the line select...

Page 53: ...mode or the answering system automatically hangs up and returns to standby The system will only playback messages for four minutes and then it returns to command waiting mode To continue playing your message press then 2 again within 15 seconds Command Function then 1 Repeat then 2 Playing your messages then 3 Skipping a message then 4 Deleting a message then 5 Stop message playback then 6 Answeri...

Page 54: ... 0 You hear sounds in the room where your phone is installed After 15 seconds the answering system returns to the command waiting mode 6 Press then 0 to monitor the room for another 15 seconds Or select another remote function Or hang up to exit the system The answering system automatically returns to standby 52 REMOTE ROME MONITOR You cannot use and 0 while the new messages are playing Press then...

Page 55: ... or appliances and try again Check both ends of the base telephone line cord Make sure the AC adapter is plugged into the base and wall outlet Disconnect the AC adapter for a few minutes then reconnect it Place the handset back on the charging cradle for a few seconds The status LED blinks indicating that the phone has been reset The Nickel Cadmium battery pack may be weak Charge the battery on th...

Page 56: ...ins Adjust the speaker volume on the base Make sure you are using the correct PIN code Make sure that the touch tone phone you re using can transmit the tone for at least two seconds If it cannot you may have to use another phone to access your message When the base is in use you cannot access remote call in features Messages are incomplete After a power failure the outgoing message is deleted No ...

Page 57: ...55 MEMO ...

Page 58: ...56 MEMO ...

Page 59: ... at 1 800 297 1023 PLEASE DO NOT RETURN THIS PRODUCT TO THE PLACE OF PURCHASE Our Uniden representatives will be happy to help you with any matters regarding the operation of this unit available accessories or any other related matters Hours M F 7 00a m to 7 00 p m CST Thank you for purchasing a Uniden product ...

Page 60: ......

Reviews: