background image


17 

Basic Setup 

Selecting a Language 

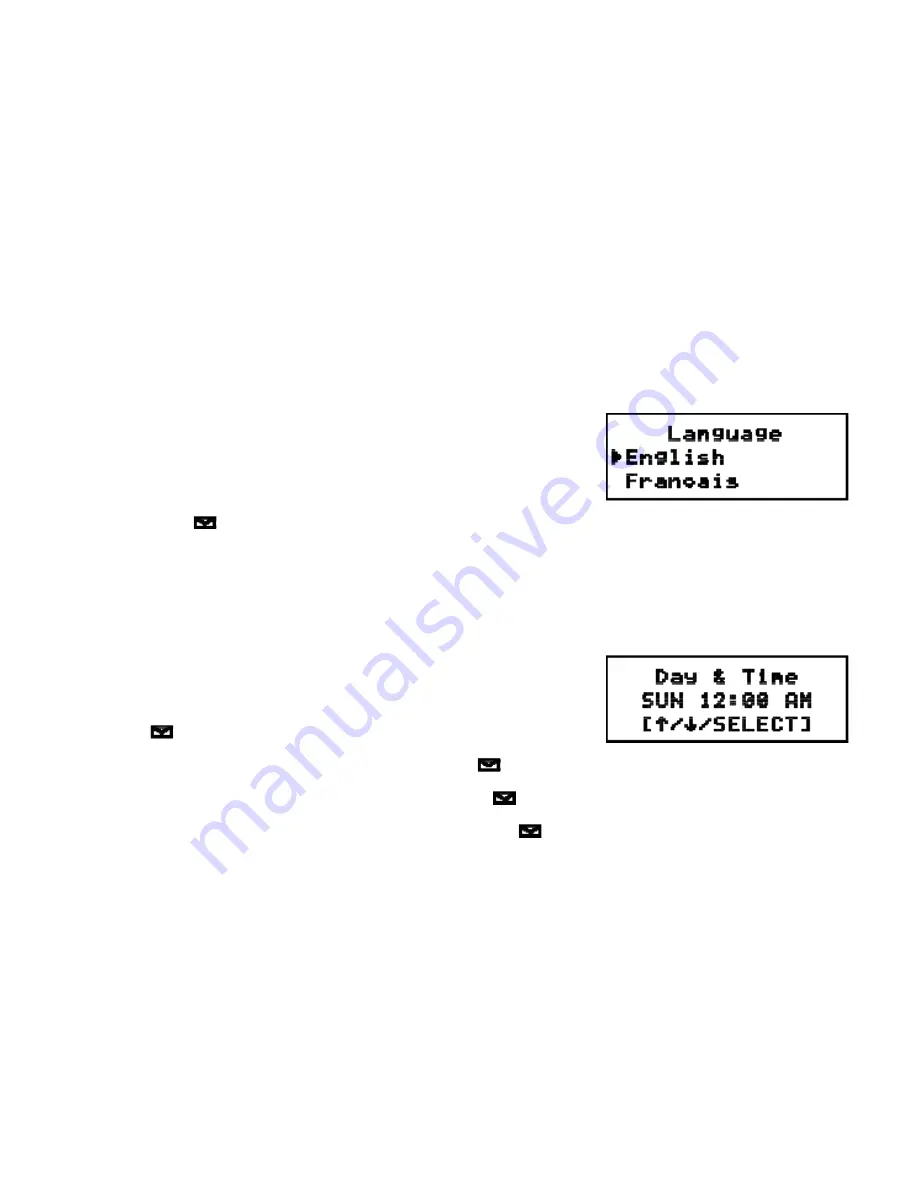
Your phone supports three languages: English, French and Spanish. Once you select a language, the menus on the 
handset will display in that language. The default language is English. 

1. Press 

[menu/clear]

. Select the HANDSET SETUP menu, and then the 

LANGUAGE submenu. 

2.  Move the cursor to choose ENGLISH, FRANÇAIS (French), or 

ESPAÑOL


(Spanish). 

3. Press 

[select/

]

. You will hear a confirmation tone. 

Setting the Day and Time 

To change the day and time shown in the display, follow the steps listed below.  

Note: If you don't press any keys for two minutes when setting the day and time, the 
phone will exit the menu. 

1. Press 

[menu/clear]

. Select the GLOBAL SETUP menu, and then the 

DAY & TIME submenu option. 

2.  Move the cursor to select the day of the week, and then press 

[select/

]

3.  Move the cursor to set the hour, and then press 

[select/

]

4.  Move the cursor to set the minute, and then press 

[select/

]

5.  Move the cursor to choose AM or PM, and then press 

[select/

].

 You will hear a confirmation tone. 

Summary of Contents for DCT70585 Series

Page 1: ......

Page 2: ...ection 15 Changing the Dial Mode 16 Installing the Belt Clip 16 Basic Setup 17 Selecting a Language 17 Setting the Day and Time 17 Activating Caller ID on Call Waiting and Call Waiting Deluxe 18 Activating Personal Ring 18 Activating the Key Touch Tone 18 Adding Accessory Handsets 19 Compatible Handsets 19 Charging Accessory Handsets 20 Registering Accessory Handsets 20 Resetting Handsets 21 Setti...

Page 3: ...nd Transfer 36 Placing a Call on Hold 36 Conferencing 37 Transferring a Call 37 Answering a Transferred Call 38 Using Special Features 38 Do Not Disturb All Calls 38 Muting the Ringer One Call Only 38 Muting the Microphone 39 Privacy Mode 39 Seven Digit Dialing 39 Using the DirectLink Communication Feature 40 Using the Intercom 41 Room Baby Monitor 42 Tone Dialing Switch Over 43 Installing the Opt...

Page 4: ...ies Annually 58 Clean the Battery Contacts 59 Troubleshooting 59 Resetting the Handset 59 Resetting the Handset Without the Base 60 Changing the Digital Security Code 60 Traveling Out of Range 61 Common Issues 61 Liquid Damage 63 Precautions 65 Important Safety Instructions 65 The FCC Wants You To Know 66 Radio Interference 67 Cordless Telephone Privacy 67 I C Notice 67 One Year Limited Warranty 6...

Page 5: ...orporation AutoStandby DirectLink IntegriSound and Random Code are trademarks of Uniden America Accessibility Uniden provides a customer service hotline for accessibility questions If you have a disability and need customer service assistance or if you have any questions about how Uniden s products can accommodate persons with disabilities please call the accessibility voice TTY line 1 800 874 931...

Page 6: ...n Call Waiting is available from your telephone provider With this service you can see incoming caller information while on another call Charger A cradle that comes with an accessory handset and charges the handset battery It connects to power but does not connect to a phone line DirectLink If you have accessory handsets on your system you can use two handsets as 2 way radios Global settings Apply...

Page 7: ...Options 10 Tones 10 Melodies Personalized Ring by Party 10 Speed Dial Numbers Last 3 Number Redial Copy Phonebook Entries to Another Handset English Spanish and French Menu Displays Call Transfer Conferencing Intercom Answering System Features Digital Tapeless Recording Up to 12 Minutes of Recording Time Personal or Pre recorded Outgoing Messages English Spanish or French Voice Prompts for Menu Se...

Page 8: ...partment 6 New Message LED 7 Handset Earpiece 8 LCD Display 9 menu clear key 10 redial pause key 11 flash key talk flash 12 key phonebook 13 tone key 14 xfer intercom key 15 select key select messages 16 key up 17 key end call 18 key caller ID 19 key down 20 key pound 21 key speaker 22 Handset Microphone 23 Handset Charging Contacts ...

Page 9: ...t 9 Message counter LED 10 on off key answering system on off 11 select key skip select 12 key play stop 13 Base antenna 14 key volume up down for speaker ringer 15 in use LED 16 find hs key find handset 17 dnd key do not disturb 18 int com key intercom 19 hold key 20 mute key 21 memo call rec key 22 speaker key 23 flash key 24 Base microphone 25 TEL LINE phone jack 26 DC IN 9V power jack ...

Page 10: ...10 on off key answering system on off 11 select key skip select 12 key play stop 13 Base antenna 14 key volume up down for speaker ringer 15 in use LED 16 memo call rec key 17 hold int com xfer key hold intercom transfer 18 mute find hs key mute find handset 19 dnd key do not disturb 20 tone key 21 key pound 22 speaker key 23 flash key 24 redial pause key 25 memory key 26 Base microphone 27 TEL LI...

Page 11: ...tery status full medium low and empty Standby The ringer off icon indicates that the ringer is turned off Talk The mute icon appears while the handset microphone is muted Talk The call record icon appears while recording a conversation Talk The boost icon appears when the Clarity Boost feature is activated Talk The speaker icon appears when the handset speaker phone is in use Talk The privacy icon...

Page 12: ...the key to the right to access Caller ID information To use this four way key place your thumb over the key on the handset and move to the four positions to get the feel of how it moves and operates Using the Handset Menus To open the menu press menu clear Select the option you want by pressing the four way function key This will move the cursor the option currently selected has a triangle beside ...

Page 13: ...a row use the same number key enter the first letter then use to move the cursor to the next position to enter the second letter For example to enter the word Movies 1 Press 6 once to enter M 2 Use to move the cursor to the right 3 Press 6 six times to enter o 4 Press 8 six times to enter v 5 Press 4 six times to enter i 6 Press 3 five times to enter e 7 Press 7 eight times to enter s 8 Press sele...

Page 14: ...ould be placed in an open area for optimum range and reception If your home has specially wired alarm equipment connected to a phone line be sure that installing the system does not disable your alarm equipment If you have questions about what will disable alarm equipment contact your telephone company or a qualified installer Wall Mounting the Base This phone can be mounted on any standard wall p...

Page 15: ... below to install the handset battery 1 Press in on the handset battery case cover use the finger indention for a better grip and slide the cover downward to remove 2 Place the battery pack in the battery compartment with the connectors on the battery and on the compartment aligned 3 Place the battery case cover back on the handset and slide it upwards until it clicks into place Note Use only the ...

Page 16: ...es If the LED does not illuminate check to see that the AC adapter is plugged in and the handset makes good contact with the charging contacts 5 Charge your handset at least 15 to 20 hours before plugging into the phone line Connecting to the Phone Line Once the battery pack is fully charged connect the telephone cord to the TEL LINE jack and to a telephone jack Testing the Connection Try making a...

Page 17: ...nge your phone s dial mode If you don t get a dial tone or can t connect to the telephone network please follow the steps below to modify your phone s settings 1 Press menu clear Select the GLOBAL SETUP menu and then the DIAL MODE submenu 2 Scroll to select PULSE 3 Press select You will hear a confirmation tone If you ever need to change the dial mode back to tone dialing follow the same procedure...

Page 18: ... a confirmation tone Setting the Day and Time To change the day and time shown in the display follow the steps listed below Note If you don t press any keys for two minutes when setting the day and time the phone will exit the menu 1 Press menu clear Select the GLOBAL SETUP menu and then the DAY TIME submenu option 2 Move the cursor to select the day of the week and then press select 3 Move the cu...

Page 19: ...F CWDX OFF 3 Press select You will hear a confirmation tone See Using Call Waiting Deluxe on page 33 for instructions on using Call Waiting Deluxe Activating Personal Ring You can assign special ringer tones to anyone in your phonebook When your phone gets a call it looks up the Caller ID information in your phonebook If you ve assigned a personal ringer to that number the phone uses it so you kno...

Page 20: ...andset anywhere AC power is available to connect the handset charger All the handsets ring when a call is received Compatible Handsets Your phone is compatible with the following Uniden 2 4 GHz Digital Accessory Handsets DCX640 DCX700 and DCX750 Please visit our website at www uniden com for the most up to date list of compatible handsets If you purchase an accessory handset you must register the ...

Page 21: ... least 15 20 hours before using your new cordless telephone for the first time Registering Accessory Handsets If you purchase an accessory handset you need to register the handset before use Only one handset can be registered at a time Handsets supplied with the phone are registered to the base by the factory When charged pre registered handsets display a handset ID number Handsets that have not b...

Page 22: ...EGISTERING appears in the display When the display shows REGISTRATION COMPLETE the handset has been registered to the base If REGISTRATION FAILED appears please try these steps again Resetting Handsets If you want to register the handset to a different base or replace a handset with another one you must first clear the registration information from the base and the handset 1 Press and hold and for...

Page 23: ...ebook entries are full you will hear a beep and MEMORY FULL appears You cannot store any additional names and numbers unless you delete some of the existing ones You can also use the phonebook entries or speed dial memory to store a group of numbers up to 20 digits that you may need to enter once your call connects This is referred to as chain dialing Creating Phonebook Entries To store names and ...

Page 24: ...one of the 20 different ring tone options see Selecting a Ring Tone Handset Only on page 28 for a complete list of ring tones As you scroll through the tones you will hear a sample of each tone When you hear the ring tone you want to use press select If you do not want to use a personal ring tone for this phonebook entry choose NO SELECTN the phone will use your standard ring tone setting 6 Assign...

Page 25: ...phonebook Editing an Existing Phonebook Entry 1 With the phone in standby press to open the phonebook 2 Select DIAL EDIT 3 Find the entry you want to edit and press select 4 Follow the steps for Creating Phonebook Entries on page 22 If you do not wish to change the information at any step simply press select to go to the next step Storing Caller ID or Redial Numbers in the Phonebook You can store ...

Page 26: ...ss menu clear 4 DELETE MEMORY appears in the display Select YES and then press select 5 You will hear a confirmation tone and DELETED appears in the display Deleting all the phonebook entries at once 1 When the phone is in standby press 2 Move the cursor to select DELETE ALL and press select 3 DELETE ALL appears in the display Select YES and then press select You will hear a confirmation tone and ...

Page 27: ...f your phonebook contains 100 entries you cannot store any new phonebook entries You will hear a beep and MEMORY FULL appears on the display If the selected handset is out of range or data transfer is canceled UNAVAILABLE appears in the display Phonebook listings will not be transferred Programming Base Speed Dial Numbers Dual Keypad Model Only The dual keypad base can store 10 speed dial numbers ...

Page 28: ...name once it is registered to the base The default banner is Handset 1 Handset 2 etc You can change the name your phone displays by changing the banner display If you have more than one handset the banner name identifies your handset during handset to handset functions like intercom and DirectLink communication The name will be displayed on the LCD screen during Standby Intercom Intercom Hold Room...

Page 29: ...weet Heart SWEETHEART Star Spangled Banner STAR SPNGL Old MacDonald OLD MACDLD Ringers Flicker Clatter Soft Alert Wake Up Light Bug Beep Boop Tone Board Chip Chop Party Clap Reminder 1 Press menu clear Select the HANDSET SETUP menu and then the RINGER TONES submenu 2 Move the cursor to select a ring tone As each ring tone is selected you will hear a sample of the ring tone 3 When you hear the tone...

Page 30: ...You will hear a confirmation tone Activating Any Key Answer Handset only Any Key Answer allows you to answer the phone by pressing any key in the twelve keypad 1 Press menu clear 2 Select the HANDSET SETUP menu and then the ANY KEY ANSWER submenu 3 Select ON or OFF and then press select You will hear a confirmation tone ...

Page 31: ...e handset from the charging cradle 2 Dial the number 3 Press Dual Keypad Model Only 1 Press speaker 2 Listen for the dial tone 3 Dial the number Answering a call 1 Pick up the handset If AutoTalk is on the phone will answer when you remove the handset from the charging cradle 2 Press flash If Any Key Answer is on you can also press any key on the twelve number keypad 1 Pick up the handset If AutoT...

Page 32: ... When the phone is in standby press and hold one of the number keys 0 through 9 until the assigned phonebook entry appears in the display 2 Press flash or to dial the number Making a Call with Base Speed Dial Dual keypad Base Only 1 When the phone is in standby press speaker 2 Press memory 3 Press the number key 0 through 9 where the desired phone number is stored The phone dials the programmed nu...

Page 33: ...emory between your Phonebook and Caller ID entries Once you reach your maximum phonebook entries of 100 Caller ID information will not be stored but it will still display when the call comes in To open the Caller ID list press on the right side of the four way key The phone will show the number of new Caller ID records and the total number of stored records Use and to scroll through the list or en...

Page 34: ...hrough your telephone provider to receive Call Waiting services Not all features are available in all areas Using Call Waiting Deluxe Your handset gives you new options for Call Waiting Deluxe At the touch of a button you can place the caller on hold send them to your voice mail service or conference them into your current call You must subscribe to both Call Waiting and Call Waiting Deluxe to use...

Page 35: ...ss redial pause 1 With the phone in standby press redial pause to open the redial list 2 Use redial pause or and to scroll through the redial list 3 When you find the number you want to dial press flash or Note You can also redial the last number dialed on the handset by pressing flash or and then redial pause Deleting a Redial Record If you want to delete a phone number from the handset s redial ...

Page 36: ...to make it louder or to make it softer Base Speakerphone You can choose from ten volume levels for the base speakerphone To adjust the speaker volume while on a call press to make it louder or to make it softer Adjusting the Audio Tone If you aren t satisfied with the audio quality of your phone you can adjust the Audio Tone of the earpiece while on a call Your phone gives you three audio tone opt...

Page 37: ...by All registered handsets will beep for 60 seconds and PAGING appears on the handset display To cancel paging press find hs mute find hs again or any key on the found handset Using Hold Conference and Transfer Placing a Call on Hold To place a caller on hold press xfer intercom on the handset hold on the base or hold int com xfer on the dual keypad base If you leave a caller on hold for more than...

Page 38: ...nt com xfer on the dual keypad base 2 The call will automatically be placed on hold and a paging tone sounds on all stations On the dual keypad base you can select the handset you want to talk with by pressing 1 through 4 or press tone to page all registered handsets To cancel the transfer press speaker or int com hold int com xfer 3 When another station accepts the transferred call you will be di...

Page 39: ...is not picked up within one minute the operation will be canceled Using Special Features Do Not Disturb All Calls Do not disturb DND allows you to mute the ringer of all stations at once With the phone in standby press and hold dnd on the base You will hear a confirmation tone and the dnd LED illuminates To cancel press dnd again You can also mute the ringer tone while the phone is ringing by pres...

Page 40: ...ill show UNAVAILABLE 1 While on a call press menu clear 2 Move the cursor to PRIVACY MODE and then press select PRIVACY MODE ON and appear in the display for 2 seconds the icon remains in the display as long as privacy mode is on To turn privacy mode off repeat the procedure listed above Seven Digit Dialing If you can make a local call by dialing only 7 digits instead of 10 you can program your lo...

Page 41: ...ct You will hear a confirmation tone and DIRECTLINK MODE COMPLETE appears in the display Making a DirectLink Call 1 To call another handset with DirectLink communication press flash The display shows TO DIRECTLINK A HANDSET PRESS 1 4 2 Press the number of the handset you want to call If the handset is out of range or not set to DirectLink communication the display shows UNAVAILABLE 3 To answer a D...

Page 42: ...tercom page press Note Intercom paging will be canceled if any of the following things occur You receive an outside call or an intercom page while selecting the other handset You do not select a handset within 30 seconds The party does not answer the page within one minute The party is busy The party is out of range UNAVAILABLE appears in the display Answering an Intercom Page When the intercom pa...

Page 43: ... want to monitor 3 Press select ROOM MONITOR appears and you hear sounds in the room where the station is installed 4 To turn off the room monitor press or return the handset to the cradle Note This feature only works when handsets are within the range of the base If the party is out of range UNAVAILABLE appears in the display and the operation will be canceled While a pair of handsets is in Room ...

Page 44: ...n the dual keypad base Any digits you enter from then on will be sent with tone dialing When this particular call ends the phone automatically returns to pulse dialing See Changing the Dial Mode on page 16 for instructions on setting your phone for pulse or tone dialing Installing the Optional Headset Your phone may be used with an optional headset To use this feature insert the headset plug into ...

Page 45: ...e Announcement Remote Message Retrieval Toll Saver Conversation Recording Voice Memo Message Alert Hands Free Speaker Phone at Base Records Up to 59 messages Digital Tapeless Recording allows you to quickly review save or delete the messages you choose You will never have to worry about a tape wearing out jamming or resetting improperly Voice Prompts You can set up your answering system s primary ...

Page 46: ...our home When the phone is in standby press select on the handset to access the answering system REMOTE ANSWERING MACHINE OPERATION appears on the handset display and the system announces the number of new and old messages Keep the following things in mind when you use your handset to access your answering system You can enter a command at any time during announcements After the first announcement...

Page 47: ...ys the outgoing message You can set the ring time to answer after two four or six rings If you enable the Toll Saver TS setting the answering system picks up after two rings if you have new messages and after four rings if there are none This way if you make a long distance call to check your messages you can hang up after the second ring to avoid long distance billing charges From the base From t...

Page 48: ...ct the hour 6 Press select or select until you hear the correct minute setting The numbers 00 through 59 appears on the base as each minute is announced 7 Press set to select the minute 8 Press select or select until you hear the correct AM or PM setting The message counter displays A or P 9 Press set to select the AM PM setting A confirmation tone sounds and the day and time are announced for you...

Page 49: ...nd old messages or Answering system is off 2 Press 8 at any time during the announcement 3 The system announces Record greeting Begin recording after the announcement 4 The message counter on the base displays 5 When you finish recording press 5 or 8 You will hear a confirmation tone and your recorded greeting plays back for you Selecting a Greeting Once you have recorded a personal greeting the p...

Page 50: ... four times The base displays the current number of rings recording time 1 minute 4 minutes or A for announce only and announces the setting 2 Press select or select until the desired message record time appears 3 Press set to select the new recording time A confirmation tone sounds and the system announces the new record time 1 Press menu clear Select the ANSW SETUP menu and then the RECORD TIME ...

Page 51: ...lear Select the ANSW SETUP menu and then the MESSAGE ALERT submenu 2 Move the cursor to select ON or OFF 3 Press select You will hear a confirmation tone Activating Call Screening Your phone allows you to listen to callers leaving you a message This call screen feature can be turned on or off From the base From the handset 1 Press menu clock seven times The current call screen setting ON or OFF ap...

Page 52: ... code appears on the base and it is announced 2 Press select or select until the desired number appears Press and hold select or select to quickly scroll through the numbers on the display 3 Press set to select the security code A confirmation tone sounds the system announces the new security code 1 Press menu clear Select the ANSW SETUP menu and then the SECURITY CODE submenu 2 Use the number key...

Page 53: ... plays the current greeting message Turning Off 1 With the phone in standby press on off 2 The phone announces Answering System is off 3 The message counter LED is no longer illuminated 1 With the phone in standby press select REMOTE ANSWERING MACHINE OPERATION appears on the display and the answering system announces the number of new and old messages 2 Press 9 at any time during the announcement...

Page 54: ...essage Press select to go to the beginning of the next message Press and hold select to fast forward through the current message Press 3 to go to the beginning of the next message Deleting a message While a message is playing press The message is permanently deleted While a message is playing press 4 The message is permanently deleted Deleting all messages While the phone is in standby press When ...

Page 55: ... LED flashes A confirmation tone that can be heard by both parties sounds during recording 1 During a conversation press menu clear 2 Move the cursor to select CALL RECORD and then press select 3 RECORDING A CALL appears on the display A confirmation tone that can be heard by both parties sounds during recording Stopping a recording 1 Press memo call rec or 2 You will hear a confirmation tone and ...

Page 56: ...essages 3 Press 7 The system announces Record memo message Begin your message after this announcement Stopping a memo 1 Press memo call rec or set 2 You hear a confirmation tone and the system returns to standby 1 Press 5 or 7 You hear a confirmation tone and the system waits for your next command 2 Press 2 to hear the message you just recorded or to exit the system and return to standby Turning O...

Page 57: ...15 seconds to enter the first command after the first command you have two seconds to enter each command Command Function Command Function 0 then 1 Repeat a message 0 then 6 Answering system on 0 then 2 Play incoming messages 0 then 7 Memo record start stop 0 then 3 Skip a message 0 then 8 Greeting message record start stop 0 then 4 Delete a message 0 then 9 Answering system off 0 then 5 Stop oper...

Page 58: ...oid damage from an electrical spike when the power comes back on we recommend you unplug your phone during power outages Battery Life With average use your battery talk time will be approximately 5 hours and standby time will be approximately 7 days For optimum performance be sure to return the handset to the cradle after each call If the handset is left off of the base the actual talk time durati...

Page 59: ...ery should last about one year A replacement Uniden adapter or battery may be purchased by calling Uniden s Parts department see back cover page Warning To avoid the risk of personal injury or property damage from fire or electrical shock use only BT 909 battery pack with your phone Caution Do not remove the batteries from the handset to charge them Never throw the battery into a fire disassemble ...

Page 60: ...en you want to change the digital security code You lose a handset and purchase a new one You get the message Registration Failed when you try to register the handset You are unable to register any handsets to the base When you register new handsets to the base the handset IDs do not match For example the handset registers as Handset 4 but you only have two handsets When you are instructed to by o...

Page 61: ...YES and then press select You hear a confirmation tone and the handset deletes its own base information without contacting the base The handset displays MODELS VARY CHARGE HANDSET ON THE BASE FOR REGISTRATION OR REFER TO OWNER S MANUAL 4 Register the handset to the new base see Registering Accessory Handsets on page 20 Changing the Digital Security Code The digital security code is an identificati...

Page 62: ... when the handset is placed in the cradle Make sure the AC adapter is plugged into the base or the charger if you have more than one handset and wall outlet Make sure the handset is properly seated in the cradle Make sure the charging contacts on the handset are clean The audio sounds weak Move the handset and or base away from metal objects or appliances and try again Make sure that you are not t...

Page 63: ... 20 hours by placing the handset on the base or charging cradle Change the Digital Security Code see Changing the Digital Security Code on page 60 You cannot register the handset at the base Charge the battery pack in the handset for 15 to 20 hours Change the Digital Security Code see Changing the Digital Security Code on page 60 The handset doesn t communicate with other handsets Change the Digit...

Page 64: ...view Adjust the speaker volume on the base or handset Make sure the call screen feature is set to on Cannot access answering system from a remote phone Make sure you are using the correct PIN number Make sure that the touch tone phone you re using can transmit the tone for at least two seconds If it cannot try using a different touchtone phone Liquid Damage Moisture and liquid can damage your cord...

Page 65: ...re using 1 Disconnect the AC adapter from the base cutting off electrical power 2 Disconnect the telephone cord from the base 3 Let dry for at least 3 days IMPORTANT You must unplug the telephone line while recharging the battery packs to avoid charge interruption CAUTION DO NOT use a microwave oven to speed up the drying process This will cause permanent damage to the handset base and the microwa...

Page 66: ...and or accessories contain lead a chemical known to the State of California to cause birth defects or other reproductive harm Wash hands after handling Important Safety Instructions When using your telephone equipment basic safety precautions should always be followed to reduce the risk of fire electric shock and injury to persons including the following 1 Do not use this product near water for ex...

Page 67: ...e customer as soon as possible Also you will be advised of your right to file a complaint with the FCC if you believe it is necessary The telephone company may make changes in its facilities equipment operations or procedures that could affect the operation of the equipment If this happens the telephone company will provide advance notice in order for you to make necessary modifications to maintai...

Page 68: ...way from the TV or VCR will often reduce or eliminate the interference Cordless Telephone Privacy Cordless telephones are radio devices Communications between the handset and base of your cordless telephone are accomplished by means of radio waves which are broadcast over the open airways Because of the inherent physical properties of radio waves your communications can be received by radio receiv...

Page 69: ...tives in connection with the performance of this warranty Warrantor at its option may replace the unit with a new or refurbished unit THE LIMITED WARRANTY SET FORTH ABOVE IS THE SOLE AND ENTIRE WARRANTY PERTAINING TO THE PRODUCT AND IS IN LIEU OF AND EXCLUDES ALL OTHER WARRANTIES OF ANY NATURE WHATSOEVER WHETHER EXPRESS IMPLIED OR ARISING BY OPERATION OF LAW INCLUDING BUT NOT LIMITED TO ANY IMPLIE...

Page 70: ...ncing 37 Day and time 17 47 Dial mode 16 43 DirectLink 40 Making a call 40 Do not disturb 38 FCC statements 66 Finding a handset 36 Greetings Deleting 49 Recording 48 Selecting 48 Handset Accessing the answering system 45 Accessory handsets 19 Banner 27 Choosing a ringer 28 Copying phonebook entries 25 Displays and icons 10 Entering text 12 Finding 36 Parts of the handset 7 Registering 20 Resettin...

Page 71: ...voice memo 55 Redial Deleting a record 34 Making calls with 34 Ringer Choosing a handset ringer 28 Muting 38 Personal ring 18 Room monitor 42 Safety notices 65 Screening calls 50 53 Security code 60 Answering system 51 Seven digit dialing 39 Speed dial Making calls from 31 Programming 23 Programming on the dual keypad base 26 Text entering 12 Tone dialing 16 43 Transferring a call 37 Volume adjust...

Page 72: ...71 MEMO ...

Page 73: ...en enter your PIN code 3 Press 0 then 5 to stop the announcement 4 Press 0 then 6 to turn the answering system on REMOTE OPERATION CARD Remote access away from home 1 Call your phone number from a touch tone phone 2 During the outgoing message press 0 and enter your PIN code The answer ing system announces the number of messages stored in memory and begins the voice prompts 3 To quit hang up the p...

Page 74: ...e a Message Stop Operation Answering System On Memo Record Stop Greeting Message Record Stop Answering System Off Help Task Key Repeat a Message Play Incoming Messages Skip a Message Delete a Message Stop Operation Answering System On Memo Record Stop Greeting Message Record Stop Answering System Off Help Task Key Repeat a Message Play Incoming Messages Skip a Message Delete a Message Stop Operati...

Page 75: ...iday 8 am to 5 pm CST Help for our customers with special needs If you need special assistance due to a disability or have questions on the accessibility features of this product please call 1 800 874 9314 voice or TTY May be covered under one or more of the following U S patents 4 797 916 5 381 460 5 426 690 5 434 905 5 491 745 5 493 605 5 533 010 5 574 727 5 581 598 5 650 790 5 660 269 5 661 780...

Page 76: ......

Reviews: