background image

4

3. Double-click on the UMAX AstraCam 1000 CD icon (your CD-ROM drive

icon).

4. Double-click on the SETUP icon.

5. Follow the onscreen instructions to continue the installation. On the Select

Component screen, select the programs you want to install:

Mr. Photo

VistaShuttle

AstraCam 1000 Software (including the Twain driver)

The default setting is to install all three programs (highly recommended). You
must install the AstraCam 1000 and Mr. Photo software in order to download
photos to your computer using the DOWNLOAD button.

CONNECTING THE ASTRACAM 1000 TO YOUR
COMPUTER

The AstraCam 1000 connects your camera to a computer using the attached
USB cable. The USB syst

e

m is "hot-swappable." You do not have to turn

your system off before inserting the USB cable into the port.

1. Look on the back of your computer for the USB port.  The USB port is a

small slot 1/2" long by 1/4" wide (see illustration on the right). Insert the
USB cable into the USB socket.

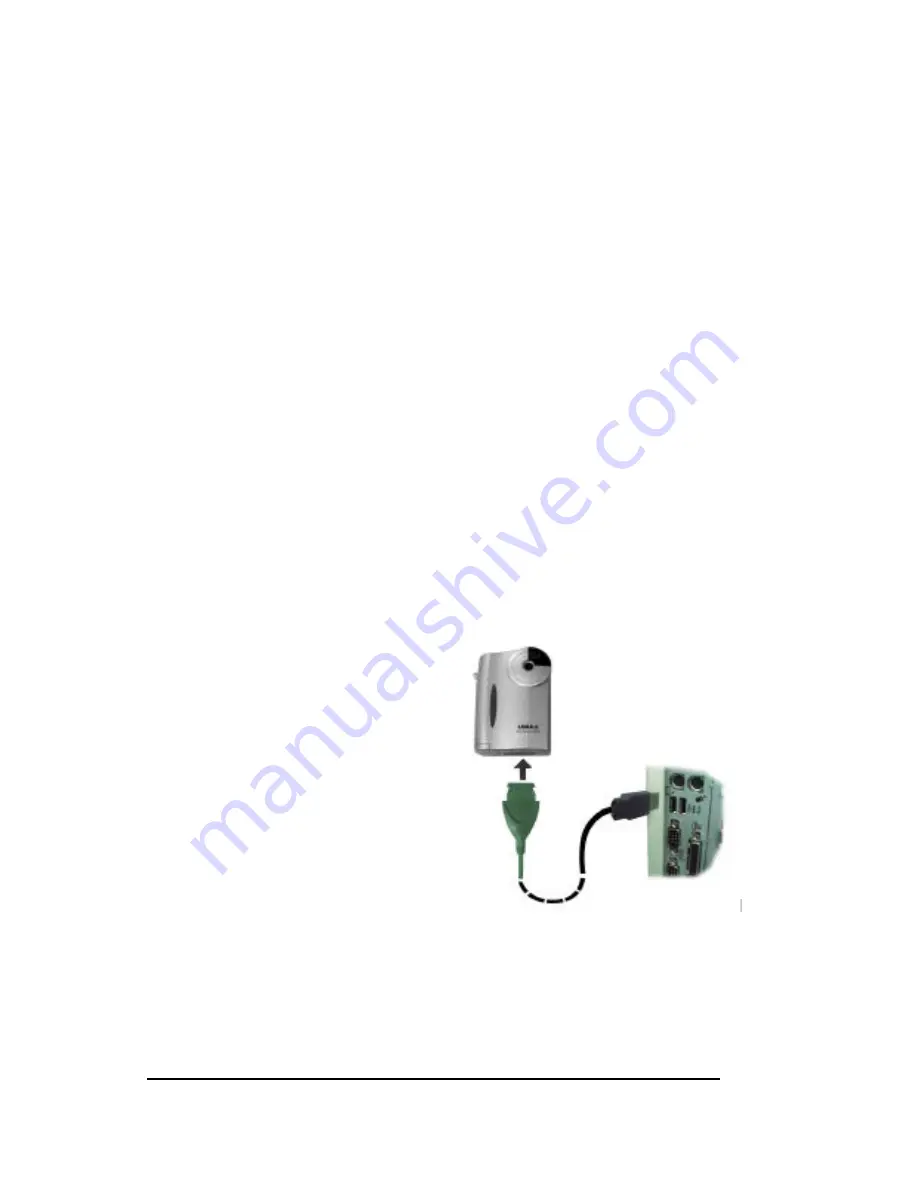
2. With the AstraCam 1000 power

switch turned off, gently insert the
large end of the USB cable into the
bottom of the AstraCam 1000. The
side of the connector that has
“UMAX” printed on it should face
in the same direction as the front of
the camera. The front of the
camera is the side that displays the
UMAX logo.Windows will display
screens saying that it discovered
your new hardware, is updating the
driver database and is installing
new software.

Note:  To save battery, you can turn off the camera when connecting to PC for
           downloading.

Summary of Contents for PowerLook 1000

Page 1: ...UMAX AstraCam 1000 OWNER S GUIDE P N 83100177 0000...

Page 2: ...on the product When replacement parts are required be sure that service technicians have used replacement parts that conform to at least the same safety standards with regard to fire electric shock o...

Page 3: ...ing thumbnail photo 11 AFTER SHOT RECOVERY ASR 11 Rotate Photos 12 Transferring the Photos 12 Saving a Photo to a File 12 Megapixel 13 Deleting Photos 13 OPERATING THE ASTRACAM 1000 FROM THE SOFTWARE...

Page 4: ...photo greeting cards with VistaShuttle AstraCam 1000 with its lightweight point and shoot simplicity and fast photo downloading is a great way to welcome you to the world of digital photography UMAX...

Page 5: ...e AstraCam 1000 1 Unwrap the 2 AAA batteries Note the polarity symbols near the ends of each battery 2 Open the battery cover at the bottom of the camera by pushing the cover out with your thumb 3 Not...

Page 6: ...ick on the MY COMPUTER icon on your Windows desktop 3 Double click on the PHOTODELUXE icon your CD ROM drive icon 4 Double click on the AUTOPLAY icon 5 Follow the onscreen instructions to continue the...

Page 7: ...SB cable The USB system is hot swappable You do not have to turn your system off before inserting the USB cable into the port 1 Look on the back of your computer for the USB port The USB port is a sma...

Page 8: ...symbols White Balance Icon Displays the selected White Balance Mode See page 6 White Balance Settings for Better Photos HQ EQ Quality Indicates that the AstraCam 1000 is ready to take photos in High...

Page 9: ...r if you plan to enlarge your photo to 1280 x 960 resolution by using the AstraCam 1000 software However pictures taken in HQ mode will take up more of the camera s internal memory than if using EQ mo...

Page 10: ...the ERASE button The film counter will begin blinking and the green action light will turn on 2 Press the ERASE button again to erase the photo from the camera s memory To erase all the photos 1 Press...

Page 11: ...camera or scanner to a program The AstraCam 1000 software includes a TWAIN driver to communicate with photo manipulation programs and other TWAIN compliant applications Examples of TWAIN compliant app...

Page 12: ...Mr Photo and AstraCam 1000 driver on the top will be started 3 Select the photos you want to download and click on TRANSFERING PICTURE S button for downloading 2 Acquire Photos Through a Photo Applica...

Page 13: ...e AstraCam 1000 program 1 Open the VistaShuttle program 2 Click on one of VistaShuttle s task buttons to open the AstraCam 1000 software 3 Click on the LOADING THUMBNAIL S FROM CAMERA button at the to...

Page 14: ...the bottom of the photo adjust panel to save the changes Click on the red CANCEL button to keep the photo unchanged Adjust Image controls panel You can make adjustments to your thumbnail photos in th...

Page 15: ...click on the photo you want to transfer and it will appear in the photo manipulation program Selected Photos 1 Click on the photo s you want to transfer Press and hold the CTRL key to select multiple...

Page 16: ...the bottom of the photo display The resolution of the selected photo has increased to 1280 x 960 Deleting Photos You can delete one or all the photos stored on your AstraCam 1000 To delete one photo...

Page 17: ...Settings for Better Photos Resolution The resolution setting for the AstraCam 1000 is always 640 x 480 However the Megapixel feature can increase the resolution of downloaded photos to 1280 x 960 usin...

Page 18: ...ll appear around the selected photo 3 Click on the information icon at the left corner of the selected photos 4 Enter the data for Title Keyword Time and Memo 5 Click on the OK button to close the Inf...

Page 19: ...g Photos 2 Click on the photos you want to work with a red frame will appear around the selected photo 3 Click on the Tool Panorama icon at the right application bar 4 Panorama software will be open a...

Page 20: ...OOSE MONTHLY CALENDARS option from the drop down menu 5 Follow the onscreen instructions through step 5 then click on the ADD tab and choose CAMERAS The AstraCam 1000 software will open 6 Click on the...

Page 21: ...1 Connecting AstraCam 1000 to your computer 2 Launch the VistaShuttle and select the E card you are going to create 3 AstraCam 1000 driver will be launched automatically 4 Select a photo thumbnail you...

Page 22: ...the screen 2 A Send box will appear displaying the compatible e mail programs programs not installed on your system are grayed out Select the e mail program you want and click on the SEND button to o...

Page 23: ...ean the lens 1 Carefully use an air blower or compressed gas duster to blow dust off the lens 2 Moisten lens cleaning tissue with a commercial lens cleaning fluid and wipe the lens gently Never pour l...

Page 24: ...y 72 Photos EQ 45 Photos HQ Download Speed 3 Seconds per Image approximate Lens Aperture Focus Free F2 8 Lens Focal Length 50mm as equivalent to a 35mm camera Lens Focal Distance focus free 20 to Infi...

Page 25: ...information ready The camera model and serial number The version number of the camera driver located on the front of the CD The computer model you are using The printer and model that you are using if...

Page 26: ...sed in accordance with the instructions may cause harmful interference to radio communications However there is no guarantee that interference will not occur in a particular installation If this equip...

Page 27: ...ged by accident electrical fault through misuse or abuse If the product has been altered without written authorization by UMAX the warranty will not be applicable This Warranty applies only to hardwar...

Reviews: