


5
Installation
Ulma3000 TCA shall be mounted in one of the doors of the boiler. It is often suitable to mount it in the oil
burner door, but if the space for ash is small the door for wood burning could be a good alternative. If the
door is so small it can not be opened without removing the pellet burner, it can easily be removed and re-
mounted with the enclosed mounting flange.
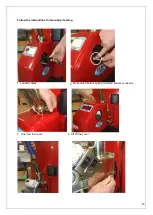
Mounting of the burner
1. Decide where on the boiler the burner should be mounted. If possible place it so that you can open
the door with the burner still on, since that facilitates the operation.
N.B.!
T
HE DOOR MAY NOT BE POSSIBLE TO OPEN WITHOUT THAT THE POWER TO THE BURNER IS
SWITCHED OFF
.
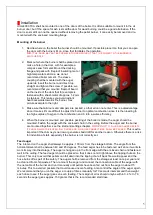
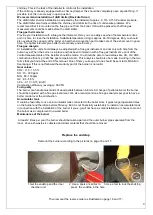
2. Mark out where the burner shall be placed and
make a hole in the door, with for example a
compass saw for metal. Mount the docking
flange and pack with fireproof insulating mat or
high temperature silicone, we do not
recommend boiler cement. The sleeve
coupling shall be mounted with the auger
upwards. Insert the burner and direct it up
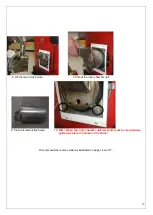
straight and tighten the screw. If possible, we
recommend that you mount a fireproof board
on the inside of the door that for example is
fastened with a sheet-metal of approx. 1-2 mm
in stainless. This makes you avoid radiant
heat backwards towards the burner. See
picture example to the right.
3. Make sure that all doors and dampers are packed, so that air can not enter. This is a disadvantage
since it makes it more difficult to adjust the burner to optimal combustion since it is then leading to
too high surplus of oxygen in the combustion and in turn a worse efficiency.
4. When the burner is mounted and possible packing of the boiler is made, the auger should be
mounted. Fasten the auger with the enclosed chain in the ceiling. Before the auger and the burner
are mounted together, see the start and settings chapter
.
IMPORTANT
!
I
F FLUE
-
GAS DAMPER EXISTS
IT SHOULD ALWAYS BE OPEN
.
A
LL DOORS AND FLUE
-
GAS CONNECTIONS SHALL BE PACKED
.
This is extra
important if the chimney is narrow or generates bad draft for another reason
.
Otherwise there is a risk
for indention at start, especially if the burner is not correctly set.
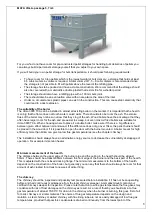
Feed auger
The inlet end on the auger shall always be approx. 100 mm from the storage bottom. The angle from the
horizontal level shall be between 43 and 45 degrees. The feed auger has to be fastened well since it wants to
work its way into the storage. The auger is hanged up in the front edge with the enclosed chain and fastened
well in the ceiling. The feed auger should be placed so that it does not sit right above the tipping chute on the
burner. This only to avoid that pellets can fall down into the tipping chute if back fire would appear and the
hose burns off as part of the safety. The auger shall be removed from the storage at least once per year and
be cleaned from chip wastes. Then re-mount the auger and connect the connection cable of the auger with
the net cable of the burner and run it manually until pellets have been fed out from the auger in about 15
minutes. This to avoid air pockets that could cause uneven feeding. Also control the angle of the auger again.
We recommend that you run the auger a couple of times manually for 70 seconds intervals and then weight
each dose to see if the auger gives an even feeding. The margin of error should only be within 3-4 %. In 70
seconds the auger gives approx. 150 grams that is the recommended start dose.


