background image

14

21

General Operations

Your                 HBC220 SNOW helmet communicator is now all set and ready to go!


The operations described here 

are applicable to all modes 

of operations.

Power On

•  Hold the Answer button for 2 seconds to power on the

   helmet communicator. The status indicator will blink blue 

   and a power up tone can be heard.

Power Off

•  To switch off the helmet communicator, press and hold the Answer button for 5 seconds. 

   The status indicator will blink red 5 times followed by a long beep before fully shutting 

   down.

Power Save Mode (Auto Power Off)

•  If the intercom feature has been in use, and all Bluetooth devices have been disconnected,

   the system will auto shutdown in 2 hours. If the intercom feature has not been in use and 

   the HBC220 SNOW is not connected to any other devices, the system will auto shutdown in

   10 minutes.

Low battery

•  When the battery level is low, the status indicator light will flash red twice every 2 seconds

   while emitting a warning beep every minute. 

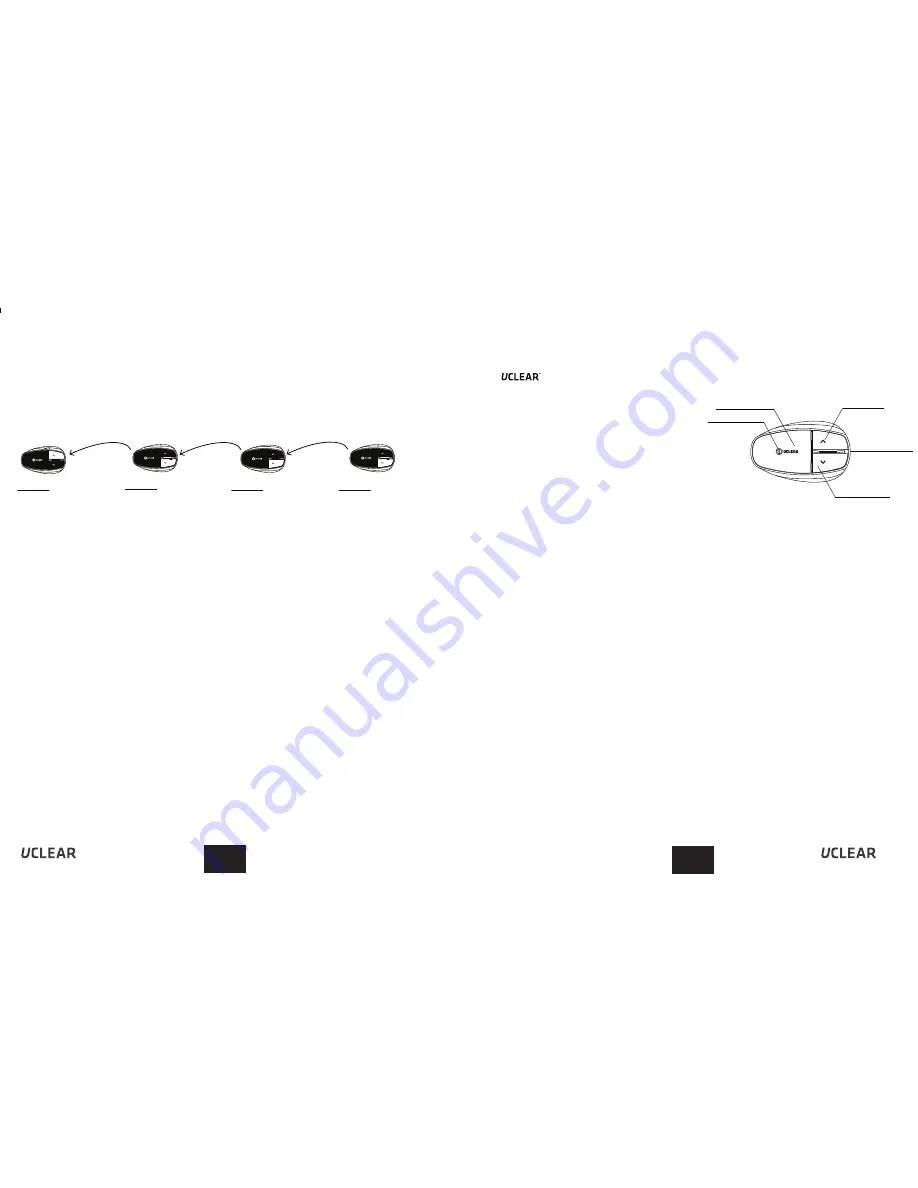
Status Indicator

Answer Button

Up Button

Speaker/

Charging socket

Down Button

Intercom Operations

Large Group Intercom (Three parties or more)

You can daisy-chain multiple HBC220 units to form bigger group intercom. A chain of 

10 or more parties is achievable.To setup group intercom, you must first pair all the 

HBC220 units. Pairing process needs to be carried out only once. unless your group 

of riders changes.


Pairing

1.Power off all the HBC220 control units first.

2.Pick one unit as the 1st device, hold Answer and Down button for approximately 3 

   seconds. Remove your fingers as soon as you see the light come on. The status 

   indicator will begin to blink blue and then purple.

3.For the 2nd device, hold Answer and Up buttons for 3 seconds releasing when you see

   the red light. The status indicator will blink blue then purple. Wait until the 1st device 

   status indicator turns blue, and then proceed to pair the next device.

4.Hold 3 seconds Answer and Up buttons on the 3rd device releasing when you see a 

   red light, and then status indicator will blink purple. Wait for the 2nd device status 

   indicator to turn blue, and then proceed to pair the next device.

5.Repeat above step 4 for all other units until all the devices are paired. 

6.The last device will be blinking purple. You can then press any button on the last 

   device to end the pairing process, the status indicator should turn blue. 

It is recommended that after the pairing process is successful, restart all UCLEAR 

control units.

Helmet 1

 ( 1st device) 

Hold Answer and Down Button

Helmet 2

 ( 2nd device) 

Hold Answer and Up Button

Helmet 3

 (3rd device) 

Hold Answer and Up Button

Helmet 4

 ( 4th device) 

Hold Answer and Up Button

and more

……

EN

EN

Summary of Contents for HBC220 SNOW

Page 1: ...Helmet Communication User Manual HBC 220 SNOW US PUB 2E...

Page 2: ...ed by BITwave Pte Ltd Any use of the mark by any other parties without prior written permission of BITwave Pte Ltd constitutes an infringement of legal rights The Bluetooth trademark is owned by Bluet...

Page 3: ...l information please visit our website at www uclear digital com For customer and technical support in the US and Canada please contact BITwave USA LLC 1093 E lron Eagle Dr 115 Eagle ID 83616 1 855 BI...

Page 4: ...dangers in using the product while in traffic including injury or illness strains fractures partial and or total paralysis death or other ailments that could cause serious disability due to any causes...

Page 5: ...wastes at the end of its working life There is a separate collection system for used electronic products in accordance with legislation that requires proper treatment recovery and recycling Household...

Page 6: ...All product warranties for the product by are limited to those mentioned in the product manual WAIVER AND DISCLAIMER BITwave and all their representatives partners agents distributors suppliers and re...

Page 7: ...duce risks of fire or burns do not disassemble crush puncture short external contacts or dispose in fire or water CHARGING NOTICE To reduce the risk of personal injury electrical shock fire or damage...

Page 8: ...to provide reasonable protection against harmful interference in a residential installation This equipment generates uses and can radiate radio frequency energy and if not installed and used in accord...

Page 9: ...tible or any other cables may lead to permanent product damage and will void the product warranty Never make any modifications to any part of the helmet communicator in any way as it may cause the sys...

Page 10: ...ng The weather resistant engineered design ensures the possibility of communication rain or shine The integrated microphone array technology allows you to communicate without the hassle of using boom...

Page 11: ...Press Answer 2 times Press Answer 1 time Press Up button 2 times Press Down button 2 times Backtrack Hold Up Down for 2 seconds Volume up Press Up once Pairing as helmet 1 First Unit Pairing as helme...

Page 12: ...SNOW you may need to pair your mobile phone to the GPS device by following the instructions of the GPS device Install Speakers Use the plastic inserts optional to ensure a firm and secure mounting are...

Page 13: ...button for 2 seconds music will resume automatically after that Other Functions Firmware Upgrade Please check out www uclear digital com for new firmware update Installation Mounting Control Unit on...

Page 14: ...installed showing the UCLEAR Logo right side up with the 2 side holes at the top and the metal prong pointing down Apply slight pressure onto the metal mounting bracket to ensure that the metal mount...

Page 15: ...To setup group intercom you must first pair all the HBC220 units Pairing process needs to be carried out only once unless your group of riders changes Pairing 1 Power off all the HBC220 control units...

Page 16: ...ncurrently but at any point of time only one profile is active The automatic profile switch determines which profile should be active at any point of time starting from the highest priority 1 Mobile P...

Page 17: ...phone and music Bluetooth capabilities After pairing the helmet communicator to your mobile phone you may now use the helmet communicator to answer your calls or make outgoing calls or listen to music...

Page 18: ...Streaming Operations To use the helmet communicator with your music devices you must connect them wirelessly through Bluetooth pairing This step is only required for Bluetooth music streaming devices...

Reviews: