U.S. Range C836-1-35F Installation And Operation Manual Download Page 9

Part # 4518632 (02/19/08)

Page 9

OPERATION 

continued

Lighting Instructions

For specific models see “Lighting Instructions” on the inside 
of fryer compartment.

(

Frypot must be filled before lighting)

.

1. Turn thermostat knob to the frying temperature. The 

thermostat knob is located inside the compartment in 
the front of the frypot.

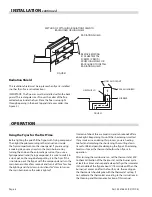
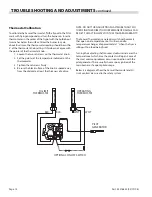
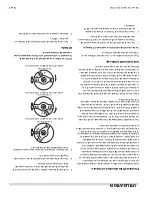
2. Open the fryer door and turn the combination safety 

valve knob to the PILOT position.

3. Push the knob in, light the pilot and continue to hold 

knob in for about sixty seconds after the flame has been 
lit.

4. Turn valve knob counter-clockwise to ON.

5. Main burners will now light and will be controlled 

automatically by the thermostat
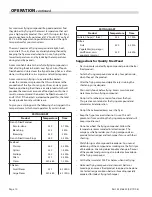
NO

OFFP

I

L

O

T

NO

OFF

P

I L

O T

NO

OFF

P

IL

OT

AUTOMATIC VALVE KNOB

PILOT POSITION

AUTOMATIC VALVE KNOB

ON POSITION

AUTOMATIC VALVE KNOB

OFF POSITION

NOTE: Fryer cannot be shut off at the thermostat. 
Thermostat used only to control temperatures.

Stand By

1. Turn fryer gas valve knob to “PILOT” position.

2. Put frypot cover in place.

Complete Shut Down

Turn gas valve knob clockwise to pilot position, DEPRESS 
knob, slightly clockwise, release knob and continue turning 
clockwise to OFF.

Safety Concerns

WARNING: The operator should be aware of the 
HAZARDOUS NATURE, inadvertent splashing and spilling 
etc., and RESULTANT CONSEQUENCES, personal burns, 
fires, slipping on spilled liquid etc., when moving the fryer 
with liquid in the vessel. If the fryer is to be moved, it is 
recommended that the liquid in the vessel be cooled to 
room temperature and removed from the vessel.

To assure you of maximum protection and performance 
your US Range Fryer is equipped with the best and most 
reliable controls and safety devices available. The operation 
thermostat will regulate frying compound temperatures to 
close tolerances in a range between 250°F and 375°F.

If for any reason the pilot should be extinguished the 
combination safety valve will close off the gas flow to the 
main burners and pilot burner. As an additional safety feature 
this valve prevents gas from flowing to the main burners 
when the pilot is being ignited.

On all units, due to the high rate of heating, and high limit 
control device is provided as standard equipment. If for 
any reason the frying compound temperature exceed the 
maximum dial temperature the entire fryer will turn OFF at 
450°F. If this should occur, have qualified service technician 
check the system. FOR NO REASON SHOULD THIS HIGH LIMIT 
DEVICE BE BY-PASSED!

Optimum Operation Tips

One of the most important considerations in the profitable 
use of a fryer is the choice of the frying compound used. A 
better frying compound will actually cost you less, because 
it lasts longer than the lower grades and produce fried foods 
with superior taste and appearance. There are numerous 
high-grade products available and you are strongly urged to 
use them.

Summary of Contents for C836-1-35F

Page 1: ...uga Ontario L4W 1X4 CANADA Phone 905 624 0260 Fax 905 624 5669 Enodis UK LTD Swallowfield Way Hayes Middlesex UB3 1DQ ENGLAND Telephone 081 561 0433 Fax 081 848 0041 Part 4518632 02 19 08 2005 Garland...

Page 2: ...h accessories packed inside the fryer vessel All units are adjusted tested and inspected at the factory before shipment Sizes weights and input rates of all models are listed in this manual NOTE The o...

Page 3: ...Battery 7 Assembly Instructions Low Profile Backguard 7 Radiation Shield 8 OPERATION 8 Using the Fryer for the First Time 8 Lighting Instructions 9 Stand By 9 Complete Shut Down 9 Safety Concerns 9 Op...

Page 4: ...2 000 feet 610mm above sea level Input must be derated for high altitude installations FRYING CAPACITY per hour FRENCH FRIES FISH BREADED CHICKEN Raw to Done Blanched to Done 3oz 84g Battered Raw to D...

Page 5: ...ies check meter size and piping to assure that the unit is supplied with sufficient amount of gas pressure required to operate the UNIT C If it is additional or replacement equipment have gas authorit...

Page 6: ...ryer must be restrained to prevent tipping in order to avoid the splashing of hot liquid The means of restraint may be the manner of installation such as connection to a battery of appliances Or insta...

Page 7: ...t units together by mating the unions at each end of the manifold Adjoining units must have matching unions unless the union parts are of the same specifications a leak proof connection cannot be assu...

Page 8: ...level must cover the thermostat bulbs when fryer is in operation After turning the main burner on set the thermostat at 325 to check calibration of the thermostat Let the burner cycle at least four t...

Page 9: ...pping on spilled liquid etc when moving the fryer with liquid in the vessel If the fryer is to be moved it is recommended that the liquid in the vessel be cooled to room temperature and removed from t...

Page 10: ...Onion Rings 360 2 3 Min Seafood Shrimp 360 2 3 Min Oysters 350 1 4 Min Scallops 250 3 5 Min Fillets 350 3 4 Min Clams 350 360 1 3 Min Chicken Small Pieces 350 6 10 Min Large Pieces 350 360 8 11 Min OP...

Page 11: ...se only stainless steel wood or plastic tools it necessary to scrape off heavy deposits of grease and oil Do not use ordinary steel scrapers or knives as particles of iron may become imbedded and rust...

Page 12: ...depending upon severity of use CLEANING AND MAINTENANCE continued Preventive Maintenance In order to keep the unit operation at top efficiency it is advisable to perform preventive maintenance regula...

Page 13: ...thermostat b Set too low b Raise setting c Out of calibration c Re calibrate d Thermostat defective d Replace 2 Thermostat does not control set point 2 See Below a Out of calibration a Re calibrate b...

Page 14: ...s spaced away from the dial plate at least the thickness of a dime NOTE DO NOT TURN ADJUSTING SHAFT MORE THAN TWO TURNS IN EITHER DIRECTION OR PERMANENT DAMAGE CAN RESULT THIS ACTION MAY VOID THE STAN...

Page 15: ...Part 4518632 02 19 08 Page 15...

Page 16: ......

Page 17: ......

Page 18: ...ns l paisseur d une pi ce de 10 sous NOTA NE PAS TOURNER L AXE DE R GLAGE DE PLUS DE DEUX TOURS DANS UN SENS OU DANS L AUTRE SOUS PEINE DE CAUSER DES DOMMAGES PERMANENTS CETTE ACTION PEUT ANNULER LA G...

Page 19: ...R talonner d Thermostat d fectueux d Remplace 2 Le thermostat ne contr le pas le point de consigne 2 Voir ci dessous a Doit tre r talonn a R talonner b Contacts sales ou br l s b Remplacer le thermost...

Page 20: ...est construit de fa on robuste et est con u s il est entretenu normalement pour tre utilis longtemps Il est bien s r souhaitable de maintenir cet quipement dans le meilleur tat possible Quand l quipem...

Page 21: ...a t poli dans un sens Frotter dans le sens de polissage pour conserver le fi ni d origine Rincer ensuite soigneusement Pour viter les traces de doigts il existe plusieurs produits polir pour acier in...

Page 22: ...pratique contamine le produit friture et acc l re sa d t rioration Ne pas secouer les produits pan s au dessus de la friteuse Maintenir le bassin de friture couvert quand il n est pas utilis Cela emp...

Page 23: ...oins cher car il dure plus longtemps que ceux de qualit inf rieure et produit des aliments dont le go t et l apparence sont meilleurs Il existe de nombreux produits de haute qualit et nous recommandon...

Page 24: ...e br leur s allumer et s teindre au moins quatre fois et suspendre un thermom tre bain de friture au milieu du bain une profondeur d environ 3 po 76mm Quand le br leur vient de s allumer apr s le quat...

Page 25: ...le panneau avant 5 retir pr c demment 7 7 Remettre en place le couvercle de conduit de fum e 6 d mont pr c demment 1 X X 2 5 8 7 3 6 9 4 COLONNE MONTANTE ARRI RE ALUMINIS C T S ET AVANT CRAN THERMIQUE...

Page 26: ...onner et on ne devra pas placer d objets encombrants devant la friteuse afi n de ne pas emp cher la circulation d air l avant On devra pr voir un minimum de 24 po 610mm l avant de l appareil pour l en...

Page 27: ...s le nettoyage couvrir toute la surface du bassin de friture avec du produit pour friture ou de l huile pour cuisson afi n d viter la formation de rouille Roulettes A L installation sera faite avec un...

Page 28: ...est estampill sur la plaque signal tique situ e sur le panneau int rieur de porte Brancher un appareil estampill NAT au gaz naturel et un appareil estampill PRO au gaz propane B S il s agit d une ins...

Page 29: ...H 24 91kW h 4 po C E 10mBars 9 po C E 22mBars 51 1 05MM 1 1 4 po NPT Les indications pour les entr es de gaz s appliquent des installations inf rieures 2 000 pi 610 m d altitude au dessus du niveau d...

Page 30: ...Air 7 Montage en Batterie 7 Instructions De MontageDosseret Profi l Bas 8 cran Protecteur 8 UTILISATION 9 Premi re Utilisation De La Friteuse 9 Instructions D allumage 9 Attente 9 Arr t Complet 10 Pr...

Page 31: ...et munis de leurs accessoires emball s l int rieur de l appareil Toutes les friteuses sont r gl es test es et inspect es l usine avant leur exp dition Les dimensions les poids et les d bits calorifi...

Page 32: ...DA T l phone 905 624 0260 T l copieur 905 624 5669 Enodis UK LTD Swallowfi eld Way Hayes Middlesex UB3 1DQ ANGLETERRE T l phone 081 561 0433 T l copieur 081 848 0041 Pi ce n 4518632 02 19 08 2005 Garl...

Reviews: