background image

PAGE 3 OF 9 

0919 IH-7805

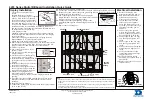
INSTALLATION CONTINUED

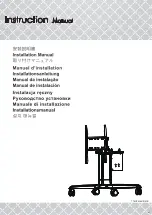
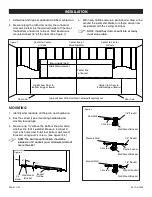
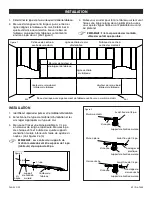
4.  Determine desired tray location and mark a line 

1" above the bottom edge of board. Drill two 5/16" 

diameter holes in wall 5⁄" apart.

5.  Push in two plastic anchors into predrilled holes. Place 

tray mount over plastic anchors and secure with two 

CS screws. (See Figure 4)

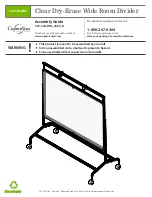
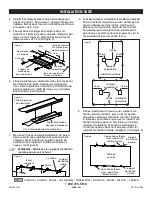
6.  Place aluminum tray in the front slot of tray mount 

and align the holes. Secure aluminum tray to tray 

mount using two Phillips tray screws. (See Figure 5)

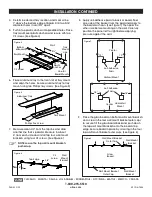
7.  Measure down 3/4" from the top line and draw 

another line that is parallel. Measure in about 

6" from each side and install top four wall mount 

brackets using four CS screws. (See Figure 6)

NOTE: Leave the top wall mount brackets 
pushed up. 

8.  Apply self-adhesive pads to back of board. Peel 

one side of the backer from the pad and apply to 

the board as shown. (See Figure 7) Then peel the 

other side before mounting on the wall. Carefully 

position the panel left to right before applying 

pressure against the wall. 

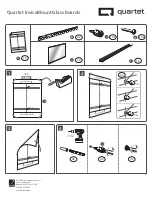
9.  Place the glass board on bottom wall mount brackets 

and screw in the four wall mount bracket outer caps 

to secure. Tilt the glass board back and push down 

the top wall mount brackets onto the board's top 

edge. Secure board in place by screwing in the four 

top wall mount bracket outer caps. (See Figure 8) 

6"

3/4"

Top Edge

Figure 6

Wall 

Mount 

Bracket

CS  

Screw

π

  CHICAGO • ATLANTA • DALLAS • LOS ANGELES • MINNEAPOLIS • NYC/PHILA • SEATTLE • MEXICO • CANADA

1-800-295-5510

uline.com

Figure 8

Figure 7

Vertical Mount

Self-Adhesive 

Pads

Self-Adhesive 

Pads

Horizontal 

Mount

18"

12"

12"

18"

Center

Center

Figure 4

5⁄"

Bottom 

of Board

Tray 

Mount 

Line

Line for  

Board Mounts

Tray Mount

Wall

CS Screw

Plastic 

Anchor

Figure 5

Aluminum Tray

Phillips Tray Screw

Tray Mount

Glass 

Board

Wall Mount Bracket 

Outer Cap

Wall Mount Bracket 

Outer Cap

Wall Mount 

Bracket

Wall Mount 

Bracket

Summary of Contents for H-7805

Page 1: ...d Use correct type anchor and predrill for the wall type IMPORTANT Do not use unless all screws are tight At least every six months check all screws to be sure they are tight TOOLS NEEDED Tape Measure...

Page 2: ...Line Floor Line Center to Center of Studs Board Height and Width Measurement Height from Floor to Bottom Edge of Board Height from Floor to Bottom Edge of Board 6 1 Board Outline CS Screw Figure 2 1...

Page 3: ...rd as shown See Figure 7 Then peel the other side before mounting on the wall Carefully position the panel left to right before applying pressure against the wall 9 Place the glass board on bottom wal...

Page 4: ...an o instalan de manera inapropiada pueden causar lesiones serias si el pizarr n se estrella Se requieren al menos dos personas para instalar el pizarr n de manera adecuada 1 Aseg rese de que la pared...

Page 5: ...a coloque el pizarr n en la posici n deseada y dibuje una l nea alrededor del per metro Aseg rese de que estas l neas dibujadas queden paralelas con el techo y el piso NOTA Si la pared tuviera polines...

Page 6: ...oque cuidadosamente el panel de izquierda a derecha antes de presionarlo contra la pared 9 Coloque el pizarr n de vidrio en los soportes para instalaci n en pared inferiores y atornille las cuatro tap...

Page 7: ...de s curit mais un maniement et une installation inappropri s peuvent r sulter en blessures graves en cas de brisure du tableau Une installation ad quate n cessite au moins deux personnes 1 Assurez v...

Page 8: ...en dessous de la ligne sup rieure Mesurez 6 po de chaque c t et installez les quatre supports de fixation murale inf rieurs l aide de quatre vis noy es Voir Figures 2 et 3 REMARQUE Les centres des sup...

Page 9: ...de pr caution positionnez le panneau en commen ant par la gauche vers le droite avant de pousser contre le mur 9 Placez le panneau en verre sur les supports de fixation murale inf rieurs puis vissez...

Reviews: