QuicKISS
Magnetic Dry-Erase Glass Boards
INSTALLATION INSTRUCTIONS
TOOLS REQUIRED
•
Drill/Screw Gun
•
1/8” Drill Bit
•
Level
•
Tape Measure
•
Pencil
•
Safety Gloves
•
Safety Goggles
•
Jigsaw
HARDWARE PROVIDED
Hardware Bag Contains:
•
(6) 2” #12 Drywall-to-Wood Screws
•
(6) 2” #12 Drywall-to-Metal Self-Drilling Screws
•
(1) Wall Bracket
•
Velcro Wall Protectors
Note: (1) hardware bag is provided for 2’x3’ and 3’x4’
boards; (2) hardware bags are provided for 4’x6’ and
4’x8’ boards
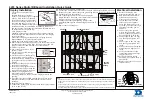
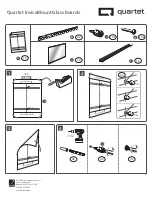
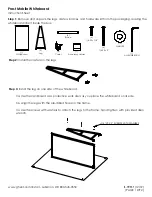
INSTALLATION INSTRUCTIONS
1.
Measure down 5/16” from the top of the desired location of the board.
2.
Draw a Level line to align the top edge of the Wall Bracket.
Note: For portrait installation, wall bracket must be cut. See Table 1 on next page for
bracket length.
3.
Align holes in Wall Bracket with wall studs. Pre-drill holes into wall studs.
Note: See Table 2 on next page for minimum anchor points needed for each board.
4.
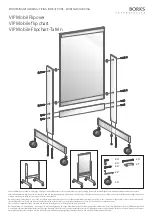
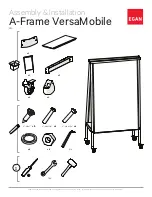
Install Wall Bracket into building structure or wall studs (wood or metal) (Fig. A).
5.
Ensure screws are flush with the face of the wall bracket to prevent scratching.
6.
Mount the board on to Wall Bracket (Fig. B & C).
7.
Adhere Velcro Wall Protectors on the bottom hem of the board.
8.
Confirm the board is securely hung on the Wall Bracket.
Fig. A
Fig. B
Fig. C