


PAGE 2 OF 9
0919 IH-7805
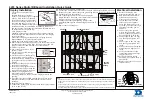
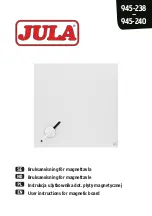
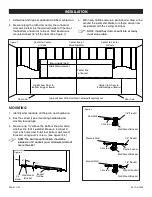
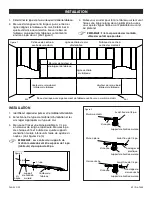
1. Determine what type of wall board will be mounted on.
2. Measure length, width and center lines of board
and wall. Determine the desired height off the floor
that bottom of board is to be at. Most boards are
mounted about 36" off the floor. (See Figure 1)
3. With help, hold board up in position and draw a line
around the perimeter. Make sure these drawn lines
are parallel with the ceiling and floor.
NOTE: If wall has studs, mount into as many
studs as possible.
INSTALLATION
Figure 1
Center Line of
Mounting Wall
Center Line
of Board
Typical Room With Stud Wall Centered Board Layout
Center to Center
of Studs
Floor Line
Floor Line
Center to Center
of Studs
Board Height and
Width Measurement
Height from Floor to
Bottom Edge of Board
Height from Floor to
Bottom Edge of Board
6"
1⁄"
Board
Outline
CS
Screw
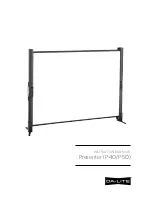
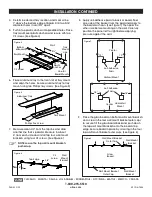
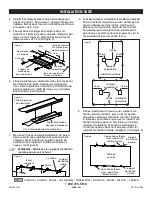
Figure 2
1/8" Predrill
1/4" Predrill
1/4" Predrill
Figure 3
Stud Wall
Masonry Wall
Drywall Wall
MOUNTING
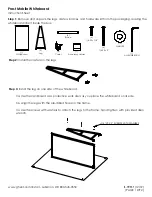
1. Identify and separate all the parts and hardware.
2. Pick the correct type of mounting hardware and
anchors for wall type.
3. Measure up 1⁄" above the bottom line and draw
another line that is parallel. Measure in about 6"
from each side and install four bottom wall mount
brackets using four CS screws. (See Figures 2-3)
NOTE: The wall mount brackets should be
placed on 16" centers (as a minimum) and not
more than 24".
CS Screw
Plastic Anchor
Drywall Anchor
CS Screw
CS Screw
Wall Mount
Bracket
Wall Mount Bracket
Wall Mount Bracket
Wall Mount Bracket