INSTALLATION · RADIO ASSEMBLY
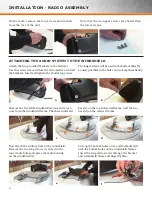
On the radio, remove the four screws and washers
from the rear of the unit.
Attach the two provided brackets to the radio(a).
Use the screws removed from the radio earlier to install
the brackets. Insert and tighten the shorter top screws.
Remove the five OEM windshield screws and acorn
nuts from the windshield frame. The three indicated
here (c) on the top horizontal frame. And the two
here (d) on the vertical frames.
The longer screws will be used in the bottom holes (b).
Loosely put them in the holes now to keep them handy.
Now attach the audio system to the windshield.
Remove the two long screws we stored in the
lower radio holes and place the radio housing
on the windshield (e).
Line up the bottom holes on the radio brackets (f)
with the bottom holes on the windshield frames.
Insert the long radio screws through the bracket
and windshield frame and finger tighten.
ATTACHING THE AUDIO SYSTEM TO THE WINDSHIELD
4
Note that the two upper screws are shorter than
the lower screws.
a
b
c
e
d
f


