background image

TRUST 922Z POWERC@M OPTICAL ZOOM 
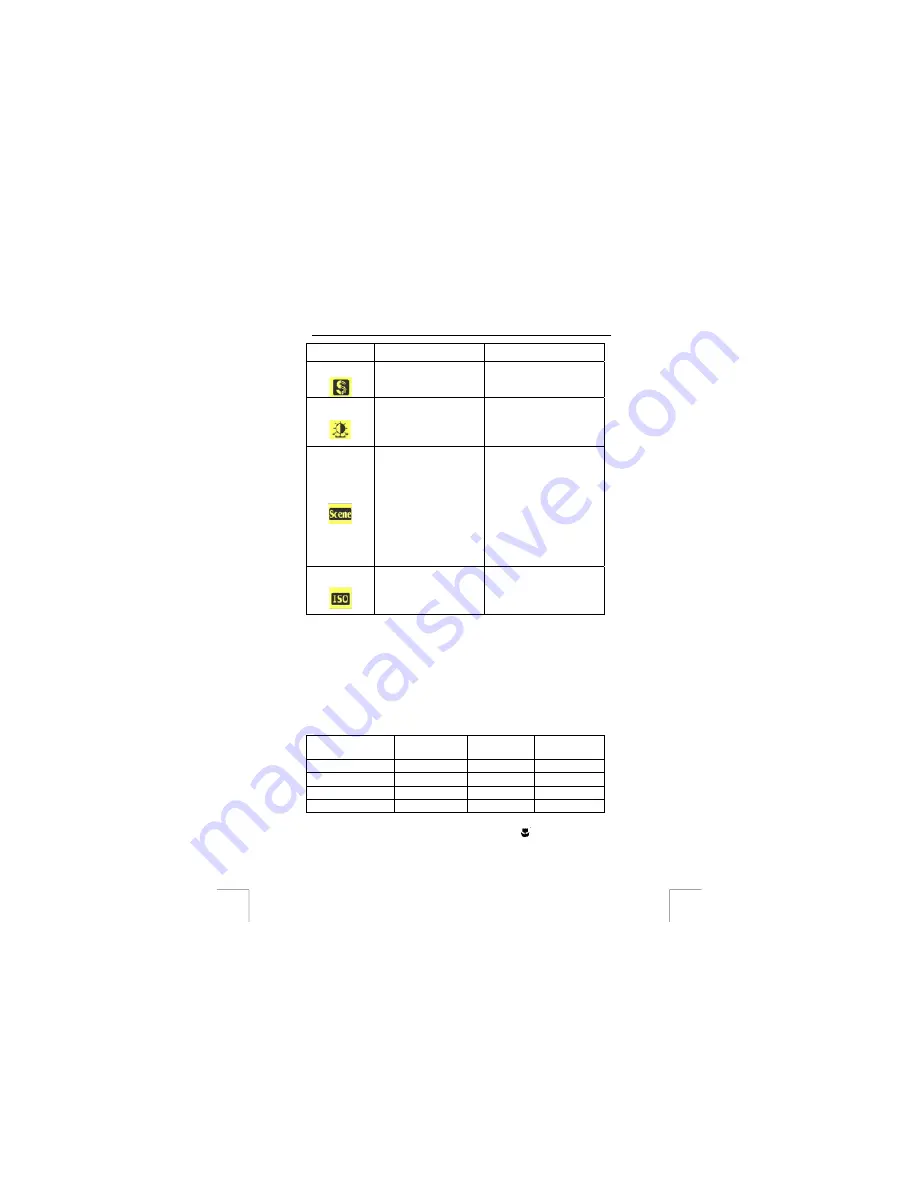
- Fluorescent 

lighting. Fluorescent- 
fluorescent lighting. 

Sharpness 


- Normal [Default] 
- High 
- Low 

Enhance the edge detail of 
the photograph. 

EV Adjust 


Value from +2.0 ~ -2.0. 
Steps in 0.5. Default value 
is 0. 

Exposure Value, which allows 
users to control the exposure 
value to either lighten or 
darken images the camera is 
trying to focus.  

Scene 


- Night 
- Portrait 
- Landscape 
- Night Portrait 
- Off 

The pre-defined settings 
make it convenient for users 
to take photographs in 
different kind of scenes while 
the settings of the camera are 
already pre-defined by the 
scenes. For example, you 
want to take a landscape, you 
don’t need to alter any 
settings but simply adjust 
scene to Landscape and the 
other related settings of the 
camera will be altered as well. 

ISO 


- 100  
- 200 
- Auto [Default] 

The settings adjust the 
sensitivity of the camera to 
the light. The higher the 
number is, the higher the 
sensibility is.  

Table 11: Capture Mode Setup 

Note:


A higher exposure value (+2.0) produces a brighter photograph. 

Tip: 

A photograph is sensitive to the light conditions. In sunlight, the 
photograph appears blue and under fluorescent lighting, the 
photograph appears green. The human eye can solve this problem. 
The camera, however, cannot solve this problem without making 
alterations. 
Under normal conditions, the white balance is adjusted automatically 
by the camera. If there are strange colours, it is recommended to alter 
the white balance manually.


Hereunder you will find relatively the number of photos you can take under certain 
camera settings: 
Resolution 

Image Quality  

Best 

Image Quality 

Better 

Image Quality 

Fine 

2720 x 2040 (5.5M) 

10 

21 

2048 x 1536 (3.0M) 

15 

20 

40 

1280 x 960 (1.3M) 

35 

44 

89 

640 x 480 (VGA) 

140 

175 

347 

Table 12: Reference table – storage on a 16MB SD card 

12.4. 

Taking close-up photograph with Macro mode (

12 

Summary of Contents for POWERCAM 922Z

Page 1: ...L I F E I S M O R E T R U S T U S T R U S T C O M 922Z POWERC M OPTICAL ZOOM U K P T User s manual...

Page 2: ...OOM U K P T Thank you for your purchase Register your product via our Internet site at www trust com register so that you will be eligible for optimal guarantee and service support You will also be au...

Page 3: ...922Z POWERC M OPTICAL ZOOM L I F E I S M O R E T R U S T U S T R U S T C O M Fig 1 Fig 2 Fig 3 Fig 4 Fig 5 Fig 6 Fig 7 Fig 8 Fig 9...

Page 4: ...special cleaning liquid for camera lenses Do not use a different type of cleaning product Camera cleaning liquid can be purchased from photography shops Do not use aggressive substances such as white...

Page 5: ...will blink when the 10 seconds timer is counting down 6 Zoom Lens Capture the object to be taken 7 Microphone Used to record the sound Table 2 Functions on the front of the camera Refer on Fig 2 Item...

Page 6: ...ion 1 Power button Turn the camera on or off 2 Shutter button Press this button to take a photograph This button is also used to start and stop recording a video clip 3 Mode dial Dial for camera opera...

Page 7: ...arts to charge the battery Note It s recommended to charge new battery for over 8 hours Note If you plug power without placing battery in the charger the LED on the charger turns green Note If you plu...

Page 8: ...6 2 Zoom in out This camera has 3x optical zoom plus 4x digital zoom The zoom bar can be found on the left side of the LCD display indicating the zoom status while the zoom in or out button is presse...

Page 9: ...amera as a camcorder or set self timer for self recording purpose Note The length of the movie is based on the capacity of your SD card and the internal memory Note You can still zoom in and out while...

Page 10: ...8 Delete photograph or video on camera 1 Make sure the mode dial is at Playback mode 2 Press the menu button 5 Fig 2 3 Shift the OK button till 4 Select either to delete Current or All recordings 9 In...

Page 11: ...tion or name may vary in the Control Panel for different operating systems 11 Downloading recordings to computer 1 Once your camera is connected to the computer 2 Your system will recognize the camera...

Page 12: ...n Off To turn the camera sound effect on or off DPOF Copy Date File no This is a standard for printing the photographs directly from the memory card Users can select 1 Copy the number of the copies of...

Page 13: ...photograph the camera will automatically check if the memory is enough If it s full a warning Memory Full icon will display on the LCD Note The icons can be invisible by pressing the menu button 5 Fi...

Page 14: ...g Refer on chapter 6 3 for options Meanwhile you can press the menu button 5 Fig 2 to enter the menu and adjust the photograph settings in the camera Depending on the environment so it ll work accordi...

Page 15: ...adjust the sensitivity of the camera to the light The higher the number is the higher the sensibility is Table 11 Capture Mode Setup Note A higher exposure value 2 0 produces a brighter photograph Tip...

Page 16: ...5 Fig 2 once and enter the menu Use the option you want and refer on the table below for the detail of the options Function Option Description Protect Picture Protect all Unprotect current Unprotect a...

Page 17: ...The external memory card must first be formatted see chapter 12 7 for optimal use Note The memory card can only be inserted into the camera in one way Do not force the card into the slot This could d...

Page 18: ...n download the latest version of the software here The Trust Photo Upload software is also included on the CD ROM supplied with the camera 13 2 3 Using the Trust Photo Upload software 1 Start Trust Ph...

Page 19: ...wnloaded from your camera 7 Shortly follow the prompts and the images will start be downloaded from your camera Note For the usage of Photo Impression please refer on the Help of the software or check...

Page 20: ...or use a different SD memory card or an MMC memory card The memory card is empty Take some photographs or record some video clips Insert the memory card in the other camera to view the recordings No...

Page 21: ...he external memory The memory card has not been inserted correctly Reinsert the memory card into the camera No photographs or video clips can be found on the external memory An external memory card ha...

Page 22: ...is normal Wait for some time and refresh the contents of the open Windows Explorer window by pressing F5 A removable disk will eventually appear in the list of folders Only then has the driver been f...

Page 23: ...ication provided with the camera to alter the size to fit the frame Video clips cannot be played in Windows Media Player The correct codec has not been installed Install the latest release of Windows...

Page 24: ...period you will receive a similar model if one is available If no similar product is available your product will be repaired Please contact our help desk for missing components such as the instruction...

Page 25: ...s Mo Fr 9 00 17 00 Deutsche Gesch ftsstelle Telefon 0800 00TRUST 0800 0087878 Fax 31 0 78 6543299 Los habitantes de Espa a pueden ponerse en contacto con lun viernes De las 9 00 a las 17 00 horas Ofic...

Reviews: