background image

19


5-3 MAINTENANCE OF BEARINGS 


5-3.1 Oil Lubricated Bearings   


WARNING 

TRUFLO®  Pumps  are  shipped  without  oil.  Oil  lubricated 
bearings must be lubricated at the job site. 


1.


Remove fill plug and add oil until level is at the center of sight glass. Replace fill plug. 

2.


Change the oil after 200 hours for new bearings, thereafter every 2000 operating hours or 3 months. (Whichever 
comes first.) 


Table 4 

Oil Volumes 

Frame 

Pints 

Milliliters 

Group 1 

1.0 pt. 

400 mL 

Group 2 

2.6 pt. 

1250 mL 

Group 3 

3.0 pt. 

1400 mL 


Note:    High quality turbine oil with rust and oxidation inhibitors should be used. For the majority of operational 
conditions, bearing temperature will run between 120

F (50

C) and 180

F (82

C). In this range, an oil of ISO viscosity 

grade 68 at 100

F (40

C) is recommended. If bearing temperatures exceed 180

F (82

C) use ISO viscosity grade 100 

with  bearing  frame  cooling  or  finned-tube  oil  cooler.  For  operating  temperatures  above  350

F  (177

C),  synthetic 

lubrication is recommended. 


Acceptable lubricants: 
 

Exxon 

Teresstic EP 68 

Shell 

Tellus Oil 68 

Philips 

Mangus Oil 315 

Chevron 

GTS Oil 68 

Mobil 

DTE 26 300 SSU @ 100

F (38

C) 

Sunoco 

Sunvis 968 

Royal Purple 

SYNFILM ISO VG 68 Synthetic Lube 


Acceptable synthetic lubricants: 


Mobil 

DTE Oil BB or SHC 630 

Shell 

Marlina 220 or Tellus 220 

Royal Purple 

Synfilm GT 220 or Synergy 220 


Summary of Contents for DAP Series

Page 1: ...I n s t a l l a t i o n O p e r a t i o n Ma i n t e n a n c e Ma n u a l AN e wV i s i o nF o r Q u a l i t yP u mp s D A P D S P S e r i...

Page 2: ...xtended by correct application proper installation periodic inspection condition monitoring and careful maintenance This instruction manual was prepared to assist operators in understanding the correc...

Page 3: ...Rotation Check 13 4 1 2 Impeller Clearance Check 13 4 1 3 Couple Pump and Driver 14 4 1 4 Lubricating Bearings 14 4 1 5 Shaft Sealing 14 4 2 Start Up 15 4 2 1 Priming the Pump 15 4 2 2 Starting the Pu...

Page 4: ...tor and Coupling Assembly 25 7 TROUBLE SHOOTING 7 1 Pump Troubleshooting Guide 26 7 2 Mechanical Seal Troubleshooting Guide 27 8 PARTS BREAKDOWN Sectional View of a Group 1 Pump 28 Sectional View of a...

Page 5: ...r can cause minor personal injury or property damage if the warning is ignored NOTE Operating procedure condition etc which is essential to observe EXAMPLES WARNING Pump shall never be operated withou...

Page 6: ...ller is 316 stainless steel CF8M unless the pump material is of higher grade alloy All impellers are dynamically balanced Back Cover Plate Standard design is cylindrical bore and oversized for increas...

Page 7: ...less Steel Nameplate 3 Direction of Rotation Sticker 4 Label stating that the pump has been shipped without oil and requires oil before start up 5 Label stating that the pump needs to be realigned rot...

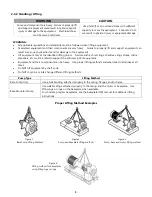
Page 8: ...as hoist rings shackles slings straps chains spreaders etc must be rated to support the entire weight of equipment Equipment and their components can be heavy Use proper lifting methods and wear stee...

Page 9: ...eves with rags to prevent grout from entering 5 Carefully lower baseplate onto foundation bolts 6 Level baseplate to within 1 8 inch 3 2mm over length of the baseplate and to within 0 088 inch 1 5mm o...

Page 10: ...dix for Alignment Procedures and Guidelines 3 5 PIPING 3 5 1 General Notes Guidelines for piping are given in the Hydraulic Institute Standards available from Hydraulic Institute 30200 Detroit Road Cl...

Page 11: ...e airtight and tested 4 A means of priming the pump must be provided such as a foot valve 5 Piping allowances must be considered to allow air in case and suction piping to vent during priming Suction...

Page 12: ...to obtain horizontal alignment angular or parallel Driver feet bolt bound Loosen pump hold down bolts and slide pump and driver until horizontal alignment is achieved Base plate not leveled properly...

Page 13: ...adation will occur TRUFLO pumps are designed such that when new the additional 0 005 inch clearance maybe set between the pump casing and impeller For pumpage temperatures above 200 F 93 C the cold am...

Page 14: ...ng rotate shaft slowly by hand Finally flush bearing housing with proper lubricating oil to ensure oil quality after cleaning See Preventive Maintenance section for lubrication recommendations WARNING...

Page 15: ...2 3 seal testing section 5 4 1 mechanical seals and section 6 2 2 seal assembly 4 2 START UP 4 2 1 Priming the Pump Never start the pump until it is properly primed Several different methods of primin...

Page 16: ...expected temperature a final coupling check can be made After the pump has been running for two hours it is recommended to perform a routine check Check pressure gauges on both the suction and discha...

Page 17: ...ling hazardous and or toxic liquids proper personal protective equipment should be worn If pump is being drained precaution must be taken to prevent physical injury Pumpage must be handled and dispose...

Page 18: ...e leakage Mechanical Seal Should be no leakage Packing Excessive leakage requires adjustment or possible packing replacement Refer to Section 5 4 2 Operating for packing gland adjustment 5 2 4 Monthly...

Page 19: ...hibitors should be used For the majority of operational conditions bearing temperature will run between 120 F 50 C and 180 F 82 C In this range an oil of ISO viscosity grade 68 at 100 F 40 C is recomm...

Page 20: ...avoided Physical injury can occur if the mechanical seal fails 5 4 2 Packed Back Cover WARNING Shut down driver power to prevent accidental start up and physical injury 1 The back cover plate is not p...

Page 21: ...ng 1 Before pulling the shafts and the bearing arrangement from the bearing housing the labyrinth bearing isolator on the inboard side must first be removed Step one is to clean the free ends of the s...

Page 22: ...mains out of limits replace it 12 Inspect labyrinth seal for cuts or cracks 13 Inspect the casing gasket for cuts flattened areas etc Standard gaskets are glass filled Teflon they may be used more tha...

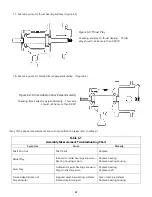
Page 23: ...5 If any of the above measurements are out of specification please refer to table 6 1 Table 6 1 Assembly Measurement Troubleshooting Chart Symptom Cause Remedy Shaft Run Out Shaft bent Replace Radial...

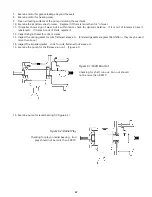
Page 24: ...lar 9 The seal assembly is now ready to be tested 6 2 3 Seal Testing There are several methods for testing the integrity of the mechanical seal Look for cracks in the seal faces nicks in the secondary...

Page 25: ...eriodic measurements until the impeller case space is the amount stated in Table 3 f Tighten the bearing case lock nuts and jack bolts until tight This step will keep the rotating assembly secured in...

Page 26: ...p Improper lubrication Check lubricant for suitability and level Lube cooling Check cooling system Improper pump driver alignment Align shafts Pump is noisy or vibrates Partly clogged impeller causing...

Page 27: ...ion Check seal flush check springs Excessive outboard temperature Inadequate buffer barrier flow Check for piping restrictions check for correct piping plan and check pump rotation vs tangential gland...

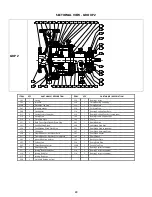
Page 28: ...ap Plug 211 8 Casing Stud Lock Washer 210 8 Casing Stud Nut 212 8 Casing Stud 105 1 Shaft Sleeve 226 1 Seal Packing Gland Flush Plug 222 1 Lifting Eye 223 1 Oil Vent Cap 204 1 Thrust Bearing Carrier 2...

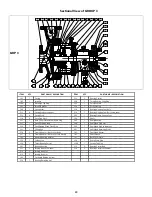
Page 29: ...ring Frame Support Foot 210 8 Case Stud Nuts 104 1 Shaft 231 2 Back Cover Plate Flush Drain Plug 203 1 Radial Bearing 227 1 Seal Packing Gland 208 1 Seal Gland Stud Nut 226 1 Seal Packing Gland Flush...

Page 30: ...1 Bearing Frame Support Foot 210 8 Case Stud Nuts 104 1 Shaft 231 2 Back Cover Plate Flush Drain Plug 203 1 Radial Bearing 227 1 Seal Packing Gland 208 1 Seal Gland Stud Nut 226 1 Seal Packing Gland F...

Page 31: ...half 2 Check setting of indicators by rotating one coupling half to ensure indicators stay in contact with the other coupling half but do not bottom out Adjust indicators accordingly Measurement 1 To...

Page 32: ...ction Top to Bottom 1 Zero the indicator at top dead center of coupling 12 O clock half 2 Rotate indicator to bottom dead center 6 O clock Observe needle and record reading 3 Negative reading One coup...

Page 33: ...iately DSP SERIES Self Priming ANSI Pump Note The only difference in the DSP and the DAP series and procedures are outlined below The DSP assembly has a different casing only the remaining parts are i...

Page 34: ...lbs of water 1 0 02832 28 32 7 481 6 229 62 44 35 31 1 1000 264 2 220 00 2205 0 03531 0 001 1 0 2642 0 2200 2 204 0 1337 0 003785 3 785 1 0 8327 8 347 0 1606 0 004545 4 548 1 201 1 10 025 0 01620 0 0...

Page 35: ...Truflo Pumps Inc 7105 Cessna Drive Greensboro NC 27409 Ph 336 664 9225 Fax 336 664 1353 www truflo com...

Reviews: