background image

Basic Operation 

3-36

OPERATION GUIDE

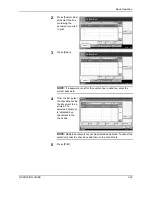
Choosing by One-Touch Key

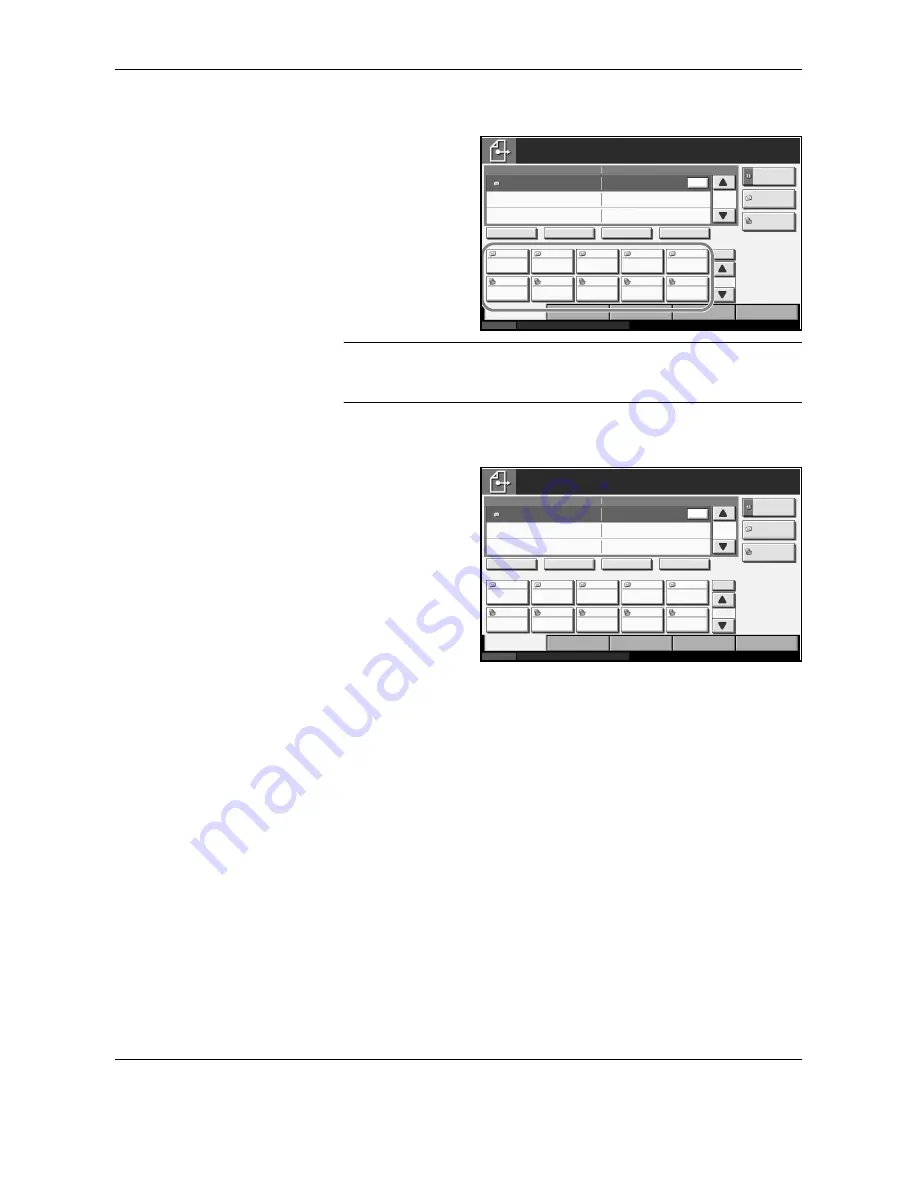
Select the 
destination using the 

one-touch

 key.

In the basic screen 
for sending, press 
the 

one-touch

 key 

where the 
destination is 
registered.

NOTE: 

If the 

one-touch

 key for desired destination is hidden on the 

touch panel, press [

T

] or [

S

] to scroll and view next or previous 

one-

touch

 key.

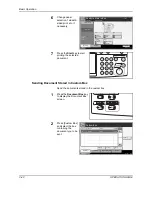
Choosing by Speed Dial

Access the 
destination by 
specifying 3-digit 

one-touch

 key 

number (speed dial). 

In the basic screen 
for sending, press 
the 

No.

 key and 

enter 3-digit 

one-

touch

 key number in 

the numeric entry 
screen.

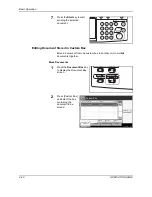
Sending to Different Types of Destinations (Multi Sending)

Multiple types of destinations, E-mail, Folder (SMB/FTP) or FAX (option), 
may be specified at one time for sending. This is called 

Multi Sending

, a 

useful feature that allows transmission to different types of destinations (E-
mail, folder, etc.) with a single operation.

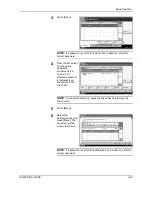
Procedures are the same as used in specifying the destinations of 
respective types. Continue to enter E-mail address or folder path so that 
they appear in the destination list. Press the 

Start

 key to launch 

transmission to all destinations at one time.

Status

10/5/2006    10:10

Place original.

Ready to send.

Destination

Type of Original/

Transmission

Quick Setup

Destination

Color/Image

Advanced

Setup

Destination

Detail

ABC

  SCANDATA

No.

  1/10

Chain

Detail/Edit

Delete

Recall

  1/1

1

To:

Address

Book

Folder Path

Entry

E-mail

Addr Entry

AAA

BBB

CCC

DDD

EEE

FFF

GGG

HHH

III

JJJ

004

003

005

001

002

006

007

008

009

010

Summary of Contents for DC 2230

Page 1: ...Instruction Handbook Basic DC 2230 2240 2250 Digital Multifunctional System ...

Page 2: ......

Page 3: ...C 2250 In this guide DC 2230 refers to the 30 ppm prints per minute model DC 2240 to the 40 ppm model and DC 2250 to the 50 ppm model NOTE This Operation Guide contains information that corresponds to using both the inch and metric versions of these machines ...

Page 4: ...er provides information on the following topics Legal Information ii Regarding Trade Names iii Energy Star ENERGY STAR Program vi Safety Conventions in This Guide vii Caution Labels viii Installation Precautions ix Precautions for Use xi Laser Safety xiv Safety Instructions Regarding the Disconnection of Power xv ...

Page 5: ...guide any copyrightable subject matter sold or provided with or in connection with the sale of the machine are protected by copyright All rights are reserved Copying or other reproduction of all or part of this guide any copyrightable subject matter without the prior written consent of copyright owner is prohibited Any copies made of all or part of this guide any copyrightable subject must contain...

Page 6: ...using embedded real time operating system Tornado by Wind River Systems Inc PCL6 a command language of HP LaserJet emulated by this machine is using the compatible system PeerelessPrintXL developed by Peerless Systems Corporation PeerelessPrintXL is a trademark of Peerless Systems Corporation 2381 Rosecrans Ave ElSegundo CA 90245 U S A TrueType is a registered trademark of Apple Computer Inc DFHSG...

Page 7: ...ers If you need to have access to the fonts on more than three printers you need to acquire a multi user license agreement which can be obtained from Monotype Imaging Monotype Imaging retains all rights title and interest to the Software and Typefaces and no rights are granted to you other than a License to use the Software on the terms expressly set forth in this Agreement 3 To protect proprietar...

Page 8: ... incidental or consequential damages or any damages caused by abuse or misapplication of the Software and Typefaces 9 Massachusetts U S A law governs this Agreement 10 You shall not sublicense sell lease or otherwise transfer the Software and or Typefaces without the prior written consent of Monotype Imaging 11 Use duplication or disclosure by the Government is subject to restrictions as set forth...

Page 9: ...ince they were last used and they must also support a Sleep Mode where power consumption is reduced to a minimum when there is not activity within a set amount of time This machine is equipped with the following features as a result of its compliance with International Energy Star Program standards This machine has a Sleep Mode only to attain further savings of energy Sleep The machine automatical...

Page 10: ... the related section includes information on actions which must be performed Specifics of the required action are indicated inside the symbol Please contact your service representative to order a replacement if the safety warnings in this Operation Guide are illegible or if the guide itself is missing fee required WARNING Indicates that serious injury or even death may result from insufficient att...

Page 11: ...gerous sparks may cause burns NOTE Do not remove these labels The area indicated in the label carries high temperature Do not touch parts in this area because there is a danger of getting burned The area indicated in the label carries high voltage Never touch parts in this area because there is a danger of electric shock The area indicated in the label carries high temperature Do not touch parts i...

Page 12: ...ems to avoid the danger of fire To keep the machine cool and facilitate changing of parts and maintenance allow access space as shown below Leave adequate space especially around the rear cover to allow air to be properly ventilated out of the machine Other precautions Adverse environment conditions may affect the safe operation and performance of the machine Install in an air conditioned room and...

Page 13: ... a power supply with a voltage other than that specified Avoid multiple connections in the same outlet These types of situations present a danger of fire or electrical shock Plug the power cord securely into the outlet If metallic objects come into contact with the prongs on the plug it may cause a fire or electric shock Always connect the machine to an outlet with a ground connection to avoid the...

Page 14: ...ts as there is a danger of fire electrical shock or exposure to the laser If the laser beam escapes there is a danger of it causing blindness If the machine becomes excessively hot smoke appears from the machine there is an odd smell or any other abnormal situation occurs there is a danger of fire or electrical shock Turn the main power switch off immediately be absolutely certain to remove the po...

Page 15: ...s This is particularly effective if accomplished prior to seasons of high humidity Consult with your service representative in regard to the cost of cleaning the internal parts of the machine Other precautions Do not place heavy objects on the machine or cause other damage to the machine During the use do not Open the front cover Turn off the main power switch Pull out the power plug When lifting ...

Page 16: ...If there is any remaining tenderness contact a physician If toner does happen to get on your skin wash with soap and water Do not attempt to force open or destroy the toner container or the waste toner box If the optional Fax kit is installed and the main power switch is off transmitting receiving Fax is disabled Do not turn off the main power switch but press the Power key on the operation panel ...

Page 17: ...r In the normal operation of the product by user no radiation can leak from the machine This machine is classified as Class 1 laser product under IEC 60825 Caution Performance of procedures other than those specified in this manual may result in hazardous radiation exposure These labels are attached to the laser scanner unit inside the machine and are not in a user access area The label shown belo...

Page 18: ...9 336 EEC 73 23 EEC 93 68 EEC and 1995 5 EC Radio Frequency Transmitter This machine contains the transmitter module We the manufacturer hereby declare that this equipment is in compliance with the essential requirements and other relevant provisions of Directive 1999 5 EC Radio Tag Technology In some countries the radio tag technology used in this equipment to identify the toner container may be ...

Page 19: ...Legal and Safety Information xvi OPERATION GUIDE ...

Page 20: ...d necessary configurations before first use Chapter 3 Basic Operation Describes the procedures for basic copying printing and scanning Chapter 4 Optional Equipment Introduces the convenient optional equipment available for this machine Chapter 5 Maintenance Describes cleaning and toner replacement Chapter 6 Troubleshooting Explains how to handle error messages paper jams and other problems Appendi...

Page 21: ...ption Convention Description Example Bold Indicates the operation panel key or a computer screen Press the Start key Regular Indicates the touch panel keys Press OK Italic Indicates the message displayed on the touch panel Ready to copy is displayed Used to emphasize a key word phrase or references to additional information For more information refer to Sleep and Auto Sleep on page 3 4 Note Indica...

Page 22: ...ation Guide the continuous operation of the keys on the touch panel is as follows Actual procedure Description in this Operation Guide Press Copy T Press Next of Quick Setup T Press T twice T Press Change of Original Image Press Copy Next of Quick Setup T twice and then Change of Original Image ...

Page 23: ...ollowing icons are used to indicate originals and paper set directions on the touch panel Set direction Indicated size The size of original paper that can be used depends on the function and source tray For further details refer to the page detailing that function or source tray Vertical direction A4 B5 A5 B6 A6 16K Letter Statement For original paper dimension A is longer than B Horizontal direct...

Page 24: ... 2 Sleep and Auto Sleep 3 4 Adjusting Operation Panel Angle 3 5 Touch Panel Display 3 6 Copying 3 7 Printing Printing from Applications 3 18 Sending 3 20 Specifying Destination 3 34 Using Document Box 3 37 Printing a Document Stored in Removable USB Memory 3 48 Canceling Viewing Changing Job 3 50 Checking Remaining Toner and Paper 3 54 Quick Setup Screen 3 55 4 Optional Equipment Overview of Optio...

Page 25: ...14 5 Maintenance Cleaning 5 2 Toner Container and Waste Toner Box Replacement 5 7 6 Troubleshooting Solving Malfunctions 6 2 Responding to Error Messages 6 4 Clearing Paper Jams 6 10 Appendix Character Entry Method Appendix 2 Specifications Appendix 6 Index ...

Page 26: ...OPERATION GUIDE 1 1 1 Part Names This chapter identifies the machine parts and operation panel keys Machine 1 2 Operation Panel 1 5 Touch Panel 1 6 ...

Page 27: ...ndicator Plates 3 Clip Holder 4 Receive Indicator Blinks while data is received 5 Error Indicator Blinks when an error occurs and the job is stopped 6 Left Cover 1 7 Left Cover 1 Lever 8 Left Cover 2 9 Platen 10 Operation Panel 11 Cassette 1 12 Cassette 2 3 9 10 1 11 12 8 6 5 4 2 7 ...

Page 28: ...PartNames OPERATION GUIDE 1 3 14 36 13 34 35 15 33 16 24 23 32 31 30 17 18 29 19 20 21 22 28 27 26 25 ...

Page 29: ...Switch 21 Paper Width Guides 22 Multi Purpose MP Tray 23 Memory Card Cover Holder 24 Handles 25 USB Memory Slot A2 26 USB Memory Slot A3 27 Memory Card Slot 28 Network Interface Connector 29 USB Interface Connector 30 Parallel Interface Connector 31 Option Interface Slot OPT1 32 Option Interface Slot OPT2 33 USB Memory Slot A1 34 Green Knob A1 35 Paper Feed Unit A2 36 Paper Feed Unit Cover A2 ...

Page 30: ...ine is accessing to hard disk fax memory Data Backup Kit Option or USB memory general purpose item 14 Error Indicator Blinks when an error occurs and the job is stopped 15 Help Key Indicator 16 Logout Key Indicator 17 Power Key 18 Main Power Indicator 19 Numeric Keys 20 Clear Key 21 Start Key Indicator 22 Stop Key 23 Reset Key 1 2 3 4 5 9 10 11 12 13 14 15 16 17 18 23 22 21 20 19 6 7 8 Status 10 5...

Page 31: ...Selection 1 sided 1 sided Text Photo Collate Duplex Original Image Collate Offset Auto Plain Status 10 5 2006 10 10 Image Quality Set Original Copy Image Org Paper Finishing Quick Setup Layout Edit Advanced Setup Original Size Copies Paper Selection Mixed Sized Originals Original Orientation Collate Offset Staple Output Tray 1 Original Zoom Paper 100 Ready to copy Status 10 5 2006 10 10 Image Qual...

Page 32: ...tice File Name Entry Priority Override Repeat Copy Multi page Form Ready to copy Status 10 5 2006 10 10 Place original Ready to send Destination Type of Original Transmission Quick Setup Destination Color Image Advanced Setup Destination Detail ABC abc defg com Address Book Folder Path Entry E mail Addr Entry No 1 10 Chain Detail Edit Delete Recall To 1 AAA BBB CCC DDD EEE FFF GGG HHH III JJJ 004 ...

Page 33: ...s 10 5 2006 10 10 Advanced Setup Ready to send Original Zoom Send Sending Image Density Original Image Scan Resolution Color Image Type of Original Transmission Quick Setup Destination Destination 1 Set Original 100 Place original Color Selection Sharpness Background Density Adj Status 10 5 2006 10 10 Advanced Setup Ready to send Original Zoom Send Sending Image Color Image Type of Original Transm...

Page 34: ...m Box Removable Memory Name Date Size Remove Memory Print Delete Detail Removable Memory 001 001 Status 10 5 2006 10 10 Edit Box Removable Memory Job Box Custom Box No Name Owner Use Detail Open FAX Box 001 3 1 User 1 FAX Box 002 3 2 User 2 User 3 FAX Box 003 3 3 User 4 FAX Box 004 3 4 001 002 003 004 100 80 60 40 User 5 FAX Box 005 3 5 005 20 User 6 FAX Box 006 3 6 006 0 FAX Box FAX Box 001 001 S...

Page 35: ... Printing Jobs Sending Jobs Storing Jobs Device Communication Paper Supplies Status 10 5 2006 10 10 Detail doc20060506144759 InProcess 000092 14 47 AAAAA 001 001 Status Status Ready Device Communication Paper Supplies 10 5 2006 10 10 Scanner Display Error Ready Printer Not connected Removable Memory OK Hard Disk Not connected Memory Card Storing Jobs Sending Jobs Printing Jobs Format Remove Format...

Page 36: ...een 2 Register Screen 3 Edit Screen Program 01 02 03 04 05 06 07 08 09 10 No Status 10 5 2006 10 10 001 005 Call Register Edit Program 01 02 03 04 05 06 07 08 09 10 Status 10 5 2006 10 10 001 005 Call Register Edit Program Status 10 5 2006 10 10 01 02 03 04 05 06 07 08 09 10 001 005 Call Register Edit ...

Page 37: ...Part Names 1 12 OPERATION GUIDE ...

Page 38: ...l as the procedures for loading papers and originals Determining Connection Method and Preparing Cables 2 3 Connecting Cables 2 5 Setting Date and Time 2 8 Configuring Network LAN Cable Connection 2 10 Installing Software 2 12 Selecting Default Screen Optional 2 13 Changing Language Optional 2 14 Loading Paper 2 15 Loading Originals 2 25 ...

Page 39: ...ng documents are contained in the attached CD ROM Product Library Refer to them as necessary Documents Extended Printer Driver User Guide Network FAX Driver Operation Guide Embedded Web Server Operation Guide Network Tool for Clients Operation Guide Network Tool for Direct Printing Operation Guide ...

Page 40: ...ASE T FAX Option Send FTP Sends the scanned image as a data file on the FTP Send E mail Sends the image data of scanned originals to the desired recipient as a file attached to an E mail message Send SMB Saves the scanned image as a data file on your PC MFP FAX Administrator s PC Embedded Web Server Network settings Scanner default settings User and destination registration Network FAX Option TWAI...

Page 41: ...lable as option Function Interface Necessary Cable Printer Scanner Network FAX Function available by using optional fax kit For details of Network FAX refer to the operation guide of the fax kit Network interface LAN 10Base T or 100Base TX Shielded Printer USB interface USB2 0 compatible cable Hi Speed USB compliant Max 5 0 m Shielded Parallel interface Parallel cable IEEE1284 Compliant Max 1 5 m ...

Page 42: ...he Power key on the operation panel Check that the Power indicator and the memory indicator are off After this turn off the main power switch 2 Connect a LAN cable to the network interface located on right side of the body 3 Connect the other end of the cable to HUB 4 Configure the network For details refer to Configuring Network LAN Cable Connection on page 2 10 Check that the indicator is off ...

Page 43: ...d first press the Power key on the operation panel Check that the Power indicator and the memory indicator are off After this turn off the main power switch 2 If connection is established using a parallel cable PC to be connected should also be powered off 3 Connect the printer cable to each interface located on right side of the body When Connecting to Parallel Interface Check that the indicator ...

Page 44: ...Connecting to USB Interface 4 Connect the other end of the cable to PC Connecting Power Cable Connect one end of the supplied power cable to the machine and the other end to power outlet IMPORTANT Only use the power cable that comes with the machine ...

Page 45: ...f the region where the machine is used NOTE Be sure to set the time difference before setting date and time 1 Turn on the main power switch 2 Press the System Menu key 3 Press T Date Timer and then Change of Time Zone 4 Select the region and press OK NOTE Press S or T to view next region 5 Press Change of Date Time Date Timer Time Zone Set time zone Please select the location nearest you Time Zone...

Page 46: ...Month M Date D Hour H Minute M and Second S 8 Press OK 9 When exiting press Close repeatedly to return to the System Menu default screen Date Timer Date Time Set the date and time On Cancel OK Status 10 5 2006 10 10 Off D M Y S M H On Summer Time Date Timer Date Time Set the date and time On Cancel OK Status 10 5 2006 10 10 Off D M Y S M H On Summer Time ...

Page 47: ...IP address is used Make sure that IP address is ready by asking your network administrator to obtain it in advance 1 Press the System Menu key 2 Press System Change of Network and then Change of TCP IP 3 Press On of TCP IP 4 Press Off of DHCP 5 Press IP Address and enter IP address using the numeric keys System TCP IP Use TCP IP On Off Cancel OK Status 10 5 2006 10 10 DHCP On Off IP Address Subnet...

Page 48: ...e main power switch off and on Setting TCP IP When Using DHCP Follow the steps below to set TCP IP when DHCP server is available 1 Press the System Menu key 2 Press System Change of Network and then Change of TCP IP 3 Press On of TCP IP and On of DHCP 4 Press OK 5 Press the Power key and after confirming that the Power key indicator and memory indicator have turned off turn the main power switch o...

Page 49: ...ter function of this machine or perform TWAIN transmission or FAX transmission from your PC NOTE Installation on Windows XP Windows NT 4 0 2000 and Server 2003 must be installed by a user logged on with administrator privileges Plug and Play is disabled on this device when in Sleep Mode Wake the device from Sleep Mode before continuing See Sleep and Auto Sleep on page 3 4 ...

Page 50: ... appearing immediately after power on Copy Default screen for copying screen to appear when the Copy key is pressed Send Default screen for sending screen to appear when the Send key is pressed Status Default screen for status job cancel screen to appear when the Status Job Cancel key is pressed Document box Default screen for document box screen to appear when the Document Box key is pressed Prog...

Page 51: ...uage you wish to use 4 The message instructing you to turn the power off and on appears press OK 5 Press the Power key on the operation panel Check that the Power key and the memory indicator are off After this turn on the main power switch again Touch panel language will be changed Common Settings Language Set the language to use for the touch panel display English Français Deutsch Italiano Neder...

Page 52: ...d feed air between the papers 4 Finally align the papers on a level flat table If the paper is curled or folded straighten it before loading Paper that is curled or folded may cause paper jam CAUTION If you copy onto used paper paper already used for copying do not use paper that is stapled or clipped together This may damage the machine or cause poor image quality NOTE If print outputs are curled...

Page 53: ... paper may be loaded in each of the standard two drawers of cassettes The following paper sizes are supported Ledger Legal Oficio II 8 5 13 5 Letter Letter R Statement R A3 B4 A4 A4 R B5 R A5 R Folio 8K 16K and 16K R 1 Pull the cassette out toward you until it stops NOTE Do not pull out more than one cassette at a time 2 Holding the paper width adjusting tab move the paper width guide to fit the p...

Page 54: ...r folded may cause paper jams Ensure that the loaded paper does not exceed the level indicated see illustration below When loading the paper keep the side toward the sealed side facing up Paper length and width guides must be adjusted to the paper size Loading the paper without adjusting these guides may cause skewed feeding and paper jams Be sure that the paper length and width guides rest secure...

Page 55: ...e loaded in the MP Tray The MP Tray accepts the paper sizes from A3 to Hagaki and from Ledger to Statement R Be sure to use the MP Tray when you print on any special paper NOTE The capacity of the MP Tray is as follows Thick paper 120 g m2 130 sheets Thick paper 160 g m2 Japanese noshi paper 100 sheets Thick paper 200 g m2 Rough paper 45 g m2 50 sheets Hagaki 80 sheets OHP film 25 sheets Envelope ...

Page 56: ...ides into the tray until it stops IMPORTANT Keep the side toward the sealed side facing up Curled paper must be uncurled before use Straighten the top edge if it is curled Loading Envelopes Up to 20 envelopes may be loaded in the MP Tray Acceptable envelope sizes are as follows Acceptable Envelope Size Monarch 3 1 8 7 1 2 Comm 10 4 1 8 9 1 2 Envelope DL 110 220 mm ...

Page 57: ...ckward In the case of the portrait form envelope open the flap Insert the envelope all the way along the width guides keeping the printing side face up and with the flap positioned opposite to the entrance Envelope C5 162 229 mm Executive 7 1 4 10 1 2 Comm 9 3 7 8 8 7 8 Comm 6 3 4 3 5 8 6 1 2 ISO B5 176 250 mm Envelope C4 229 324 mm Oufuku Hagaki 200 148 mm Youkei 2 Haguruma Envelope Swiss You 2 w...

Page 58: ...paper type you load When you use the optional side feeder cassette 3 of up to 3 000 sheets capacity select the paper type only Selection Item Selectable Size Type Paper Size Auto Paper size is automatically detected and selected Select whether the paper is in Metric size or in Inch size Standard Size 1 Select from the standard sizes Selectable paper sizes are as follows Inch size Ledger Letter R L...

Page 59: ...c or Inch as the unit To select the paper size press Standard Sizes 1 or Standard Sizes 2 and select the paper size 4 Press OK 5 Press Change in Media Type Setting and select the paper type Then press OK Paper Type Plain Rough Vellum Recycled Preprinted Bond Color Prepunched Letterhead High Quality and Custom 1 8 Selection Item Selectable Size Type Common Settings Custom 1 Set cassette paper size ...

Page 60: ...izes are as follows Inch size A3 A4 R A4 A5 R A6 R B4 R B5 R B5 B6 R and Folio 8K 16K R and 16K Metric size Ledger Letter R Letter Legal Statement R Executive 8 5 13 5 and Oficio II 8K 16K R and 16K Others Select from special standard sizes and custom sizes Selectable paper sizes are as follows ISO B5 Envelope 10 Envelope 9 Envelope 6 Envelope Monarch Envelope DL Envelope C5 Envelope C4 Hagaki Ouf...

Page 61: ...vertical sizes You may enter the size directly using the numeric keys by pressing Keys 4 Press OK 5 Press Change in Media Type Setting and select the paper type Then press OK Common Settings Multi Purpose Tray Setting Set the multi purpose tray paper size Cancel OK Status 10 5 2006 10 10 Paper is present in Document Processor A3 A4 A4 A5 A6 B4 B5 B5 B6 Standard Sizes 1 Auto Standard Sizes 2 Others...

Page 62: ... installed open the document processor Before opening the document processor be sure that there are no originals left on the original table or on the original eject table Originals left on the original table or on the original eject table may fall off when the document processor is opened Keep the document processor open if the original is 40 mm or thicker 2 Place the original Put the scanning sid...

Page 63: ... the original cover CAUTION Do not push the original cover forcefully when you close it Excessive pressure may crack the platen glass NOTE Shadows may be produced around the edges and in the middle of open faced originals CAUTION Do not leave the document processor open as there is a danger of personal injury ...

Page 64: ...riginals Originals Not Supported by the Document Processor Do not use the document processor for the following types of originals Soft originals such as vinyl sheets Transparencies such as OHP film Carbon paper Originals with very slippery surfaces Originals with adhesive tape or glue Wet originals 6 5 3 2 1 4 Weight 45 g m2 to 160 g m2 Size Maximum A3 to Minimum A5 R Maximum Ledger to Minimum Sta...

Page 65: ...inals to jam How to Load Originals CAUTION Before loading originals be sure that there are no originals left on the original eject table Originals left on the original eject table may cause the new originals to jam 1 Adjust the original width guides to fit the originals 2 Place the originals Put the side to be scanned or the first side of two sided originals face up Slide the leading edge into the...

Page 66: ...originals do not exceed the level indicated Exceeding the maximum level may cause the originals to jam see the figure below Originals with punched holes or perforated lines should be placed in such a way that the holes or perforations will be scanned last not first ...

Page 67: ...Preparation before Use 2 30 OPERATION GUIDE ...

Page 68: ...justing Operation Panel Angle 3 5 Touch Panel Display 3 6 Copying 3 7 Printing Printing from Applications 3 18 Sending 3 20 Specifying Destination 3 34 Using Document Box 3 37 Printing a Document Stored in Removable USB Memory 3 48 Canceling Viewing Changing Job 3 50 Checking Remaining Toner and Paper 3 54 Quick Setup Screen 3 55 ...

Page 69: ...one Lights out This function is ready Lighting This function is selected Copy is selected as the default so that the Copy key indicator lights on first NOTE The key which indicator is off can be used even if any other key remains blinking Power Off When turning off the main power switch press the Power key on the operation panel to off Make sure that the Power key and the memory indicator are off ...

Page 70: ... etc turn the main power switch off If it will not be used for an extended period of time vacations etc remove the power plug from the outlet for safety purposes CAUTION Do not turn the main power switch off when the optional fax kit is installed If you turn the main power switch off you cannot receive FAX automatically Make sure that the indicator is off ...

Page 71: ...ng Sleep the print job is performed while the touch panel remains unlit When using optional fax received fax data is printed out also with the operation panel remaining unlit To resume press the Power key The machine will be ready to operate within 15 seconds Auto Sleep Auto Sleep automatically switches the machine into Sleep if left idle for a preset time The default preset time is 45 minutes for...

Page 72: ...BasicOperation OPERATION GUIDE 3 5 Adjusting Operation Panel Angle Adjust the angle of the operation panel in two steps by releasing the operation panel lock lever ...

Page 73: ...nal Image Collate Offset 1 sided 1 sided Text Photo Collate 100 Normal 0 Auto Layout Edit Image Quality Org Paper Finishing Quick Setup Copies 1 100 A4 A4 Original position Size orientation of original and paper Paper source Output tray A4 A4 Status 10 5 2006 10 10 Advanced Setup Ready to copy Original Zoom Paper Copy Image Continuous Scan Job Finish Notice Mirror Image Auto Image Rotation Negativ...

Page 74: ...refer to Loading Originals on page 2 25 3 Check that Auto is selected of Paper Selection on the touch panel Paper that matches the size of the original will be selected automatically To change the paper size press Paper Selection and select desired paper source NOTE Select paper size manually if necessary instead of using automatic paper selection Status 10 5 2006 10 10 Image Quality Ready to copy...

Page 75: ...sired number up to 999 5 Press the Start key to start copy 6 Remove the finished copies from the top tray Adjusting Density Adjust the copy density Density Adjustment Option Description Manual Adjust density using the 7 or 13 levels Auto Optimum density is selected depending on density of original ...

Page 76: ...10 5 2006 10 10 Image Quality Set Original Copy Image Org Paper Finishing Quick Setup Layout Edit Advanced Setup Density Copies Original Image EcoPrint 1 Original Zoom Paper 100 Ready to copy Status 10 5 2006 10 10 Ready to copy Press OK to display 3 Auto Cancel OK Add Shortcut 2 1 0 1 2 3 2 5 1 5 0 5 0 5 1 5 2 5 Density Lighter Normal Darker Copies 1 the image Image Quality Option Description Tex...

Page 77: ...r size Status 10 5 2006 10 10 Image Quality Set Original Copy Image Org Paper Finishing Quick Setup Layout Edit Advanced Setup Density Copies Original Image EcoPrint 1 Original Zoom Paper 100 Ready to copy Status 10 5 2006 10 10 Ready to copy Press OK to display Copies Cancel OK Original Image Select original document type for best copy results Text Photo Text and photos together Text Only text no...

Page 78: ...alCopy Inch Models 100 Auto 400 Max 200 STMT Ledger 154 STMT Legal 129 Letter Ledger 121 Legal Ledger 78 Legal Letter 77 Ledger Legal 64 Ledger Letter 50 Ledger STMT 25 Min Metric Models 100 Auto 400 Max 200 A5 A3 141 A4 A3 A5 A4 127 Folio A3 106 11 15 A3 90 Folio A4 75 11 15 A4 70 A3 A4 A4 A5 50 25 Min Metric Models Asia Pacific 100 Auto 400 Max 200 A5 A3 141 A4 A3 B5 B4 122 A4 B4 A5 B5 115 B4 A3...

Page 79: ...ayed magnifications of X horizontal and Y vertical You can also enter the magnification directly using the numeric keys by pressing keys Press Original Orientation to select orientation of the originals either Top Edge Top or Top Edge Left Then press OK 3 Press OK Y X Status 10 5 2006 10 10 Image Quality Set Original Copy Image Org Paper Finishing Quick Setup Layout Edit Advanced Setup Copies 1 Or...

Page 80: ...es are not rotated B Original Left Right to Binding Top Images on the second sides are rotated 180 Copies can be bound on the top edge facing the same orientation when turning the pages Two sided to One sided Copies each side of a two sided original onto two individual sheets Optional document processor is required The following binding options are available Binding Left Right Images on the second...

Page 81: ...py of a 2 sided or open book original The following binding options are available Binding Left Originals with facing pages are copied from left to right Binding Right Originals with facing pages are copied from right to left NOTE The following sizes of original and paper are supported in Two sided to One sided and Book to One sided Original Ledger Letter R A3 B4 A4 R B5 R A5 R and 8K Paper Letter ...

Page 82: ...pies of Finished 5 Press Original Orientation to select orientation of the originals either Top Edge Top or Top Edge Left Then press OK 3 4 3 4 3 4 2 1 2 1 4 3 1 2 1 2 1 0 2 3 2 1 3 0 Original Copy Status 10 5 2006 10 10 Image Quality Set Original Copy Image Org Paper Finishing Quick Setup Layout Edit Advanced Setup Copies 1 Original Zoom Paper 100 Zoom Combine Margin Centering Border Erase Bookle...

Page 83: ...ng each set or page by 90º NOTE To use offset function load the same sized paper with different orientation in the paper source other than the selected paper source The paper sizes supported in Offset are A4 B5 Letter and 16K 1 Press Org Paper Finishing and then Collate Offset 3 2 1 3 2 1 3 2 1 3 2 1 Original Copy 3 2 1 3 2 1 3 2 1 3 2 1 Original Copy Status 06 06 2006 Image Quality Press OK to di...

Page 84: ...ing press Off or Each set of Offset Press OK 3 Use the numeric keys to enter the copy quantity 4 Place the originals and press the Start key Status 10 5 2006 10 10 Ready to copy Copies Cancel OK Collate Offset Press OK to display Add Shortcut Same Width Off Each set Off On Collate Offset 1 the image ...

Page 85: ...operties The Properties dialog box appears 6 Select Basic tab and click Page Size to select the paper size To print on the special paper such as thick paper or transparency click Media Type menu and select the paper type 7 Click Source and select the paper source NOTE If you choose Auto Select papers are supplied automatically from the paper source loaded with the papers of optimum size and type T...

Page 86: ...BasicOperation OPERATION GUIDE 3 19 10 Click OK button to start printing ...

Page 87: ...t data stored in custom box to PC page 3 28 NOTE Originals in color can be scanned by adding more memory in the machine Consult with your service Different sending options can be specified in combination Refer to Sending to Different Types of Destinations Multi Sending on page 3 36 Send as E mail Sends a scanned original image as an attached file of E mail NOTE To enable sending as E mail network ...

Page 88: ... the steps 4 and 5 to specify the destination Up to 100 E mail addresses can be specified NOTE When Add to Addr Book is displayed the destinations are registered in the address book 7 Press OK The destinations are registered in the destination list 8 Check the destination list Select a destination and press Detail Edit to check and edit it Refer to the steps 4 and 5 to edit the destination as nece...

Page 89: ...ified shared folder of any PC 1 Place the originals on the platen or in the optional document processor NOTE For loading instructions refer to Loading Originals on page 2 25 Status 10 5 2006 10 10 Place original Ready to send Destination Type of Original Transmission Quick Setup Destination Color Image Advanced Setup Destination Detail ABC abc defg com Address Book Folder Path Entry E mail Addr En...

Page 90: ... and press OK Data to be entered are as follows Status 10 5 2006 10 10 Place original Ready to send Destination Cancel OK Next Dest Add to Addr Book 1 Connection Test Host Name Path Login User Name Login Password SMB FTP Folder Path Entry Status 10 5 2006 10 10 Use the keyboard to enter Backspace Upper case Lower case No Symbol Space Cancel OK Host Name Input characters Limit characters 0 126 Item...

Page 91: ...entry is registered in the address book 8 Press OK to register the entry in the destination list 9 Check the destination list Select a destination and press Detail Edit to check and edit it Edit it if necessary referring to the steps 5 to 7 Login User Name User name to access the folder Up to 62 characters Login Password Password to access the folder Up to 62 characters Specify the port number dif...

Page 92: ...er 1 Place the originals on the platen or in the optional document processor NOTE For loading instructions refer to Loading Originals on page 2 25 2 Press the Send key to display the Send screen Status 10 5 2006 10 10 Place original Ready to send Destination Type of Original Transmission Quick Setup Destination Color Image Advanced Setup Destination Detail ABC User ScanData Address Book Folder Pat...

Page 93: ...st Host Name Path Login User Name Login Password SMB FTP Folder Path Entry Executing TX job 1 Status 10 5 2006 10 10 Use the keyboard to enter Backspace Upper case Lower case No Symbol Space Cancel OK Host Name Input characters Limit characters 0 62 Item Data to be entered Max characters Host name Specify the port number different from the default 21 using the format of Host Name Port No Host name...

Page 94: ...destination list Select a destination and press Detail Edit to check and edit it Edit it if necessary referring to the steps 4 to 6 Select a destination and press Delete to remove the destination from the list 10 Change the original size scan resolution etc if necessary Status 10 5 2006 10 10 Place original Ready to send Destination Cancel OK Next Dest Add to Addr Book Executing TX job 1 Connectio...

Page 95: ...t data must already be stored in the Custom Box For detail see Using Document Box on page 3 37 Adding the machine to PC Add this machine to PC to select the machine s Custom Box 1 Select Start button of the Windows display All Programs TWAIN Driver Setting and then TWAIN Driver Setting NOTE You can also add the machine to PC when selecting Start of the Windows display Control Panel and then TWAIN ...

Page 96: ...hine name in Scanner Name field 4 Select the machine from Model field 5 Enter the machine address in Scanner Address field NOTE When the machine address is unknown contact Administrator 6 Select Inch or Metric 7 Click User Authentication Settings button ...

Page 97: ...ne name and model name are displayed in Scanner List field NOTE Click Delete button to delete the added machine Click Edit button to change names Scanning document data Scan the document data stored in the Custom Box of the machine 1 Activate the TWAIN compatible application 2 Select the machine using the application and display the TWAIN dialog box NOTE For selecting the machine see the Operation...

Page 98: ...Box appears in Document List field 4 Set how to display the document data Click Setting button to select each item 5 Click OK button Item Description View Change the display in Document List field to List or Thumbnails Delete After scanning the document data delete the data from Custom Box Invert Invert the document data color to start scanning ...

Page 99: ...ERATION GUIDE 6 Select the document data to be scanned from Document List filed Enter the document data name in Search field to find the data having the same document data name or the same head part of the document data name ...

Page 100: ...Click Detail button to display the selected document data When the document data includes multiple pages select the checkbox beside the pate you want to scan The selected pages is scanned 8 Click Acquire button The document data is scanned ...

Page 101: ... Press OK to register the selected destination in the destination list NOTE To delete the destination in the list select the destination and press Delete Status 10 5 2006 10 10 Place original Ready to send Destination Type of Original Transmission Quick Setup Destination Color Image Advanced Setup Destination Detail ABC SCANDATA No 1 10 Chain Detail Edit Delete Recall 1 1 Executing TX job 1 To Add...

Page 102: ...equired initial letter Keys used Search type Subjects searched 1 Search by name Search by registered name 2 Search by address number Search by registered address number 3 Advanced search by destination type Advanced search by type of registered destination E mail Folder SMB FTP FAX or Group FAX Only when optional fax kit is installed 4 Advanced search by initial letter Advanced search by initial l...

Page 103: ...of destinations E mail folder etc with a single operation Procedures are the same as used in specifying the destinations of respective types Continue to enter E mail address or folder path so that they appear in the destination list Press the Start key to launch transmission to all destinations at one time Status 10 5 2006 10 10 Place original Ready to send Destination Type of Original Transmissio...

Page 104: ...isplay the Document Box screen 3 Press Custom Box and select the box in which the file to be stored NOTE The custom box storing a file needs to be created in advance Status 10 5 2006 10 10 Ready to store in Box Storing Image Functions Quick Setup Zoom File Name Original Orientation Border Erase Original Size Original Image Mixed Sized Originals Centering File Name Entry Density 2 sided Book Origin...

Page 105: ...ed in the custom box 1 Press the Document Box key to display the Document Box screen Status 10 5 2006 10 10 Custom Box Removable Memory Job Box Custom Box FAX Box Edit Box 001 001 No Box Name Owner Use Store File Detail Open Box 001 User 1 001 20 Status 10 5 2006 10 10 Ready to store in Box Storing Image Functions Quick Setup Zoom File Name Original Orientation Border Erase Original Size Original ...

Page 106: ...be selected and printed To cancel the selection press the check box and remove the check mark 5 Press Print Status 10 5 2006 10 10 Custom Box Removable Memory Job Box Custom Box FAX Box Edit Box 001 001 No Box Name Owner Use Store File Detail Open Box 001 User 1 001 20 Status 10 5 2006 10 10 Custom Box Removable Memory Job Box Custom Box FAX Box Edit Box 001 001 No Box Name Owner Use Store File De...

Page 107: ...en 2 Press Custom Box and select the box containing the document you to be sent Status 10 5 2006 10 10 Ready to store in Box Set Original Original Zoom Paper Copies Printing Image Functions Quick Setup Cancel Collate Auto Off Paper Selection Collate Offset Staple Punch 1 sided 1 sided Off Duplex Delete after Printed 1 File Name Program Detail Status 10 5 2006 10 10 Custom Box Removable Memory Job ...

Page 108: ...destinations Status 10 5 2006 10 10 Custom Box Removable Memory Job Box Custom Box FAX Box Edit Box 001 001 No Box Name Owner Use Store File Detail Open Box 001 User 1 001 20 Status 10 5 2006 10 10 Box No Detail 001 001 Name Date Size Join Move Delete Print Send Store File Close 0001 Document1 2006 05 05 11 11 MB 21 Status 10 5 2006 10 10 Enter Destination Ready to send from Box Destination Functi...

Page 109: ...m box to another or join multiple documents together Move Documents 1 Press the Document Box key to display the Document Box screen 2 Press Custom Box and select the box containing the document to be moved Status 10 5 2006 10 10 Custom Box Removable Memory Job Box Custom Box FAX Box Edit Box 001 001 No Box Name Owner Use Store File Detail Open Box 001 User 1 001 20 ...

Page 110: ...be moved to the box NOTE If a password is set for the destination box in advance enter the correct password Status 10 5 2006 10 10 Custom Box Removable Memory Job Box Custom Box FAX Box Edit Box 001 001 No Box Name Owner Use Store File Detail Open Box 001 User 1 001 20 Status 10 5 2006 10 10 Program Detail Detail 001 001 Name Date Size Join Move Delete Print Send Store File Close 0001 Document 1 2...

Page 111: ...2 Press Custom Box and select the box containing the documents to be joined 3 Press Open NOTE If a password is set for the custom box in advance enter the correct password Status 10 5 2006 10 10 Custom Box Removable Memory Job Box Custom Box FAX Box Edit Box 001 001 No Box Name Owner Use Store File Detail Open Box 001 User 1 001 20 Status 10 5 2006 10 10 Custom Box Removable Memory Job Box Custom ...

Page 112: ...up or down according to the order to be joined 7 Press Next 8 Press File Name 9 Enter a new file name for the documents joined and press OK NOTE Refer to the Appendix for entering characters Status 10 5 2006 10 10 Program Detail Detail 001 001 Name Date Size Join Move Delete Print Send Store File Close 0001 Document 1 2006 05 05 11 11 MB 1 0002 Document 2 2006 05 05 11 12 MB 1 Status 10 5 2006 10 ...

Page 113: ...ent Box screen 2 Press Job Box Status 10 5 2006 10 10 Program Detail Detail 001 001 Name Date Size Join Move Delete Print Send Store File Close 0001 Document 1 2006 05 05 11 11 MB 1 0002 Document 2 2006 05 05 11 12 MB 1 Type of box contained Documents stored Private Print Stored Job Print jobs stored by using Private Print or Stored Job functions Quick Copy Proof and Hold Print jobs stored by usin...

Page 114: ... is set for the custom box in advance enter the correct password Status 10 5 2006 10 10 Open Removable Memory Job Box Custom Box Private Print Stored Job Quick Copy Proof and Hold Repeat Copy Form for Form Overlay Copy Box Name 1 0 0 2 Files Job Box Quick Copy Proof and Hold Status 10 5 2006 10 10 Close Detail Name Date Size Print Delete Private Print Stored Job Job Box Document 1 pdf 2006 05 05 1...

Page 115: ... the USB memory Multiple documents cannot be selected and printed Use the USB memory properly formatted by this machine Plug a USB memory directly into the USB memory slot We do not warrant that USB memory printing is error free if a USB hub is used Printing Print documents stored in the removable USB memory 1 Press the Document Box key to display the Document Box screen 2 Plug a USB memory into t...

Page 116: ... displayed Status 10 5 2006 10 10 Removable Memory Detail Delete Memory Detail 001 999 Name Date Size Remove Memory Print Custom Box Job Box Removable Memory FAX Box Document 1 2006 05 09 10 00 MB 1 Document 2 2006 05 09 10 10 MB 1 Document 3 2006 05 10 09 50 MB 1 Document 4 2006 05 10 10 00 MB 1 Document 5 2006 05 10 10 05 MB 1 Removable Memory Document 001 Cancel Start Print Copy s 1 999 Status ...

Page 117: ...can be cancelled in each screen are as follows Printing Jobs 7 jobs of Copy Printer Box FAX E mail reception Removal Memory and Report Sending Jobs 5 jobs of E mail Folder TWAIN FAX Multiple combination of multi sending methods Storing Jobs 3 jobs of Scan Printer and Fax 3 Select the job you wish to cancel and press Cancel Canceling will appear of Status and the job will be canceled NOTE The cance...

Page 118: ...tination 5 Press Close to end viewing Viewing Job Log View the jobs that have been finished or canceled 1 Press the Status Job Cancel key to display the Status Job Cancel screen 2 Press any of Printing Jobs Sending Jobs or Storing Jobs Then press Log Status Status Log Type All Job No Accepted Time Type 438 Job Name User Name Status 14 44 doc20060225144435 Waiting 001 001 Pause All Print Jobs Cance...

Page 119: ...ty Override the new urgent job will be executed after completion of the current job 1 Press the Status Job Cancel key to display the Status Job Cancel screen Status Log Type All Job No Date Type doc20060225142427 User Name Result OK 000080 02 25 14 24 Status Job Name 001 001 Printing Jobs Sending Jobs Storing Jobs Device Communication Paper Supplies Status Executing TX job 10 5 2006 10 10 Detail d...

Page 120: ...priority print job 3 The suspended print job will resume after completion of the Priority Override Status Status Log Type All Job No Accepted Time Type 438 Job Name User Name Status 14 44 doc20060225144435 Waiting 001 001 Pause All Print Jobs Cancel Priority Override Detail Printing Jobs Sending Jobs Storing Jobs Device Communication Paper Supplies Status 10 5 2006 10 10 ...

Page 121: ... also be checked 1 Press the Status Job Cancel key to display Status Job Cancel screen 2 Press Paper Supplies 3 Check the remaining toner of Toner Information and the remaining paper of each paper source of Paper NOTE Remaining toner level is indicated by any of the 11 levels between 100 and 0 The smaller the number the fewer the remaining toner Paper remaining in the MP Tray is indicated either b...

Page 122: ...ent for better efficiency Functions Available for Registration in Quick Setup Screen Default registrations and the functions available for registration are as follows Function Default Registration Functions Available for Registration Copying 1 Zoom 2 Density 3 Staple Punch 4 Duplex 5 Original Image 6 Collate Offset Paper Selection Zoom Staple Punch Density Duplex Combine Collate Offset Original Im...

Page 123: ...smitted Printing From Box 1 Paper Selection 2 Delete After Printed 3 Staple Punch 4 Duplex 5 Collate Offset Paper Selection Staple Punch Delete After Printed Collate Offset Duplex Function Default Registration Functions Available for Registration Status 10 5 2006 10 10 Original Zoom Paper 100 Image Quality Ready to copy Set Original Copies Copy Image Org Paper Finishing Quick Setup Layout Edit Adv...

Page 124: ...he key to set replacement location 4 Press OK The Original Image Quality function will be newly registered Status 10 5 2006 10 10 Copy Paper Selection Key 1 Cancel OK Off Key 2 Key 3 Register Paper Selection function on the Quick Setup screen Key 4 Key 5 Key 6 ...

Page 125: ...Basic Operation 3 58 OPERATION GUIDE ...

Page 126: ...ional Equipment 4 2 Document Processor 4 4 Paper Feeder 4 4 3000 Sheet Paper Feeder 4 5 Built in Finisher 4 5 Document Finisher 4 9 3000 Sheet Document Finisher 4 9 Job Separator 4 10 Document Table 4 10 Key Counter 4 11 Fax Kit 4 12 Data Backup Kit 4 12 Security Kit USB Key 4 13 Serial Interface 4 13 PDF Upgrade Kit USB Key 4 14 ...

Page 127: ... Optional Equipment The following optional equipment is available for the machine Document Processor Paper Feeder Job Separator 3000 Sheet Document Finisher Folding Unit Built in Finisher Document Table 3000 Sheet Paper Feeder Document Finisher Mailbox ...

Page 128: ...OptionalEquipment OPERATION GUIDE 4 3 Data Backup Kit Key Counter Fax Kit PDF Upgrade Kit Security Kit Serial Interface ...

Page 129: ...peration refer to Loading Originals in the Document Processor on page 2 27 Paper Feeder Add an additional 2 paper cassettes like Cassette 2 of the machine Paper capacity and loading method are the same as Cassettes 1 and 2 Refer to Loading Paper in the Cassettes on page 2 16 NOTE Left cover 3 is located on the left side of the paper feeder for use in clearing paper jams ...

Page 130: ...tter or B5 paper can be added NOTE Left cover 3 is located on the left side of the 3000 sheet paper feeder for use in clearing paper jams Built in Finisher The built in finisher holds a large quantity of finished prints The finisher offers a convenient means of sorting Sorted finished prints may also be stapled 1 Finisher tray 2 Finisher process tray 1 2 ...

Page 131: ... tray serves as an output tray of sorted prints Use the auxiliary tray to sort Ledger Legal 8 5 13 5 Oficio II Letter Letter R A3 B4 A4 A4 R B5 Folio 8K or 16K prints Adding Staples 1 Pull to open the stapler front cover 2 Pull out the staple holder ...

Page 132: ...d a new staple case in your right hand insert the staple case into the staple holder in the direction of an arrow 5 Insert the staple case fully to the end Pull to remove the paper tape wound on the staple case 6 Insert the staple holder into the slot of the staple unit again When fully inserted the staple holder locks with a clicking sound ...

Page 133: ...e of the staple holder lift the face plate 3 Clear the staple jammed in the cartridge end staple loaded side 4 Lower the face plate of the staple holder 5 Insert the face plate back in place When fully inserted the face plate locks with a clicking sound 6 After lifting the staple unit slightly lower it and insert it again into its place 7 Close the stapler front cover A ...

Page 134: ...etails refer to the document finisher Operation Guide 3000 Sheet Document Finisher The document finisher holds a large quantity of finished copies The finisher offers a convenient means of sorting It can also staple finished sets and punch holes if equipped with the appropriate optional accessories For further details refer to the 3000 sheet document finisher Operation Guide Other options include ...

Page 135: ... sorting Specify an output tray for copy or print jobs Or specify the default output tray for printing from the copy or document box screen printing from the PC and printing of the received fax data Document Table Place original or other documents when using the machine It has a drawer to accommodate clips ...

Page 136: ...or centralized management of copy volume for different departments in a large company Inserting the Key Counter Insert the key counter securely into the key counter slot NOTE When the key counter function is activated copies can only be made when a key counter is inserted If the key counter is not inserted Insert key counter will be displayed ...

Page 137: ...which will enable quicker message transmission to a number of recipients If one of the lines is dedicated to receiving the time of busy line can be reduced For further details refer to the operation guide of the fax kit Data Backup Kit A microchip card for storing fax reception data and job accounting data Installation and removal of the card is performed by our service representative Refer to the...

Page 138: ... the data remains on the hard disk until it is overwritten by other data Thus the data could conceivably be retrieved by accessing the hard disk using specialized tools For greater security the security kit prevents this by overwriting all unnecessary data in the storage area of the hard disk so that it cannot be retrieved Serial Interface Install for connecting to printers with serial port interf...

Page 139: ... 14 OPERATION GUIDE PDF Upgrade Kit USB Key When saving scanned originals as PDF files enables the creation of high compression PDF files and PDF encryption Use PDF file encryption to customize password based rights access ...

Page 140: ...OPERATION GUIDE 5 1 5 Maintenance This chapter describes cleaning and toner replacement Cleaning 5 2 Toner Container and Waste Toner Box Replacement 5 7 ...

Page 141: ...sor Glass Surface Wipe the backside of the platen cover the inside of the document processor and the glass surface with a soft cloth dampened with alcohol or mild detergent IMPORTANT Do not use thinner or other organic solvents Platen Cover Document Processor 1 Open the top cover of the document processor and hold the green knob to lift the reverse unit 2 Clean the white roller at the inside of th...

Page 142: ...ner or organic solvents 1 Remove the cloth from the cleaning cloth compartment 2 Open the document processor and wipe the slit glass a 3 Press End Status 10 5 2006 10 10 Hold 1 Open the document processor Clean the slit glass 03 14 End 2 Clean the surface of the slit glass located on the left side with the supplied dry cloth 3 Close the document processor and open the document processor cover 4 Li...

Page 143: ...at least monthly to ensure optimum output quality 1 Open the front cover 2 Remove cleaning brush blue colored 3 Pull up left cover 1 lever and open left cover 1 4 As shown in the figure clean dirt from the separator by moving the brush from side to side along the separator ...

Page 144: ...5 Put away the cleaning brush press the specified position of the front cover and left cover 1 to close Transfer Roller 1 Open the front cover 2 Remove the cleaning brush blue colored 3 Pull up left cover 1 lever and open left cover 1 ...

Page 145: ...dirt from the transfer roller by moving the brush from side to side along the roller while rotating the roller by turning the gear at the left end of the roller 5 Put away the cleaning brush press the specified position of the front cover and left cover 1 to close ...

Page 146: ...below Dirty parts may deteriorate output quality CAUTION Do not attempt to incinerate the toner container or the waste toner box Dangerous sparks may cause burns CAUTION Do not attempt to force open or destroy the toner container or the waste toner box 1 Open the front cover 2 Push up the toner container stopper and slowly pull out the used toner container until its handle is visible WARNING High ...

Page 147: ...ld the toner container handle and take out slowly 4 Unwrap a new toner container and tap its top 5 6 times 5 Shake the toner container at least 10 times horizontally to distribute the toner evenly 6 Insert the toner container slowly while holding its handle ...

Page 148: ...move the waste toner box 9 Seal the opening of the waste toner box CAUTION Do not attempt to incinerate the toner container or the waste toner box Dangerous sparks may cause burns CAUTION Do not attempt to force open or destroy the toner container or the waste toner box 10 Install a new waste toner box ...

Page 149: ...ft cover 1 13 As shown in the figure clean dirt from the separator by moving the brush from side to side along the separator 14 As shown in the figure clean dirt from the transfer roller by moving the brush from side to side along the roller while rotating the roller by turning the gear at the left end of the roller ...

Page 150: ...e cleaning Close the front cover and left cover 1 by pressing specified part 16 Open the MP Tray and remove the filters F1 and F2 17 Clean the filters using a vacuum cleaner or the like CAUTION Do not wash the filters with water Do not use the attached cleaning brush F1 F2 ...

Page 151: ... in place and close the MP Tray NOTE Return the exhausted toner container and waste toner box to your dealer or service representative The collected toner container and waste toner box will be recycled or disposed in accordance with the relevant regulations ...

Page 152: ...OPERATION GUIDE 6 1 6 Troubleshooting This chapter explains how to solve problems with the machine Solving Malfunctions 6 2 Responding to Error Messages 6 4 Clearing Paper Jams 6 10 ...

Page 153: ...hem with the original size indicator plates 2 25 When placing originals in the optional document processor place them face up 2 27 Printouts are too light Is the machine in Auto Density mode Set the correct density level for auto density Is the machine in Manual Density mode Use Image Quality to set the correct density level 3 8 When changing the default density level adjust the density manually a...

Page 154: ...ype Is it in good condition Remove the paper turn it over and reload it 2 16 Is the paper curled folded or wrinkled Replace the paper with new paper 2 16 Are there any loose scraps or jammed paper in the machine Remove any jammed paper 6 10 Printouts from the document processor have black lines Are the slit glasses dirty Clean the slit glasses 5 3 Printouts are wrinkled Is the paper separator of t...

Page 155: ...panel 2 18 Add staples Has any of the built in finisher center binding finisher document finisher or 3 000 sheet capacity document finisher run out of staples If the staples are depleted the machine will stop and the location of staple depletion will be indicated on the touch panel Leave the machine on and follow the instruction to replace the staple case Press Continue to print without using Stap...

Page 156: ... type that cannot be punched Select the available paper size type Press Continue to print without using Punch Cannot staple this paper type Did you select a paper size type that cannot be stapled Select the available paper size type Press Continue to print without using Staple Check the cover Is there any cover which is open Close the cover indicated on the touch panel Check the document processor...

Page 157: ...aper Is the acceptable storage capacity exceeded for the folding tray of the 3 000 sheet capacity document finisher Remove paper from the folding tray Hard Disk error This job is canceled Press End Incorrect Account ID The Account ID does not match Check the registered Account ID Incorrect Login User Name or Password Enter correct login user name or password Job Accounting restriction exceeded Is ...

Page 158: ... panel Leave the machine on and follow the instruction to remove the jammed paper 6 10 Print overrun Warning Low printer memory The job was paused Press Continue to resume the job Removable memory error This job is canceled Press End Removable memory was removed Press End Replace all originals and press Continue Remove originals from the document processor put them in the original order and place ...

Page 159: ...city document finisher For details refer to the Operation Guide of the 3 000 sheet capacity document finisher Set the punch waste box The punch waste box of the document finisher or 3 000 sheet capacity document finisher is not set correctly Follow the instruction on the touch panel to set the punch waste box correctly Set the waste toner box The waste toner box is not set correctly Set it correct...

Page 160: ...aper Remove paper from the top tray and press Continue to resume the job Tray is full of paper Is the acceptable storage capacity exceeded for any of the trays A to C of the 3 000 sheet capacity document finisher Remove paper from the tray indicated on the touch panel If the tray B or C is full of paper press Continue to resume printing Warning low memory Further scanning cannot be performed by in...

Page 161: ...001 ABCDEF 1 Open left cover 1 of the machine Paper jam and remove any paper that is inside 2 Open cassette 1 3 Remove the paper 4 Reset the cassette and close the cover 02 08 1 1 1 1 1 G E E F F A B C C D D H 1 1 1 1 1 1 Status 10 5 2006 10 10 Hold JAM Job No Job Name User Name JOB001 0001 ABCDEF 1 Open left cover 1 of the machine Paper jam 2 Remove the paper 3 Hold the handle to lift the duplex ...

Page 162: ...n the optional document finisher or 3 000 sheet capacity document finisher The page which jam has occurred will be printed again WARNING High voltage is present in the charger section Take sufficient care when working in this area as there is a danger of electrical shock CAUTION The fixing unit is extremely hot Take sufficient care when working in this area as there is a danger of getting burned C...

Page 163: ...E 2 Remove the jammed paper 3 Pull out cassette 1 4 Remove the jammed paper If the paper tears remove every loose scrap from inside the machine 5 Push cassette 1 back in place securely 6 Press the specified position to close left cover 1 ...

Page 164: ...w the steps below to clear paper jams in cassette 2 1 Open left cover 2 2 Remove the jammed paper 3 Pull out cassette 2 4 Remove the jammed paper If the paper tears remove every loose scrap from inside the machine 5 Push cassette 2 back in place securely ...

Page 165: ... 4 Follow the steps below to clear paper jams in cassettes 3 or 4 when using the optional paper feeder or 3 000 sheet capacity paper feeder 1 Open left cover 3 2 Remove the jammed paper If the paper tears remove every loose scrap from inside the machine 3 Pull out the cassette in use ...

Page 166: ...Follow the steps below to clear paper jams in the MP Tray 1 Remove all papers from the MP Tray 2 If a paper is jammed inside lift the lever to remove the paper Inside the Left Covers 1 2 and 3 Follow the steps below to clear paper jams inside left cover 1 2 or 3 when using the optional paper feeder or 3 000 sheet capacity paper feeder ...

Page 167: ...mmed inside 2 Remove the jammed paper If the paper tears remove every loose scrap from inside the machine 3 Close the left cover Duplex Unit Follow the steps below to clear paper jams in the duplex unit 1 Pull up left cover 1 lever and open the left cover 2 Remove the jammed paper ...

Page 168: ...it and remove the jammed paper 4 Press the specified position to close left cover 1 Duplex Unit and Cassette 1 Follow the steps below to clear paper jams in duplex unit and cassette 1 1 Pull up left cover 1 handle and open left cover 2 Remove the jammed paper ...

Page 169: ...sette 1 and remove the jammed paper If the paper tears remove every loose scrap from inside the machine 5 Push cassette 1 back in place securely 6 Press the specified position to close left cover 1 Paper Feed Unit Follow the steps below to clear paper jams in the paper feed unit 1 Open left cover 1 ...

Page 170: ... 6 19 2 Remove the jammed paper If the paper tears remove every loose scrap from inside the machine 3 Open front cover 4 Turn green knob A1 clockwise 5 Remove the jammed paper If you cannot remove the paper proceed with the next step ...

Page 171: ...t cover A3 and remove the jammed paper 8 If the paper is torn pull paper feed unit A2 all the way out and lift it slightly to remove the paper 9 Remove the jammed paper If you cannot remove the paper proceed with the next step 10 Push paper feed unit A2 back in place and close front cover ...

Page 172: ... Optional Document Processor Follow the steps below to clear paper jams in the optional document processor 1 Remove the original from the original tray 2 Open the document processor top cover 3 Remove the jammed original If the original tears remove every loose scrap from inside the machine ...

Page 173: ...ve the jammed original If the original tears remove every loose scrap from inside the machine 6 Replace reverse unit and close the document processor top cover 7 Reload the originals on the document processor tray Optional Document Finisher If a misfeed occurs in the optional document finisher or 3 000 sheet capacity document finisher refer to the respective Operation Guides to clear the jam ...

Page 174: ...OPERATION GUIDE Appendix 1 Appendix Character Entry Method Appendix 2 Specifications Appendix 6 ...

Page 175: ...try Screens Lower case Letter Entry Screen No Display Key Description 1 Display Displays entered characters 2 Limit Display Displays maximum number of characters 3 Cursor Key Press to move the cursor on the display 4 Back space Press to delete a character next to the left of the cursor 5 Keyboard Press the character to enter 6 Upper case Press to use upper case letters 7 Lower case Press to use lo...

Page 176: ...play Key Description Use the keyboard to enter Backspace Upper case Lower case No Symbol Space Cancel OK Path Input characters Limit characters 0 126 No Display Key Description 12 S T To enter the number or symbol not shown in the keyboard press the cursor key and scroll the screen to view other numbers or symbols to enter Use the keyboard to enter Backspace Upper case Lower case No Symbol Space C...

Page 177: ...4 Press i s t and Space 5 Press Upper case 6 Press A 7 Press No Symbol 8 Press S or T repeatedly to view the keyboard containing and 1 Use the keyboard to enter Backspace Upper case Lower case No Symbol Space Cancel OK L Path Input characters Limit characters 1 126 Use the keyboard to enter Backspace Upper case Lower case No Symbol Space Cancel OK List Path Input characters Limit characters 4 126 ...

Page 178: ...N GUIDE Appendix 5 9 Press and 1 10 Check that the entry is correct Press OK Use the keyboard to enter Backspace Upper case Lower case No Symbol Space Cancel OK List A 1 1 4 Path Input characters Limit characters 8 126 ...

Page 179: ...Comm 6 3 4 Monarch Youkei 2 Youkei 4 Folio 8K 16K 16K R Duplexing A3 to A5 R Ledger to Statement R Non Copying Margin 0 5 to 5 5 mm maximum Paper Supply Capacity Cassettes 1 and 2 500 sheets 80 g m2 MP Tray 200 sheets 80 g m2 Output Tray Capacity 250 sheets 80 g m2 150 sheets 80 g m2 with built in finisher Warm up Time 30 sec Time for recovery from Sleep 15 sec at room temperature 22ºC 71 6ºF 60 R...

Page 180: ...s min A5 R 16 sheets min A6 R 18 sheets min 50 ppm model A3 Ledger 26 sheets min B4 Legal 26 sheets min A4 Letter 50 sheets min A4 R Letter R 31 sheets min B5 50 sheets min B5 R 24 sheets min A5 R 18 sheets min A6 R 18 sheets min First Copy Time 30 ppm model 3 9 sec or less 1 1 A4 Letter Platen 40 50 ppm model 3 5 sec or less 1 1 A4 Letter Platen Resolution Scanning 600 600 dpi Printing 600 600 dp...

Page 181: ...erface Connector 1 USB Hi Speed Serial interface optional 1 RS 232C Controller Software PDL PRESCRIBE Emulation PCL6 5e XL KPDL3 PostScript3 compatible KC GL Line Printer IBM Proprinter X24E DIABLO 630 EPSON LQ 850 Fonts Outline font 80 fonts PCL6 136 fonts KPDL3 Bitmap font 1 font 79 fonts are processed by outline font Connectivity Plug Play SNMP printer MIB supported Others EcoPrint ON OFF print...

Page 182: ...inary dot 2 gradations Color RGB 256 values dot Zoom Level Same as Copier Zoom Level Scanning Capacity Max 999 sheets 998 sheets for 2 sided originals File Format Monochrome TIFF MMR PDF MMR Gray TIFF JPEDG PDF JPEG Color JPEG PDF high compression Scanning Speed 1 sided B W 50 sheets min Color 25 sheets min 2 sided B W 25 sheets min Color 12 5 sheets min A4 landscape 600 dpi Image quality Text Pho...

Page 183: ...ply Method Friction retard method No sheets 3000 80 g m2 Paper Size Letter A4 B5 Supported Paper Paper weight 60 105 g m2 Paper types standard recycled color Dimensions W D H 23 5 16 23 5 8 12 3 8 585 600 314 mm Weight Approx 50 6 lbs Approx 23 kg Number of Trays 1 tray Paper Size Non stapling Ledger Legal Oficio II 8 5 13 5 A3 B4 Folio 8K 500sheets Letter Letter R A4 A4 R B5 16K 1000 sheets Suppo...

Page 184: ...ts Supported Paper Weight Stapling 90 g m2 or less Punching option 45 200 g m2 Maximum Sheets for Stapling Ledger Legal Oficio II 8 5 13 5 A3 B4 Folio 8K 30 sheets Letter Letter R A4 A4 R B5 16K 50 sheets Paper weight 90 g m2 or less Dimensions W D H 26 15 16 22 3 16 42 13 16 684 563 1087 mm Weight Approx 105 6 lbs or less Approx 48 kg or less Number of Trays 1 tray Maximum Sheets 100 sheets 80 g ...

Page 185: ...ing Supported Paper Letter Letter R A4 A4 R B5 500 sheets 60 to 80 g m2 Weight 19 8 lbs or less Approx 9 kg or less Maximum Sheets for Stapling Ledger Legal A3 B4 Folio 20 sheets Letter Letter R A4 A4 R B5 30 sheets Paper weight 80 g m2 or less Dimensions W D H 12 3 16 16 1 8 6 5 16 310 410 160 mm Time to Sleep mode default setting 45 minutes 30 and 40 ppm models 90 minutes 50 ppm model Duplexing ...

Page 186: ...ng Paper Jams 6 10 Configuring Network LAN Cable Connection 2 10 Connecting Cables 2 5 Conventions in This Guide xviii Copying 3 7 D Data Backup Kit 4 12 Description of Operation Procedure xix Determining Connection Method and Preparing Cables 2 3 Document Finisher 4 9 Document Processor 4 4 Document Table 4 10 E Energy Star ENERGY STAR Program vi F Fax Kit 4 12 I Included Guides xviii Installatio...

Page 187: ... 3 48 Q Quick Setup Screen 3 55 R Regarding Trade Names iii Responding to Error Messages 6 4 S Safety Conventions in This Guide vii Safety Instructions Regarding the Disconnection of Power xv Security Kit USB Key 4 13 Selecting Default Screen Optional 2 13 Sending 3 20 Serial Interface 4 13 Setting Date and Time 2 8 Sleep and Auto Sleep 3 4 Solving Malfunctions 6 2 Specifications Appendix 6 Specif...

Page 188: ...E1U ...

Page 189: ...UTAX GmbH Ohechaussee 235 22848 Norderstedt Germany ...

Reviews: