A
Q U A S E N S A T I O N
A S 2 0 0 0 T / A S 2 0 0 0
7
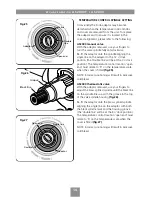
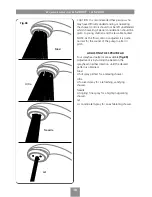
Fig.6
REMOVING THE COVER
To remove the cover, first pull off the temperature
control only
(fig.6)
–
not the flow control.
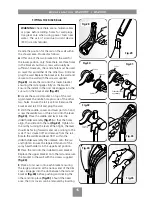
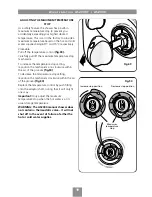
This will reveal the maximum temperature stop
(fig.7)
. This should be left in position.
NOTE: If adjustment of the maximum temperature
stop is required, refer to section
’Adjusting the
maximum temperature stop’
.
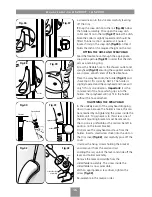
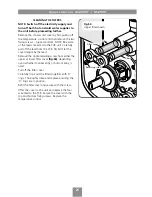
Remove the two cover fixing screws – top and
bottom
(fig.8)
.
Carefully lift the cover away from the backplate.
Lay aside the cover and screws until the unit is
fully installed.
NOTE: When removing the cover for future
maintenance purposes etc., be aware of the lead
connected to the PCB unit. Carefully pull off the
lead from the PCB. Do not let the cover dangle by
the lead.
PLUMBING CONNECTIONS
Plumbing to precede wiring
NOTE: The outlet of the shower must not be
connected to anything other than the hose and
sprayhead supplied.
DO NOT use jointing compounds on any pipe
fittings for the installation.
When connecting pipework avoid using tight 90°
elbows. Swept or formed bends will ensure
optimum performance.
Isolate the mains water supply to the cold water
cistern. Drain the hot and cold pipes by opening
all taps.
The hot water supply can be taken from the hot
supply pipe from the cylinder, ensuring that it is
the first draw-off below the ventilation pipe tee in
order to minimise the effects of water draw-off
elsewhere in the house
(see fig.2)
.
NOTE: There must not be any other draw-offs
between the take-off point and the shower.
A dedicated cold water supply must be taken
directly from the cold water cistern to the shower.
This draw-off must be positioned 25mm below
the cold feed connection to the hot water cylinder
on the opposite side of the cistern to the float
operated valve
(see fig.2)
. This minimises air
ingress into the pipework.
Maximum
temperature
stop
Fig.7
Fig.8
Summary of Contents for Aquasensation AS2000
Page 28: ...UKAS QUALITY MANAGEMENT 003 ...


