background image

2

1

3

4

2

5

6

7

8

9

303468_Manual.indd   2

27/02/2019   15:31

Summary of Contents for 303468

Page 1: ...tructions Bedienings en veiligheidsvoorschriften Instructions d utilisation et consignes de sécurité Sicherheits und Bedienungsanleitung Istruzioni per l uso e la sicurezza Instrucciones de uso y de seguridad Instrukcja obsługi i bezpieczeństwa 303468_Manual indd 1 27 02 2019 15 31 ...

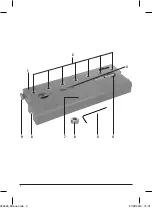
Page 2: ...2 1 3 4 2 5 6 7 8 9 303468_Manual indd 2 27 02 2019 15 31 ...

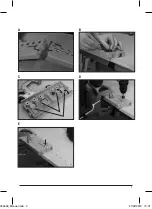
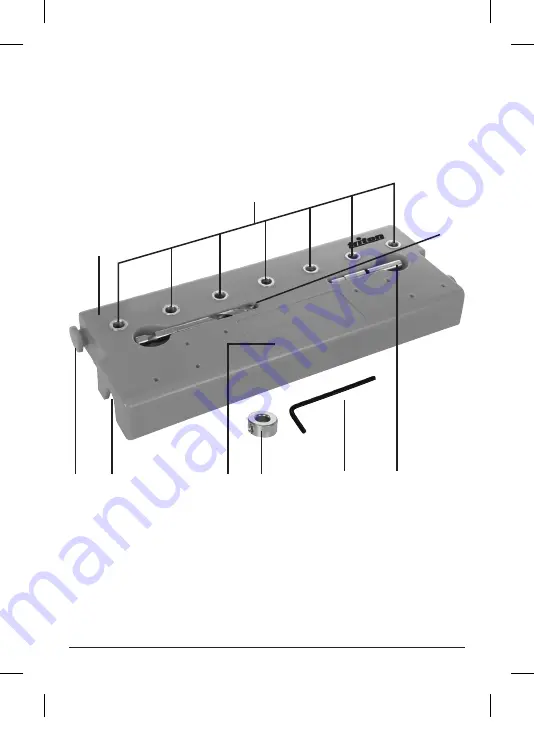
Page 3: ...3 D B E C A 303468_Manual indd 3 27 02 2019 15 31 ...

Page 4: ...es on the underside of the Jig 1 Image C to set the required distance from the edge of the workpiece Note There are 2 sets of guides to allow for 2 different distance settings 5 Locate the guides against the edge of the workpiece Image D and position the Jig 6 Clamp the Jig in place using the Clamping Area 7 Image D 7 Connect a drill not supplied to the Drill Bit 8 Place the Drill Bit into one of ...

Page 5: ... plaats te vergrendelen Afbeelding B 4 Gebruik de uittrekbare geleidingen aan de onderzijde van de mal 1 Afbeelding C om de vereiste afstand in te stellen ten opzichte van de rand van het werkstuk Opmerking Er zijn 2 sets met geleidingen waarmee 2 verschillende afstanden kunnen ingesteld worden 5 Plaats de geleidingen tegen de rand van het werkstuk Afbeelding D en positioneer de mal 6 Klem de mal ...

Page 6: ...guettes situées sur le dessous du gabarit 1 Image C afin de configurer la distance requise à partir du bord de la pièce de travail Remarque le gabarit est équipé de 2 lots de languettes pour accommoder 2 réglages de distance différents 5 Positionnez les languettes contre le bord de la pièce de travail Image D puis positionnez le gabarit 6 Verrouillez le gabarit en place à l aide d une pince de ser...

Page 7: ... entfernen Sie Harz mit einem geeigneten Lösungsmittel Kontakt Informationen zu Reparatur und Kundendiensten erhalten Sie unter der Rufnummer 44 1935 382222 Webseite tritontools com de DE Support Postanschrift Powerbox Boundary Way Lufton Trading Estate Yeovil Somerset BA22 8HZ Großbritannien Einführung Vielen Dank dass Sie sich für dieses Triton Werkzeug entschieden haben Diese Anleitung enthält ...

Page 8: ...lare di profondità in posizione Immagine B 4 Utilizzare le guide estraibili sul lato inferiore della dima 1 Immagine C per impostare la distanza richiesta dal bordo del pezzo Nota ci sono 2 set di guide per consentire 2 diverse impostazioni di distanza 5 Posizionare le guide contro il bordo del pezzo Immagine D e posizionare la dima 6 Bloccare la dima in posizione utilizzando l area di morsa 7 Imm...

Page 9: ...la profundidad requerida Imagen B 4 Utilice las guías situadas en la parte inferior de la guía 1 Imagen C para ajustar la distancia requerida desde el borde de la pieza de trabajo Nota Existen 2 tipos de guías diferentes para 2 ajustes de distancia diferentes 5 Coloque las guías inferiores contra el borde de la pieza de trabajo Imagen D y ajuste la posición de la guía 6 Utilice la superficie de su...

Page 10: ...a kołnierzu głębokościowym za pomocą klucza sześciokątnego 5 celem unieruchomienia kołnierza w położeniu zdjęcie B 4 Za pomocą prowadnic wysuwanych spod spodu przyrządu 1 zdjęcie C ustawić wybraną odległość od krawędzi detalu Uwaga Dostępne są 2 zestawy prowadnic pozwalające na konfigurację 2 różnych ustawień odległości 5 Umieścić prowadnice przy krawędzi detalu zdjęcie D i ustawić przyrząd 6 Zaci...

Page 11: ...11 303468_Manual indd 11 27 02 2019 15 31 ...

Page 12: ...303468_Manual indd 12 27 02 2019 15 31 ...

Reviews: