Tuning Your Engine for Best Performance
The engine’s performance depends on the fuel mixture. Turn
the mixture needles clockwise to lean the fuel mixture and
counterclockwise to richen it. Leaning the fuel mixture will increase
engine power up to the engine’s mechanical limits.
Never run the
engine too lean (not enough fuel flow). leaning the engine beyond
the safe allowable limits will result in poor performance and engine
damage.
Indications of an overly lean mixture include:
• Cutting out or sudden loss of power during acceleration.
• Overheating (temperature beyond 300° at the glow plug).
• Little or no blue smoke coming from the exhaust.
If any of these conditions are present, stop immediately and richen the
high-speed mixture 1/4 turn. The engine will probably be slightly rich
at that setting and you can then retune for performance. Always tune
for performance by starting rich and moving toward the ideal setting.
Never try to tune from the lean side. There should always be a light
stream of blue smoke coming from the exhaust.
Before you begin tuning, the engine should be warmed up to its normal
operating temperature and running slightly rich. All final tuning adjustments
must be made to the engine at its normal operating temperature. You can
tell the engine is running rich by noting any of the following:
• Sluggish acceleration with blue smoke coming from the exhaust.
• There is unburned fuel spraying from the exhaust tip.
• Leaning the high-speed fuel mixture increases performance.
High-Speed Fuel Mixture adjustment
With the engine warm and running at a rich setting, gradually lean the
high-speed fuel mixture in 1/16 turn increments. Make several high-
speed passes with the Nitro Stampede after each adjustment to clear
out the engine and note any change in performance. Continue this
procedure until one of the following conditions exists
:
1.
There is no longer any performance improvement
2.
The engine begins to cut out at high-speed
3.
There is a sudden loss of power during acceleration
4.
The engine begins to overheat (see Tuning the Engine by
Temperature for symptoms of overheating).
If any one of the above conditions occurs, the fuel mixture is already
past the maximum safe lean setting. Richen the fuel mixture to the
optimum setting by richening the high-speed needle at least 1/8
turn counterclockwise and retest. This setting will extend engine
component life.
low-Speed Fuel Mixture adjustment
The low-speed mixture is always set after the high-speed needle is
correctly adjusted. The low-speed mixture will be set using the pinch test.
1.
Once the engine is warm, do several high-speed runs to confirm that
the high-speed needle is set correctly.
2.
Bring the vehicle in and pinch closed the fuel line going into the
carburetor. The engine should run for 2-3 seconds, speed up, and
then die.
3.
It is very important to make several high-speed runs with the Nitro
Stampede between adjustments to clear out any excess fuel. Perform
the pinch test immediately after. If the engine is allowed to idle for
a long period of time, it could “load up” with fuel and give you an
inaccurate measurement from your pinch test.
4.
If the engine runs longer than 3 seconds, then lean the low-speed
needle 1/16 turn, make several more high-speed runs, and retest.
5.
If the engine dies immediately without speeding up, then richen the
low-speed needle 1/8 turn, make several more high-speed runs,
and retest.
6.
If the engine dies when you try to accelerate abruptly, then the low-
speed needle is probably set too lean. Richen the low-speed needle
1/8 turn, make several more high-speed runs, and retest.
7.
When the low-speed needle is set correctly, the engine’s throttle
response should be very quick.
Idle Speed adjustment
Once the high and low-speed mixtures have been set, reduce the
idle speed to the minimum reliable idle speed. Remember, this
adjustment should be made while the engine is running at normal
operating temperature.
1.
Turn the throttle trim on the transmitter so that the brakes are
applied. This ensures that the throttle barrel is resting against the idle
adjustment screw.
2.
If necessary, remove the air filter to gain access to the idle
adjustment screw.
3.
Turn the screw clockwise to reduce the idle speed, or
counterclockwise to increase it. The idle speed should be
set as low as possible while still maintaining reliable running
characteristics.
4.
Reset the throttle trim on the transmitter.
Fine-Tuning the Carburetor
After fine-tuning your engine at the end of the break-in procedure, no
major adjustments to the fuel mixture are usually necessary. Make note
of the temperature, humidity, and barometric pressure at the time you
finished fine tuning your carburetor. Current weather conditions can
be found online from national websites, local TV news websites, and
television. This information will be considered your baseline setting.
You may need to adjust your carburetor needles to compensate for
changes in temperature and barometric pressure (air density) from
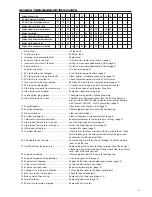
day to day. Generally, you’ll need to richen the fuel mixture when the
weather is colder than your baseline temperature and the air density
is higher. Lean the fuel mixture when weather is warmer than your
baseline temperature and the air density is lower. The chart below
provides general guidelines on how weather conditions affect air
density when they move higher or lower than your baseline setting.
Tuning the Engine by Temperature
The following procedures require an optional
infrared temperature probe or on-board
temperature gauge (Traxxas on-board digital
temperature gauge, part #4091). Engine
temperature can be used as an effective
tuning aid when you understand the relationship between engine
temperature and ambient temperature. The engine operating
temperature, when tuned for maximum performance, will vary
according to atmospheric conditions, engine load, gauge accuracy,
and many other factors. The atmospheric condition that has the most
influence on engine temperature is air temperature. Expect the engine
temperature to vary almost in direct proportion to air temperature.
Assuming you tuned the engine for the same maximum performance
each day, the engine will run about twenty degrees hotter when it’s
ninety degrees outside than it would in seventy-degree weather. For
this reason, we cannot give you a definitive temperature range that
indicates the best possible engine tuning.
There is NO optimal temperature that can be used as a target to
deliver the best engine tuning. Do not rely on a temp gauge alone to
tune your engine. Tune the engine by paying very close attention to
how it responds to changes in fuel mixture (more smoke/less smoke,
fast/sluggish, reliable/stalling, smooth sound/ muffled sound, etc).
Once the engine is tuned, then observe the temperature.
The temperature gauge can aid you in tuning by giving you a relative
indication of how your adjustments are affecting the engine and to
help prevent you from reaching excessive engine temperatures. For
example, as you lean the fuel mixture, the engine performance will
increase along with the temperature. If you continue to lean the fuel
mixture and the temperature increases but the engine performance
does not change, then you have exceeded the maximum safe lean
setting. Make note of the engine temperature. Generally, try to keep
your engine from exceeding 270° F when measured at the glow plug.
If necessary, increase airflow to the engine by cutting out the
windshield. In some situations, the engine may perform very well
with no stalling, lagging, or hesitation at temperatures above 270° F,
particularly in very hot climates.
7
the overall mixture should be...
Slightly richer
Slightly leaner
leaner
Richer
Richer
leaner
Richer
leaner
Richer
leaner
then the air density is...
Slightly more dense
Slightly less dense
less dense
More dense
More dense
less dense
More dense
less dense
is..
lower
Higher
lower
Higher
lower
Higher
lower
Higher
lower
Higher
If the...
Humidity
Pressure
(barometer)
Temperature
altitude
Nitro %
Part #4091

