10
bad or broken.
However, glow plug performance can deteriorate
significantly before the element actually burns in two.
The only
sure way to test for a faulty glow plug is to replace it with a new
one to see if the problem goes away.
You can view the glow
plug element by removing it and touching it against the engine
head while pressing the EZ-Start button. The glow plug will not
light unless it is grounded against the engine. Glow plugs can be
damaged by particles in the combustion chamber or by running
the fuel mixture excessively lean.
Traxxas makes three glow plugs. The standard hot plug (part
#3230) is the stock replacement plug for TRX
®
Pro.15 engines.
The optional heavy-duty (part #3231) and super-duty (part #3232)
plugs will last longer in most cases, however, it is a medium
temperature plug so performance may be reduced slightly. Do not
use plugs with idle bars!
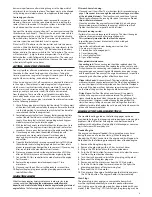
Carburetor
Dirt is the main enemy to your carburetor. If you notice a sudden
change in the fuel mixture (lean) and performance of your model,
you may have dirt lodged in the carburetor. To dislodge a dirt
particle in your carburetor try screwing the high-speed needle all
the way in and then back out to its original settings. If the engine
doesn’t return to normal operation, then try backing the mixture
screw out and priming the engine to force fuel through the
carburetor. Return the mixture screw back to its original settings.
The engine will be flooded at this point so follow the directions for
relieving a flooded engine. If this fails, then the carburetor will need
to be removed and cleaned with denatured alcohol. Do not blow on
carburetor passages or fuel lines with your mouth. Fuel and solvents
are extremely poisonous. To prevent this from occurring again,
insert a fuel filter in the line between the tank and the carburetor.
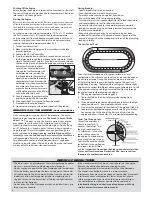
Piston stuck at “top dead center” (TDC)
“Top dead center” is the position where the piston is at the very
top of the tapered sleeve. Occasionally an engine can get “stuck”
at this position. This is most likely to happen on new engines
during break-in, but can also happen at other times. If the engine
is stuck at TDC, use the following procedure to release the piston
from the sleeve:
1.
Remove the glow plug using an 8mm (5/16”) nut driver and
verify that the piston is at the top of its stroke.
2.
Use a flat blade screwdriver to rotate the flywheel. Place the
blade of the driver into one of the grooves of the flywheel
and push down, turning the flywheel counterclockwise when
viewed from the front. The flywheel should turn, freeing the
piston from the sleeve.
3.
Put two or three drops of light machine oil into the glow plug
hole to lubricate the piston and sleeve. Do not use too much
oil. It will hydro-lock the engine. Verify the starter will spin the
engine with the glow plug out.
4.
Rotate the flywheel so the piston is at bottom dead center and
replace the glow plug with gasket. Reconnect the blue glow
plug wire.
5.
You should now be able to start the engine with the EZ-Start.
LIMITED WARRANTY INFORMATION
Electronic Components
Traxxas electronic components are warranted to be free from defects in
materials and workmanship for a period of thirty (30) days from the date of
purchase. Electronic components consist of the radio system (transmitter,
receiver, servos, switches, AC chargers, adapters, and receiver battery holders),
and any other Traxxas electronic component. See the additional limitations
that apply.
Chassis and Engine
The chassis consists of all remaining parts of the model that are not considered
electronic or part of the engine. This includes recoil starters, the EZ-Start®
system and controller, starter components, and the glow plug.
The Nitro Stampede is considered to be a race oriented, hobby-class model.
We have made every effort in component design, material selection, and
assembly to make our products as durable as possible. Because our products
are high-performance hobby-class models that operate at a much higher level
of performance than a “toy,” require periodic maintenance, and are intended
to be used in high performance applications over an extremely wide range of
running conditions and situations, no warranties are expressed or implied that
cover damage caused by normal use or wear, or cover or imply how long any
chassis or engine part will last before requiring replacement due to wear. Parts
will wear from use and occasionally require replacement. Engines and chassis
are only covered against manufacturer’s defects in materials, workmanship or
assembly when they are new (before being used).
If any component is found to be defective, incorrectly made, or incorrectly
assembled within the warranty coverage time period (where applicable), it will
be repaired or replaced at Traxxas’ sole discretion. This will be done within a
reasonable time period and free of charge. If you believe a defect in materials,
workmanship, or assembly was not apparent when the product was new and
only became evident after the product was used, then please call us at 1-888-
TRAXXAS. We stand behind our products and reputation and pledge to do our
best to make sure you are satisfied with your Traxxas product.
limitations
Any and all warranty coverage does not cover replacement of parts and
components damaged by abuse, neglect, improper or unreasonable use,
crash damage, water or excessive moisture, chemical damage, improper or
infrequent maintenance, accident, unauthorized alteration or modification,
use of improper fuels, or items that are considered consumable. Traxxas will
not pay for the cost of shipping or transportation of a defective component
from you to us.
Your Hobby Dealer’s Role
All warranty claims are handled directly by Traxxas. Your dealer can assist
you in contacting Traxxas and determining which components might be
defective, but he is under no obligation to provide free replacement parts
or service. Traxxas does not authorize dealers to make over-the-counter
exchanges or refunds for Traxxas products that have been used. Traxxas will
make the sole and final determination if a product or component can be
covered under warranty.
limitations of liability
Traxxas makes no other warranties expressed or implied. Traxxas shall not be
liable for any special, indirect, incidental, or consequential damages arising
out of the assembly, installation, or use of their products or any accessory or
chemical required to use their products. By the act of operating/using the
product, the user accepts all resulting liability. In no case shall Traxxas’ liability
exceed the actual purchase price paid for the product. Traxxas reserves the
right to modify warranty provisions without notice. All warranty claims will
be handled directly by Traxxas. The Traxxas warranty gives the customer
specific legal rights and possibly other rights that vary from state to state. The
customer is required to fill out and return the Registration Card enclosed with
the product as a condition of the coverage and performance of the warranty.
All dollar amounts stated are in United States dollars. The term “lifetime”
shall refer to the product’s production life at Traxxas. Traxxas is not obligated
to provide upgraded products at a reduced rate when a previous product’s
production cycle has ended.
To Obtain Warranty Service:
Call us first! Before you begin the process of obtaining warranty or repair
service, please call us at 1-888-TRAXXAS and speak with one of our friendly
and knowledgeable support technicians. Often a product might appear
defective, or to malfunction, only because it is being used improperly or
requires a simple adjustment. One phone call to our experienced support
staff just might get you back running quickly and easily!
When you return a product to Traxxas, please provide the following:
• Proof of purchase indicating the date purchased
• Any applicable forms
• Return address
• Daytime and evening phone numbers
• E-mail address
• Brief description of the problem and mail or ship to:
TRaXXaS
1100 Klein Road
Plano, Texas 75074
For technical assistance regarding your model, call 1-888-TRaXXaS
(872-9927), 972-265-8000 (outside of the U.S.), or e-mail Traxxas at
[email protected].
For orders and other information, call 972-265-8000.

