background image

11

Follow these steps to turn on the system for the 
first time.

a.

Ensure the antenna has a clear, unobstructed 

view of the sky.

b.

Apply power to the TV and receiver.

c.

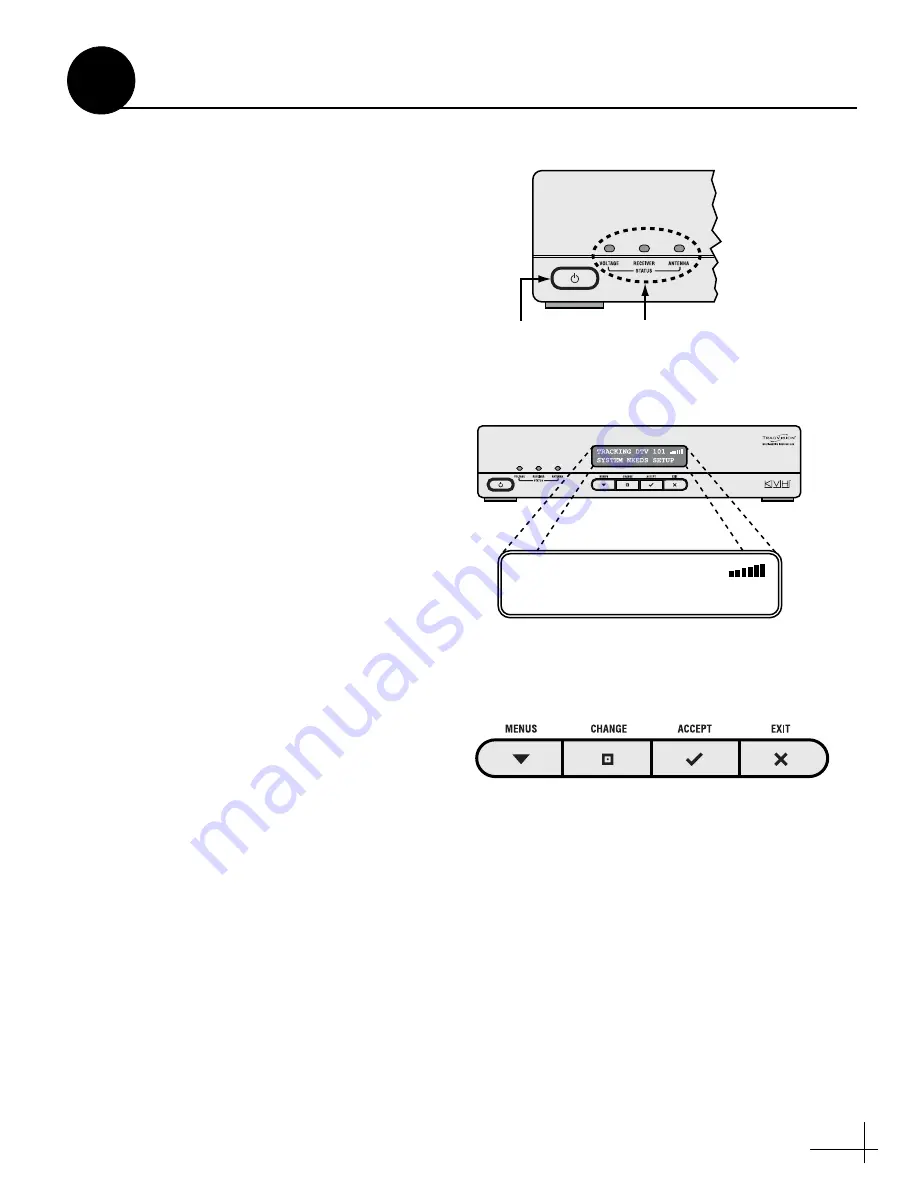
Press the power switch on the front of the 

interface box to apply power to the 

TracVision system (see Figure 17).

d.

Wait while the antenna searches the sky for 

the satellite. Within a few minutes, all three 

status lights on the front of the interface box 

should be lit green (see Figure 17).

NOTE: 

If all three status lights are not lit green, refer 

to the User’s Guide for troubleshooting information.

e.

Verify that the “System Needs Setup” screen 

is displayed on the interface box (see 

Figure 18).

f.

Using the buttons on the interface box front 

panel (see Figure 19), follow the steps in the 

next section to set up the TracVision system 

for the customer’s service provider:

Option 1

 - DIRECTV 

(see page 

12

)

Option 2

 - DISH Network 

(see page 

13

)

Option 3

 - ExpressVu 

(see page 

14

)

NOTE: 

If you do not see an operating mode on the 

following pages that tracks your desired set of 
satellites, you can select up to five satellites in Manual 
mode instead. Refer to the User’s Guide for details.

Figure 17:  Interface Box Power Switch and Status Lights

Status Lights

Power Switch

Figure 18:  “System Needs Setup” Screen

TRACKING DTV 101

SYSTEM NEEDS SETUP 

Figure 19:  Interface Box Buttons

Turn On the System

9

Summary of Contents for R6DX

Page 1: ...TracVision R6 DX Installation Guide...

Page 2: ...find a technician near you please visit www kvh com wheretogetservice If you purchased the product and decide to install it yourself please see the enclosed warranty statement for warranty implicatio...

Page 3: ...0 connector installation tool KVH part 19 0242 Eight 1 4 fasteners see Mount the Interface Box on page 10 Satellite TV receiver s for your desired service see Figure 2 for a list of validated receiver...

Page 4: ...able that does not exceed 80 feet in length Once you ve chosen a location for the antenna identify a safe location nearby for the 5 8 cable access hole in the roof Make sure you will not drill into an...

Page 5: ...4 20 screws on the bottom of the antenna at the locations shown in Figure 6 Save these shipping restraints for future use Figure 5 Carrying the Antenna to the Roof Figure 6 Shipping Restraint Locatio...

Page 6: ...cable connector faces the rear of the vehicle see Figure 8 c Attach the three antenna mounting plates to the roof using 15 fasteners appropriate for the roof s construction see Figure 9 d Seal all fas...

Page 7: ...roof access hole and into the vehicle Later you will connect this end of the cable to the interface box e Leave an adequate service loop approximately 8 of slack in the antenna cable for easy servicea...

Page 8: ...tacker models are available from KVH The destacker converts the stacked signal from the interface box into an unstacked signal which receivers are configured to decode of Additional Receivers Destacke...

Page 9: ...ct the positive red wire to clean 12 VDC vehicle power NOTE If vehicle power fluctuates or is noisy KVH recommends that you use an AC DC power supply KVH part 72 0206 01 to provide stable power to the...

Page 10: ...the vent slots see Figure 16 b Secure the brackets to the mounting surface using appropriate 1 4 fasteners not supplied NOTE Be sure to leave enough slack in the connecting cables service loop for ea...

Page 11: ...y that the System Needs Setup screen is displayed on the interface box see Figure 18 f Using the buttons on the interface box front panel see Figure 19 follow the steps in the next section to set up t...

Page 12: ...n This mode is only provided for compatibility with older DIRECTV HDTV configurations that included an HDTV converter instead of a Tri Sat AutoSwitch Dual Sat Select this mode for DIRECTV service if y...

Page 13: ...Select this mode if you wish to receive programming from the 119 and 110 satellites for DISH 500 service d Follow the instructions in Step 11 on page 15 to set up your receiver s Mode Satellites Trac...

Page 14: ...nd 82 satellites Single Sat Select this mode if you wish to receive ExpressVu programming from just the 91 satellite d Follow the instructions in Step 11 on page 15 to set up your receiver s Mode Sate...

Page 15: ...essages on the TV they do not correctly indicate when the antenna is ready for the next Check Switch test g After waiting 15 minutes repeat Steps d f to run a second Check Switch test h Refer to the t...

Page 16: ...has a clear unobstructed view of the sky h Repeat the Check Switch steps on page 15 Additional Receiver s 1 Check Switch Test If you connected multiple receivers to the system follow these steps to ru...

Page 17: ...AUTO The DewShield electronic dew elimination system prevents dew from forming on the antenna moisture weakens satellite signals Clean the antenna regularly Dirt buildup on the radome can affect sate...

Page 18: ...008 KVH Industries Inc KVH TracVision and TracPhone are registered trademarks of KVH Industries Inc KVH Industries Inc 50 Enterprise Center Middletown RI 02842 5279 U S A Phone 1 401 847 3327 Fax 1 40...

Reviews: