background image

114

Chapter 8

NVR Management

8. 3  Reset the NVR

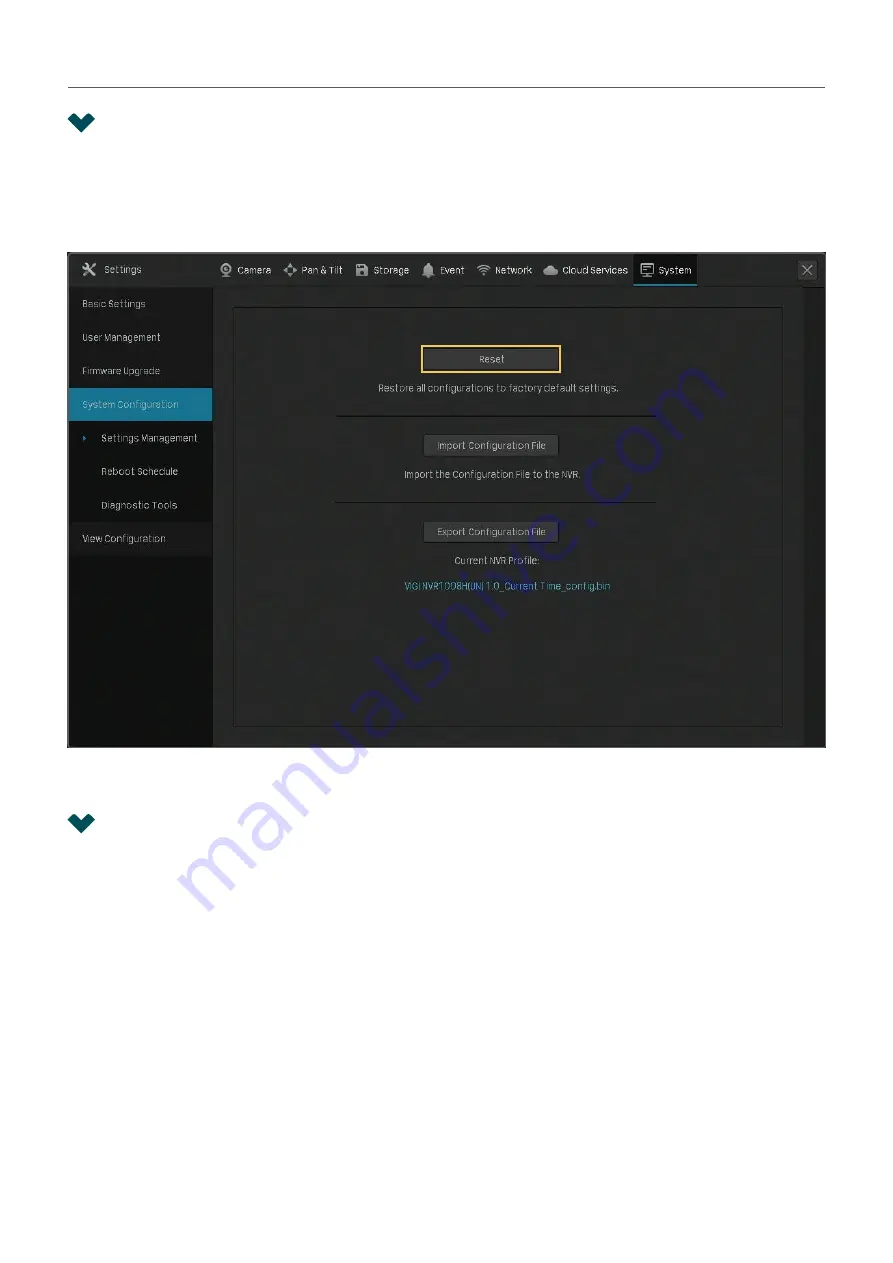
To reset the NVR to the factory settings, right click on the Live View screen and click 

Settings

 in the 

Main Menu. Go to 

System 

System Configuration 

Settings Management

. Then, click 

Reset

Note: Please wait without any operations until the NVR is reset successfully. It may take a few minutes.

8. 4  Configure Reboot Schedule for NVR

When Reboot Schedule is enabled, the NVR reboots automatically and regularly at the specified time.
Follow the steps below to configure Reboot Schedule for NVR.
1.  Right click on the Live View screen and click 

Settings

 in the pop-up Main Menu. Go to 

System 

System Configuration 

Reboot Schedule

.

Summary of Contents for VIGI NVR1008

Page 1: ...Network Video Recorder User Guide 1910012908 REV1 0 0 September 2020 ...

Page 2: ...e 35 2 3 2 Configure Image Settings 35 2 4 Configure OSD Settings 36 2 5 Configure Privacy Mask 38 2 6 Configure Stream Settings 39 2 6 1 Configure Main Stream and Substream 39 2 6 2 Configure ROI 41 2 7 Configure Pan Tilt 41 2 7 1 Preset and Call Positions 41 2 7 2 Preset and Call Paths in Cruise Scan 43 2 7 3 Preset and Call Patterns in Pattern Scan 43 2 7 4 Enable Park 44 2 7 5 Preview Preset S...

Page 3: ... 2 Configure Disk Quota 65 4 3 Record Manually 66 4 4 Manage Hard Drive 67 4 4 1 View and Configure Settings of Hard Drive 67 4 4 2 Add External Hard Drive to NVR 69 4 4 3 Bad Sector Detection 69 4 4 4 S M A R T Detection 70 4 5 Export Recordings 72 4 6 Backup Recordings 74 Playback 76 5 1 Instant Playback 77 5 2 Play Normal Recordings 77 5 3 Play Recordings with Tags 80 5 4 Playback Recordings of...

Page 4: ... Configure UPnP 108 7 4 Enable Remote Management via Cloud Services 109 NVR Management 111 8 1 Upgrade the NVR Firmware 112 8 2 Restart Log Out Shut Down the NVR 113 8 3 Reset the NVR 114 8 4 Configure Reboot Schedule for NVR 114 8 5 Diagnose the NVR 115 System Management 118 6 1 Configure Basic Settings 119 6 2 Modify System Time 120 6 3 Configure Interface Output 122 6 4 Manage User Accounts 123...

Page 5: ... This guide uses the specific formats to highlight special messages The following table lists the conventions that are used throughout this guide Underlined Indicates hyperlinks You can click to redirect to a website or a specific section Bold Indicates contents to be emphasized and texts on the web page including the menus tabs buttons and so on The menu structures to show the path to load the co...

Page 6: ...ow to set up your NVR for the first time The quick setup wizard brings you convenience and flexibility to configure VIGI NVR This chapter includes the following sections Connect the Hardware Log In to Your NVR Set Up NVR via Quick Setup Wizard ...

Page 7: ...re in the same network Follow the steps below to connect the devices 1 Connect your monitor to the HDMI or VGA port according to the connection port it supports 2 Connect your monitor to a power source and turn it on 3 Connect the LAN port of the NVR to a network device with an Ethernet cable 4 Connect the provided USB Mouse to the USB Interface of the NVR front panel 5 Connect the power adapter t...

Page 8: ...m Password Confirm the password of your NVR Password Reset Email for NVR Set an email address to reset the password of your NVR Camera s Password Set a password for cameras added to your NVR The password will be applied to the cameras without passwords Password Reset Email for Camera Set an email address to reset the passwords of your cameras Same as the NVR Optional Click the checkbox if you want...

Page 9: ...ble your cameras will be automatically added to the NVR It is recommended to enable this function to simplify the processes of quick setup and adding cameras 1 3 Set Up NVR via Quick Setup Wizard The Quick Setup Wizard guides you through the process to set up your NVR If you have enabled Plug and Play refer to Quick Setup When Plug and Play is Enabled if not refer to Quick Setup When Plug and Play...

Page 10: ...e NVR will automatically modify the IP addresses of your cameras The following window pops up automatically Click Add to add cameras to the NVR 2 Set the basic parameters for the NVR Click Next Resolution Select the screen resolution according to your needs Adaptive The NVR automatically selects the highest resolution supported by the screen ...

Page 11: ...rd drive installed in the NVR to ensure the recording function Click Next If you click Initialize to format the hard drive the files stored in it will be lost Disk No Displays the number of hard drive Capacity Displays the total space of hard drive Status Displays the status of hard drive Properties Read write The data on the hard drive can be read and written Read only The data on the hard drive ...

Page 12: ...the NVR Click Next Turn on 24 Hour Continuous Recording All of the cameras will be set to record continuously 24 7 Turn on 24 Hour Motion Detection Recording The camera starts to record when a motion is detected Enable Loop Recording Click the check box to overwrite the oldest recording files with the latest one when the hard drive is full ...

Page 13: ...eft to download the VIGI app then scan the QR code on the right to add the NVR to the app You can view live video manage NVR and get instant alerts 6 Click Complete to finish the quick setup If your cameras have passwords enter the password to verify the cameras ...

Page 14: ...t Started Quick Setup When Plug and Play is Disabled 1 Select the screen resolution according to your need Click Next If you select Adaptive the NVR automatically selects the highest resolution supported by the screen ...

Page 15: ...11 Chapter 1 Get Started 2 Select Auto to obtain a dynamic IP address or select Manually to set a static IP address for your NVR Click Next ...

Page 16: ...12 Chapter 1 Get Started 3 Select NTP to automatically get the system time from the Internet or select Manually to set the system time manually Select the time zone according to your region Click Next ...

Page 17: ...asswords 1 Click to add a single camera If you want to add cameras in batches click the check box of cameras and click Add in Batches Smart Coding Enable Smart Coding to reduce the load on the network and the size of the file Plug and Play Enable Plug and Play to add cameras more conveniently in the future Switch to H 265 Enable Switch to H 265 to reduce bandwidth and keep high image quality ...

Page 18: ...14 Chapter 1 Get Started 2 Set a password for your cameras You can also click the checkbox to use the preset password settings for cameras Click Next ...

Page 19: ... 1 Get Started Add Cameras with Passwords Click to add a single camera If you want to add cameras in batches click the check box of cameras and click Add in Batches Then enter the password to verify it Click Next ...

Page 20: ...e the files stored in it will be lost Disk No Displays the number of hard drive Capacity Displays the total space of hard drive Status Displays the status of hard drive Properties Read write The data on the hard drive can be read and written Read only The data on the hard drive can only be read Type Displays the installed type of hard drive Free Space Displays the remaining storage capacity of har...

Page 21: ...the NVR Click Next Turn on 24 Hour Continuous Recording All of the cameras will be set to record continuously 24 7 Turn on 24 Hour Motion Detection Recording The camera starts to record when a motion is detected Enable Loop Recording Click the check box to overwrite the oldest recording files with the latest one when the hard drive is full ...

Page 22: ...7 Optional Scan the QR code on the left to download the VIGI app then scan the QR code on the right to add the NVR to the app You can view live video manage NVR and get instant alerts 8 Click Complete to finish the quick setup ...

Page 23: ...m You can customize image effects and configure OSD On Screen Display Privacy Mask Stream and Pan Tilt This chapter contains the following sections Add Cameras to the NVR Configure Image Effects Configure OSD Settings Configure Privacy Mask Configure Stream Settings Configure Pan Tilt Manage Your Cameras ...

Page 24: ... camera has a unique IP address and they are in the same subnet as your NVR To add cameras from other brands it is recommended to refer to their user guides before adding If the cameras cannot be automatically found by the NVR refer to 2 1 3 Add Cameras Manually 2 1 1 Add Cameras Singly or in Batches To add cameras without passwords refer to Add Cameras without Passwords To add cameras with passwo...

Page 25: ...abled Follow the steps below to add the cameras 1 Right click on the Live View screen and click Add Camera in the pop up Main Menu Alternatively right click on the Live View screen and click Settings in the pop up Main Menu then go to Camera Device Access Add Device ...

Page 26: ...22 Chapter 2 Configure Your Network Camera 2 Click to add a single camera If you want to add cameras in batches click the checkbox of cameras and click Add in Batches ...

Page 27: ...an view the cameras in the Device Added list Add Cameras with Passwords When Plug and Play Enabled After you connect the cameras to the network device stay in the Live View screen and wait for the NVR to add the cameras The cameras will be automatically added to the NVR Then enter the passwords in the Live View screen to verify the cameras You can also follow the steps below to verify the password...

Page 28: ...ck Add Camera in the pop up Main Menu Alternatively right click on the Live View screen and click Settings in the pop up Main Menu then go to Device Access Add Device 2 Click to add a single camera If you want to add cameras in batches click the checkbox of cameras and click Add in Batches ...

Page 29: ... connected status will change from Not certified to Connected When Plug and Play Disabled When plug and play is disabled follow the steps below to add cameras 1 Right click on the Live View screen and click Add Camera in the pop up Main Menu Alternatively right click on the Live View screen and click Settings in the pop up Main Menu then go to Camera Device Access Add Device ...

Page 30: ...26 Chapter 2 Configure Your Network Camera 2 Click to add a single camera If you want to add cameras in batches click the checkbox of cameras and click Add in Batches ...

Page 31: ...the cameras are added you can view the cameras in the Device Added list 2 1 2 Add a Camera to a Certain Screen You can add a camera to a certain channel in the Live View screen Follow the steps below to finish the configuration 1 Click a screen in the Live View screen and click on the bottom left corner ...

Page 32: ...28 Chapter 2 Configure Your Network Camera 2 Click 3 Optional If your cameras have set the password follow the steps below to manually verify the password ...

Page 33: ...work Camera When Plug and Play is enabled click Edit in the connected device list Then enter the password in Edit Channel and click Save After a successful verification the connected status will change from Not certified to Connected ...

Page 34: ... devices cannot be automatically found by the NVR you can add cameras manually using its information Follow the steps below to finish the configuration 1 Right click on the Live View screen and click Add Camera in the pop up Main Menu Alternatively right click on the screen and click Settings in the pop up Main Menu then go to Camera Device Access Add Device 2 Click Add Manually ...

Page 35: ...ides reliable ordered delivery of a stream of bytes from one device to another device Management Port The management port to configure maintain and support a network device Username The username of the camera Password The password of the camera 2 1 4 Modify IP Addresses of Cameras ToavoidIPconflictandmakesureyourcamerasareinthesamesubnet youcanmodifytheIPaddresses manually Follow the steps below t...

Page 36: ... Your Network Camera 2 Click the checkbox of camera s and click Modify IP Address You can select multiple cameras to modify their IP addresses in batches 3 Set the starting IP address you assigned for the camera s Click Yes ...

Page 37: ...33 Chapter 2 Configure Your Network Camera 4 Click Apply to confirm the new IP address es Note The IP address es will be assigned to camera s in order ...

Page 38: ... NVR are in the same network the cameras will be automatically added without your account logged in Device Access Alert If a new camera is found when the channels are full your NVR will receive a notification Devices Limited to Access After the cameras are added to the NVR they will be automatically added to the list which means they cannot be added to the NVR again automatically If you want to au...

Page 39: ...ew screen and click Picture Mode in the pop up Main Menu 2 Select a mode to adjust the image Click OK 2 3 2 Configure Image Settings 1 Right click on the Live View screen and click Settings in the pop up Main Menu Go to Camera Display Image 2 Select a channel and configure the following parameters ...

Page 40: ...When you select Off the image displays normally Wide Dynamic Wide Dynamic can improve the image effects in backlit scenes Auto The camera adjust the image effects automatically Manual You can adjust the image effects manually The effects get stronger when the value increases You can also select a channel on the Live View screen to reveal the toolbar and click to edit the basic parameters 2 4 Confi...

Page 41: ...e checkbox to display or hide the information and select a display effect Click Save Note If you change Name in the OSD setting you also change the camera name You can also select a channel on the Live View screen to reveal the toolbar and click to configure OSD settings ...

Page 42: ...itored Follow the steps below to configure Privacy Mask 1 Right click on the Live View screen and click Settings in the pop up Main Menu Go to Camera Display Privacy Mask 2 Select a channel and enable Privacy Mask Draw the privacy areas on the preview screen the blue squares in the picture below Use the mouse to adjust the size and location of areas To remove a ...

Page 43: ...ain area by specifying the ROI level 2 6 1 Configure Main Stream and Substream The NVR supports two stream levels main stream and substream In Live View the NVR decides which stream is applied to the channels automatically based on network bandwidth and device performance In Recording Controls you can apply them to the channels to record with different stream settings After configuring the streams...

Page 44: ... VBR The bit rate changes with the image within Maximum Bit Rate CBR The bit rate is Maximum Bit Rate all the time Video Quality When VBR selected as the bit rate type set the video quality as high medium or low Maximum Bit Rate When VBR selected as the bit rate type specify the upper limit of bit rate When CBR selected as the bit rate type specify the bit rate Video Encoding Select the encoding t...

Page 45: ...st the size and location of areas Specify the ROI level and click Save 2 7 Configure Pan Tilt In Pan Tilt you can preset the positions paths and pattern for each channel and call a preset to change the status of lens quickly and conveniently Also you can enable Park to trigger the preset automatically when there is no operation Note Only the cameras with Pan Tilt support this feature 2 7 1 Preset ...

Page 46: ...ectional button to rotate a certain degree in the corresponding direction Long press the button to continuously rotate in the corresponding direction Click to rotate horizontally Click it again to stop rotating when it is in the proper position Click to zoom out Long press to continuously zoom out Click to zoom in Long press to continuously zoom in Click to adjust the focus and the near objects ge...

Page 47: ...in Menu Go to Pan Tilt 2 Select a channel listed on the left panel click Cruise Scan and select a Cruise Path number from the drop down list Click Add Cruise Preset to add the position and enter the seconds that the camera stays Click Save to save the Cruise Path settings To call the preset select a Cruise Path number and click Call Then the camera patrols following the configured path 2 7 3 Prese...

Page 48: ...on Click Stop Recording to save the movements as a pattern To call the preset click Call and the camera moves following the recorded pattern 2 7 4 Enable Park When Park enabled the camera will perform the preset position path or pattern automatically if there is no operations in specified time Follow the steps below to enable Park 1 Right click on the Live View screen and click Settings in the pop...

Page 49: ... preset the camera will perform Park Preset Select a preset from the drop down list The presets in the list vary based on the selected park mode Park Time When there is no operations during this time the camera will perform the preset 2 7 5 Preview Preset Settings Follow the steps below to preview all Preset settings and edit the preset name 1 Right click on the Live View screen and click Settings...

Page 50: ...our Network Camera 2 Go to Pan Tilt Select a channel listed on the left panel and click Preview 3 Select a preset mode to view the presets Click the icons in the list to adjust the position preview the preset and edit its name ...

Page 51: ...to center on the point Click to enable Park To configure the park mode and time click Pan Tilt Settings at the bottom and click the Park tab Click the preset in the list and click the icon to edit the name Only for Preset Click to move to the preset position Only for Cruise Scan and Pattern Scan Click to perform the Cruise or Pattern scan Only for Cruise Scan and Pattern Scan Click to stop the sca...

Page 52: ...ocol used to control the camera Transport Protocol Displays the protocol used for communication Management Port Specify the management port 2 8 2 Change the Password and Reset Email You can change the device password and reset email to enhance the security 1 Right click on the Live View screen and click Settings in the pop up Main Menu Go to Camera Device Management Password Management ...

Page 53: ...d click of the administrator If you have added a camera to the NVR but cannot find it in the table check the connection to make sure the camera is connected properly Click Refresh to refresh the data 2 8 3 Upgrade the Firmware Two methods are supported to upgrade the firmware Local Upgrade and Online Upgrade Follow the steps below to upgrade the firmware 1 Get ready to upgrade the firmware For Loc...

Page 54: ...ote The cameras should be in the connected status Make sure to use the correct firmware to upgrade the corresponding camera When upgrading please do not turn off the power of camera and NVR 2 8 4 Configure Scheduled Reboot When Reboot Schedule is enable the camera reboots automatically and regularly at the specified time Note The cameras should be in the connected status 1 Right click on the Live ...

Page 55: ...nt to apply the schedule settings to other channels click Copy to Other Channels and select the channels Click Save 2 8 5 Remove Cameras from the NVR After removing the camera from the NVR you cannot configure and manage it via NVR 1 Right click on the Live View screen and click Settings in the pop up Main Menu Go to Camera Device Access Add Device ...

Page 56: ...52 Chapter 2 Configure Your Network Camera 2 Select the cameras to be removed Click Remove Device ...

Page 57: ...al time and respond to abnormal conditions with quick operations such as viewing instant playback zooming in the image and enabling real time talk This chapter contains the following sections Configure the Screen Layout Configure Live View Settings via Toolbar ...

Page 58: ...hange the screen layout quickly right click on the Live View screen and click the buttons in Main Menu Click the corresponding buttons to change the number of displayed screens into 1 4 6 8 9 Click to jump to the previous next page when the channels is more than the screens displayed in one page Click to enable disable Switching When Switching is enabled the NVR turns pages in Live View regularly ...

Page 59: ...el in the full screen double click it Double click it again to go back to multi screen layout mode 3 1 2 Rearrange Channels in Settings In Settings you can rearrange the channels in different layout modes more flexibly Follow the steps below to rearrange the layout 1 Right click on the Live View screen and click Settings in the Main Menu Go to System View Configuration ...

Page 60: ...View 2 Select a layout mode 1 4 6 8 9 below and the current layout displays Each square indicates a region on the screen Click a square and click the checkbox of a channel to rearrange the channel in Live View Click Save ...

Page 61: ...s in Normal Playback Tag Playback and Event Playback For detailed configuration refer to Playback Click to zoom in out the live image Click to adjust the image settings including brightness contrast saturation and sharpness Click to start end the recording manually Click to configure the information displayed in Live View including the time and camera name Microphone needed and only for certain ca...

Page 62: ... guarantee the fluency The video may be delayed Balanced Display the video with a balance between timeliness and fluency Displays the stream applied to this channel You can configure the main stream and substream on the NVR and the NVR decides which stream is applied to the channels automatically based on network bandwidth and device performance To view and configure stream settings refer to 2 6 C...

Page 63: ...u to set your own recording schedules and parameters assign disk quota to connected cameras manage and detect the installed hard drive as well as export and back up recordings This chapter includes the following sections Configure Recording Schedules Recording Controls Record Manually Manage Hard Drive Export Recordings Backup Recordings ...

Page 64: ...ck 24 Hour Recording in the pop up main menu all of the channels will be set to record continuously 24 7 Right click on the Live View screen and click Motion Detection Recording in the pop up main menu all the channels start to record when motion detection is triggered 4 1 2 Customize Recording Schedule Recording schedule in Storage enables users to customize the everyday recording plan for each c...

Page 65: ...the recording schedule with one of the following methods Method 1 Via Time Bar 1 Select Motion Detection Recording and drag the cursor on time bar to set 8 00 to 19 00 for motion detection recording from Monday to Friday The color of these rectangles will change from blue to green 2 Select Continuous Recording and drag the cursor to set 8 00 to 19 00 for no recording on Saturday and Sunday The col...

Page 66: ...ng and Storage Method 2 via Edit Schedule 1 Click Edit Schedule 2 Click Add Schedule select the recording type and set the start time and end time Note Make sure the periods for different recording types are not overlapped ...

Page 67: ...ct the repeating days for this schedule in a week and click Yes 4 Click Apply on the Edit Detailed Schedule page 5 Click Save in Basic Configuration to save the settings 5 Click Copy to other Channels and select the channel to apply the settings then click OK 6 Click Save in Basic Configuration to save the settings ...

Page 68: ... starts at 10 00 If you set the pre recorded time as 5 seconds the camera starts to record at 9 59 55 Note It is recommended to remain the default setting of 5 seconds Delay The time is set for cameras to record after the scheduled time or event For example if you set the post record time as 5 seconds it records till 11 00 05 as motion detection ends at 11 00 4 2 Recording Controls 4 2 1 Configure...

Page 69: ...e selected channel Storage Stream Select the stream for recording Main Main Stream The size of recording files will be larger when selected Substream The size of recording files will be smaller when selected Storage Disk Group Select the disk group for the NVR with multiple hard drives 4 2 2 Configure Disk Quota In Disk Quota you can manually start and stop recording on certain channels select the...

Page 70: ...nnel Recording Switch Start stop recording on the selected channel Storage Stream Select the stream for recording Main Main Stream The size of recording files will be larger when selected Substream The size of recording files will be smaller when selected Used Capacity Displays the used space of hard drive for this channel Recording Quota Assign the disk quota to your cameras for recording storage...

Page 71: ... Recording Controls in the pop up main menu 2 Optional Select the recording stream and disk group for storage 3 Click Recording Switch to start or stop recording 4 Click Save after you finish the configuration 4 4 Manage Hard Drive In Hard Drive Management section you can view and customize the settings of hard drive and choose different detection methods to check the bad sectors and the status of...

Page 72: ...s in the pop up main menu then go to Storage Hard Drive Management Hard Drive Management Click Save after you finish the configuration Circular Write of Disk Enable the NVR to overwrite the eariler recording files when the hard drive is full Disk No Displays the number of hard drive Capacity Displays the total space of hard drive Free Space Displays the remaining storage capacity of hard drive Sta...

Page 73: ...reen click Settings in the pop up main menu then go to Storage Hard Drive Management Hard Drive Management Click and the hard drive will be automatically added to your NVR Note The capacity of the external hard drive should exceed 120G 4 4 3 Bad Sector Detection Bad sector detection conducts a check on the entire hard drive or its critical area and display the number of bad sectors of the hard dri...

Page 74: ...rs of drive reliability and presents an overall assessment of the installed hard drive Follow the steps below to finish the S M A R T detection 1 Right click on the Live View screen and click Settings in the pop up main menu 2 Go to Storage Hard Drive Management S M A R T Detection 3 Select the disk and self checking type Short A scan of major components of the hard drive Extended A complete surfa...

Page 75: ...e status of these attributes Flags Displays the code of S M A R T ID Threshold Displays the threshold value of these attributes Threshold marks the value at which the hard drive could fail Value Displays the current value of these attributes When it gets closer to the threshold the hard drive is less likely to be healthy Worst Displays the minimum values of these attributes When Worst values are e...

Page 76: ... devices I want to Export the continuous recordings on Channel 1 between 12 00 and15 00 from 8 4 2020 to 8 18 2020 How can I do that 1 Prepare an external storage device and plug it into the USB slot of the NVR 2 Right click on the Live View screen and click Settings in the pop up main menu 3 Go to Storage Export File 4 Select the start time and end time for searching recordings ...

Page 77: ...days of the week Then click Yes 6 Click Channel to select Channel 1 for recording export Then click Yes 7 Select Continuous for the recording type and All for the file type Locked Files will not be overwritten when loop recording is enabled Unlocked Files will be overwritten when loop recording is enabled ...

Page 78: ...ck Start Backup to export the files to your external storage device 4 6 Backup Recordings Backup allows you to copy all the recordings stored in your NVR to the external hard drive You can view these recording files when installing the hard drive on another NVR Caution The data stored in your external hard drive will be lost if you choose to back up the recordings It is recommended to back up the ...

Page 79: ... should prepare an external hard disk whose total space is larger than the used space of installed hard drive in NVR If the free space of your external hard disk is not big enough for backing up recordings stored in NVR click Initialize to format your hard drive first The original data will be erased after initialization ...

Page 80: ...em such as adding tags and exporting clips You can easily search the recordings based on the channel date tag and event This chapter contains the following sections Instant Playback Play Normal Recordings Play Recordings with Tags Playback Recordings of Events Playback Operations ...

Page 81: ...yback Play the recordings with tags added Event Playback Play the recordings with events detected 5 1 Instant Playback You can replay the video recorded in the last five minutes via Instant Playback Click a channel on Live View to reveal the toolbar Click and then 5 min Playback to start instant playback 5 2 Play Normal Recordings Normal Recordings are video files from the continuous and motion de...

Page 82: ...d click Playback in the pop up Main Menu to open the Playback module 2 On the right panel select Normal Playback click the checkboxes to select channels and select a date in the calendar You can also click the checkboxes below to filter the recordings Click Search ...

Page 83: ...click a recording in the list or click to play the recordings For more playback operations refer to 5 5 Playback Operations Note When playing multiple channels some channels may be unavailable due to limited resources To watch the channels click Back to deselect a few channels on the right panel and try again ...

Page 84: ...ding Files 1 Right click on the Live View screen and click Playback in the pop up Main Menu to open the Playback module In the Normal Playback mode specify the channel and date on the right panel Click Search 2 Select a time point in the recording listed in the time bar and click in the toolbar The following window pops up Enter the tag manually or select one from history tags Click Yes ...

Page 85: ...t panel click the checkboxes to select channels and select a time range in the calendar Click Search Step 3 Play the Recording File with a tag The recording files with tags are listed on the right panel Specify the time range before and after the tagged time point then double click a recording in the list to play it ...

Page 86: ...g and area intrusion Note If you have never configured Events on the NVR there are no recordings of events To configure Events refer to Events and Alerts Follow the steps below to search and play the recordings of certain events 1 Right click on the Live View screen and click Playback in the pop up Main Menu to open the Playback module 2 On the right panel select Event Playback and select an event...

Page 87: ...st the display edit and back up the recordings Note The operations are not available in Instant Playback 5 5 1 Basic Playback Operations The following icons are supported when playing recordings Select from the drop down list to change the playing speed Jump forward backward by 30 seconds Available when the recording is paused Play the recordings by frames Click and slide to adjust the volume Avai...

Page 88: ...layback you can configure Smart Playback rules to adjust the playing speed automatically When Smart Playback configured the NVR can intelligently classify the recordings into two types Event Recordings and Non event Recordings and adjusts the speed based on the recording types Click the icon and set the playing speed You can skip Non event Recordings by clicking the checkbox Click Yes 5 5 3 Edit R...

Page 89: ...ck 1 In Playback specify the playback mode channels and time range then click Search to search recordings 2 Click the recordings in the time bar to select a start time Click at the toolbar to set the beginning of the clip ...

Page 90: ...set the end of the clip After editing you can click to view all clips To export the clip to an external storage select the clips and click Export Note To export the clips an external storage is required For the clips that are not exported they will not be saved as new recordings when you leave the Playback module ...

Page 91: ...m in batches Follow the steps below to search and back up recordings Note To back up the recordings an external storage is required 1 In Playback specify the playback mode channels and time range then click Search to search recordings 2 The recording files are listed on the right panel Click the checkbox to select the recordings to be exported and click Export Recordings ...

Page 92: ...88 Chapter 5 Playback 3 The following window pops up Specify the path to export the recordings Click Start Backup and wait until backup is completed ...

Page 93: ...t types of events VIGI NVR monitors the user defined areas and you ll be automatically alerted to any suspicious activity in your home and office This chapter includes the following sections Motion Detection Video Tampering Area Intrusion Line Crossing Detection Video Signal Loss Offline and IP Conflict Disk Exception Login Exception ...

Page 94: ...ect and enable Motion Detection 3 Draw rectangles for motion detection on the preview screen The whole region is selected by default Then configure the motion detection settings Sensitivity Adjust the value of sensitivity A higher value can trigger alarm actions more easily Detection Select the detection type It can be configured only for the cameras which support human detection and vehicle detec...

Page 95: ... is detected 5 Set the alarm schedule Click Apply 6 Click Save to save the settings 7 Optional Click Copy to other channels select the channels and click Yes if you want to apply the settings to other channels Then click Save in Motion Detection to save the settings 6 2 Video Tampering Video tampering triggers alarm actions when an area of camera s lens is purposely blocked obstructed or vandalize...

Page 96: ...ur needs Screen Prompt A warning sign in the lower right corner of the monitor screen Click it to check the event type and time Buzzer The buzzer on the NVR will beep when the video tampering is detected Recording Linkage The channels you select for recording linkage will start recording when the current channel detects the video tampering Pop up Alarm Screen The channel in Live View will be in fu...

Page 97: ...s if you want to apply the settings to other channels Then click Save in Video Tampering to save the settings 6 3 Area Intrusion Area intrusion triggers alarm actions when the NVR detects an intrusion in the specified areas You can customize the area intrusion settings select the triggered actions and set the alarm schedule Follow the steps below to finish the configuration ...

Page 98: ... intrusion area parameters Sensitivity Adjust the value of sensitivity A higher value can trigger alarm actions more easily Area Ratio Set the ratio of the size of intrusive object to the intrusion area you have drawn Intrusion Time Set the time for detecting the intrusion of objects The interval should be no more than 10 seconds Detection Select the detection type It can be configured only for th...

Page 99: ... Audible Alarm Only supports camera models with audible alarm The buzzer on the camera will alarm when an intrusion in the area is detected 5 Set the alarm schedule Click Apply 6 Click Save to save the settings 7 Optional Click Copy to other channels select the channels and click Yes if you want to apply the settings to other channels Then click Save in Area Intrusion to save the settings 6 4 Line...

Page 100: ...ity Set the sensitivity of line crossing detection A higher value can trigger alarm actions more easily Line Crossing Direction A B Only the object crossing the configured line from the A side to the B side can be detected B A Only the object crossing the configured line from the B side to the A side can be detected A B The object goes across the configured line with both directions can be detecte...

Page 101: ...etection is triggered White Light Alarm Only supports camera models with light alarm A camera with light alarm flashes when line crossing detection is triggered Audible Alarm Only supports camera models with audible alarm The buzzer on the camera will alarm when line crossing detection is triggered 5 Set the alarm schedule Click Apply 6 Click Save to save the settings 7 Optional Click Copy to othe...

Page 102: ...ings in the pop up main menu then go to Event Exception Detection Video Signal Loss The alarm actions are as follows Screen Prompt A warning sign in the lower right corner of the monitor screen Enable it to check the event type and time Pop Alarm Screen The channel in Live View will be in full screen when the NVR detects the signal loss Buzzer The buzzer on the NVR will beep when the NVR detects t...

Page 103: ...99 Chapter 6 Events and Alerts 2 Click Select Camera to apply the selected alarm actions to certain cameras Click OK 3 Click Save to save the settings ...

Page 104: ...steps below to finish the configuration 1 Right click on the Live View screen and click Settings in the pop up main menu then go to Event Exception Detection Offline and IP Conflict 2 Select the alarm actions according to your needs Screen Prompt A warning sign in the lower right corner of the monitor screen Enable it to check the event type and time Buzzer The buzzer on the NVR will beep when NVR...

Page 105: ...figuration 1 Right click on the Live View screen and click Settings in the pop up main menu then go to Event Exception Detection Disk Exception 2 Select the alarm actions according to your needs Screen Prompt A warning sign in the lower right corner of the monitor screen Enable it to check the event type and time Buzzer The buzzer on the NVR will beep when disk problems are detected 3 Click Save t...

Page 106: ...low the steps below to finish the configuration 1 Right click on the Live View screen and click Settings in the pop up main menu then go to Event Exception Detection Login Exception 2 Enable Login Limitation to limit the login attempts 3 Set the maximum login attempts The number should between 3 and 10 4 Optional Enable Buzzer if you want the buzzer to alarm after the maximum login attempts are ex...

Page 107: ...ct your NVR to the internet build up mapping between internal and external ports and manage it remotely via Cloud Services This chapter contains the following sections Configure Network Connection Configure Ports Configure UPnP Enable Remote Management via Cloud Services ...

Page 108: ...t a mode and follow the instructions below To assign a static IP address to NVR select Manually as the mode and configure the following parameters IP Address Specify an IP address for the NVR The IP address should be in the same segment as the gateway otherwise the NVR cannot connect to the internet Subnet Mask Enter the subnet mask Gateway Enter the IP address of the gateway device to which the d...

Page 109: ...sually a router is needed for the NVR to obtain a dynamic IP address If the topology or subnet is changed you should assign a new IP address to the NVR to keep the network connection In Manually mode configure the basic settings manually while in Auto mode click Save Then follow step 3 below to change the IP addresses of cameras ...

Page 110: ... and manage them 4 Click Save If you want to reset to factory settings click Reset 7 1 2 Configure Advanced Settings In Advanced Settings you can specify MTU Maximum Transmission Unit to decide the largest size of data unit that can be transmitted in the network A larger unit can improve the efficiency with more data in each packets but it may increase the network delay because it needs more time ...

Page 111: ...onnection Specify MTU and click Save 7 2 Configure Ports In Port you can configure the HTTP port and service port of NVR that can be used to access the NVR through the network When managing and monitoring the devices via VIGI Security Manager or the VIGI app the ports configured here are used for communications of corresponding protocols ...

Page 112: ...for HTTP protocol Service Port Specify a port for protocols of video services 7 3 Configure UPnP UPnP is used to establish the mapping between the internal port and external port Note The NVR and cameras should be connected to the internet and UPnP should be enabled on the gateway Follow the steps below to configure UPnP 1 Right click on the Live View screen and click Settings in the Main Menu Go ...

Page 113: ...nal port opened by the gateway Internal IP Displays the IP address of the NVR that needs to be converted Status Displays the status of mapping 3 Click Save If you want to reset to factory settings click Reset 7 4 Enable Remote Management via Cloud Services The NVR supports remote management with the support of TP Link Cloud Services With a TP Link ID bound you can remotely monitor your areas on mu...

Page 114: ...p to register 3 After binding your TP Link ID download VIGI Security Manager on the computer from Download Center or download the VIGI app on your mobile phone by scanning the QR code below Log in with your TP Link ID Then you can monitor the live view and manage the NVR remotely on your computer or mobile phone If you want to unbind the TP link ID click Unbind on the same page Enter the password ...

Page 115: ...anagement This chapter contains the following sections to introduce how to manage NVR Upgrade the NVR Firmware Restart Log Out Shut Down the NVR Reset the NVR Configure Reboot Schedule for NVR Diagnose the NVR ...

Page 116: ...re in an external storage device and plug the external storage device into the NVR 2 Right click on the Live View screen and click Settings in the Main Menu Go to System Firmware Upgrade 3 Click the buttons to upgrade the NVR online or locally For Online Upgrade Click Check for Upgrade and the NVR will detect new firmware online and upgrade automatically For Local Upgrade Click Select Upgrade Firm...

Page 117: ...he corresponding buttons Click to reboot the NVR Please wait when rebooting the NVR It may take several seconds Click to log out the account After logging out you need to enter the password to configure and manage the device Click to shut down the NVR To protect your hard disk and data shut down the NVR before unplugging the disk or turning off the power of NVR ...

Page 118: ...t Note Please wait without any operations until the NVR is reset successfully It may take a few minutes 8 4 Configure Reboot Schedule for NVR When Reboot Schedule is enabled the NVR reboots automatically and regularly at the specified time Follow the steps below to configure Reboot Schedule for NVR 1 Right click on the Live View screen and click Settings in the pop up Main Menu Go to System System...

Page 119: ...o diagnostic tools Rapid Diagnosis and Custom Diagnosis You can diagnose the NVR to test the network connection and delay Follow the steps below to diagnose the NVR 1 Right click on the Live View screen and click Settings in the Main Menu Go to System System Configuration Diagnostic Tools 2 Use a diagnostic tools and view the results ...

Page 120: ...teway Extranet Cloud Service Connection Displays the connection status between the NVR and gateway extranet TP Link Cloud Delay Displays the delay in milliseconds of each channel Not Connected means that the NVR cannot communicate with the camera Packet Loss Rate Display the ratio of lost packets ...

Page 121: ...cket Number For Ping diagnose Specify how many packets the NVR sends to the specified IP domain name Packet Size For Ping diagnose Specify the size of packets Timeout For Ping diagnose Specify the maximum time that the NVR waits for response of a ping packet If no response is received after the time the ping packet will be regarded as lost Hop Count For Tracert diagnose Specify the maximum hops wh...

Page 122: ...and view system logs and messages on NVR VIGI NVR allows users to create and modify administrator accounts based on their needs This chapter includes the following sections Configure Basic Settings Modify System Time Configure Interface Output Manage User Accounts Import and Export Settings View System Logs View System Messages ...

Page 123: ...tive on the NVR By default users already logging into the NVR are automatically logged out after 10 minutes Switch Interval Set the interval for displaying the live view screen when switching is enabled Click in the Main Menu to start switching The range is from 5s to 120s Alarm Screen Switching Delay Set the dwell time of channels in full screen when events are detected Setup Wizard Click the che...

Page 124: ...lso select the time zone according to your region To configure these settings right click on the Live View screen and click Settings in the pop up main menu then go to System Basic Settings Date NTP NTP NetworkTimeProtocol canautomaticallygetthesystemtimefromtheInternet Itisrecommended to keep the default server address ...

Page 125: ...t the system time manually 9 3 Configure Interface Output In Interface Output you can select the display resolution for your monitor and choose to display the channel number on the Live View screen and the images in the original scale To configure these ...

Page 126: ...channel number on the Live View Screen Display Original Scale Screen Display the images on the Live View screen in the original scale 9 4 Manage User Accounts You can modify the default user account admin and create user accounts based on your needs The administrator has the permission to add and delete other user accounts The Administrator user name is admin and the password is set when you set u...

Page 127: ...odify Administrator Account For the administrator account you have all the permissions to manage the NVR Administrator user name is admin and the password is set when you set up your NVR for the first time Click to modify the settings ...

Page 128: ...124 Chapter 9 System Management You can change the gesture password the login password of NVR the preset password for cameras and the email address for resetting NVR and cameras ...

Page 129: ...125 Chapter 9 System Management Add an Account You can create user accounts with different permissions to manage the NVR Follow the steps below to add a new user account 1 Click Add ...

Page 130: ...hes the live view and playback add cameras in Live View screen and check the logs of your NVR 3 Set the password for logging in the account 4 Click Save 9 5 Import and Export Settings Follow the steps below to import and export the configuration file of your NVR Note Before your operation prepare an external storage device and plug it into the USB slot on the front panel of your NVR ...

Page 131: ...e View screen and click Settings in the pop up main menu then go to System System Configuration Settings Management 2 Click Import Configuration File or Export Configuration File 3 For configuration file import select the file and click Import Configuration ...

Page 132: ... uses logs to record classify and manage the messages of the system and devices You can search view and export the logs Note To export logs an USB external storage device is required Follow the steps below to search and export the logs 1 Right click on the Live View screen and click Log in the pop up Main Menu Go to System Logs System Logs ...

Page 133: ...ype from the drop down list to filter the logs You can also click Select Subtypes to specify subtypes All All types of logs Alarm Alarms triggered by events such as tampering line crossing and area intrusion Exception Abnormal events that may influence NVR s functions such as video signal lost and errors of hard drive Operation Operations that take place on the NVR such as login and upgrade Inform...

Page 134: ...130 Chapter 9 System Management 3 Click Export Log and select a file path in the pop up window Click Export Log ...

Page 135: ...n view the information about the devices storage internet and event in System Messages Right click on the screen and click Log in the pop up main menu then go to System Message Basic Information You can view the basic information about the NVR internet and storage ...

Page 136: ...nel number channel name network connection status the IP address of camera and the status of motion detection Stream Information You can view the recording parameters of a certain camera CH No Displays the channel number Recording Status The channel starts or stops recording ...

Page 137: ...rame rate of the videos The video is smoother when the rate increases Resolution Specify the resolution of video stream The screen displays images clearer when the resolution increases Bite Rate Specify the number of bits that are conveyed or processed per unit of time Hard Drive Information Disk No Displays the number of hard drive Disk Capacity Displays the total space of hard drive Free Space D...

Page 138: ...VR MAC Address Displays the MAC Address of your NVR Connection Status Displays the network connection status of your NVR MTU Refers to maximum transmission unit measuring the largest data packet that a network connected device will accept Port Mode Displays the modes of transmission and the data speed of ports For example 100M Full Duplex means the Ethernet port of the NVR can send and receive one...

Page 139: ...135 Chapter 9 System Management Bandwidth of Net Receive Idle Displays the remaining received bandwidth Event Information You can view the event type occurred time and the channel which detects events ...

Page 140: ...w 2 Send a verification code to Password Reset Email Note Password Reset Email is the one you entered in Quick Setup for the password reset It is only used to receive the verification code when you need to reset the password If your NVR is connected to the internet click Get Verification Code and you will receive a verification code sent to your Password Reset Email ...

Page 141: ... the verification code you received into the blank and click Verify Then you can set a new password for your NVR Note If you do not receive the verification code you can Check your junk or spam folder of your email Check your email filter setting in your email account Add noreply tp link com in the White list by clicking Create a new filter in your email setting Then go back to the NVR to send the...

Page 142: ...e Main Menu Go to Camera Add Device Click Forgot Password 2 Send a verification code from Password Reset Email Note Password Reset Email is the one you entered in Quick Setup for the password reset It is only used to receive the verification code when you need to reset the password ...

Page 143: ...your Password Reset Email If your NVR and camera is not connected to the internet use your mobile phone to scan the QR code on the right to download the VIGI app and log in with your TP Link ID Tap on the top right of the app and scan the QR code on the left of the VIGI NVR Then you will receive a verification code sent to your Password Reset Email ...

Page 144: ...d for your camera Note If you do not receive the verification code you can Check your junk or spam folder Check your email filter setting in your email account Add noreply tp link com in the White list by clicking Create a new filter in your email setting If you have other questions please visit FAQ 2850 for more information ...

Page 145: ...ver there is no guarantee that interference will not occur in a particular installation If this equipment does cause harmful interference to radio or television reception which can be determined by turning the equipment off and on the user is encouraged to try to correct the interference by one or more of the following measures Reorient or relocate the receiving antenna Increase the separation bet...

Page 146: ... the equipment off and on the user is encouraged to try to correct the interference by one or more of the following measures Reorient or relocate the receiving antenna Increase the separation between the equipment and receiver Connect the equipment into an outlet on a circuit different from that to which the receiver is connected Consult the dealer or an experienced radio TV technician for help Th...

Page 147: ...t accept any interference including interference that may cause undesired operation of the device L émetteur récepteur exempt de licence contenu dans le présent appareil est conforme aux CNR d Innovation Sciences et Développement économique Canada applicables aux appareils radio exempts de licence L exploitation est autorisée aux deux conditions suivantes 1 L appareil ne doit pas produire de broui...

Page 148: ...ricted substance corresponds to the exemption The terms HDMI HDMI High Definition Multimedia Interface and the HDMI Logo are trademarks or registered trademarks of HDMI Licensing Administrator Inc Продукт сертифіковано згідно с правилами системи УкрСЕПРО на відповідність вимогам нормативних документів та вимогам що передбачені чинними законодавчими актами України Safety Information Keep the device...

Page 149: ...osion or the leakage of flammable liquid or gas Do not leave a battery subjected to extremely low air pressure that may result in an explosion or the leakage of flammable liquid or gas CAUTION Do not ingest battery Chemical Burn Hazard This product contains a coin button cell battery If the coin button cell battery is swallowed it can cause severe internal burns in just 2 hours and can lead to dea...

Page 150: ... be handled pursuant to European directive 2012 19 EU in order to be recycled or dismantled to minimize its impact on the environment User has the choice to give his product to a competent recycling organization or to the retailer when he buys a new electrical or electronic equipment Specifications are subject to change without notice All bands and product names are trademarks or registered tradem...

Reviews: