background image

TL-WR941ND

 Wireless N Router  


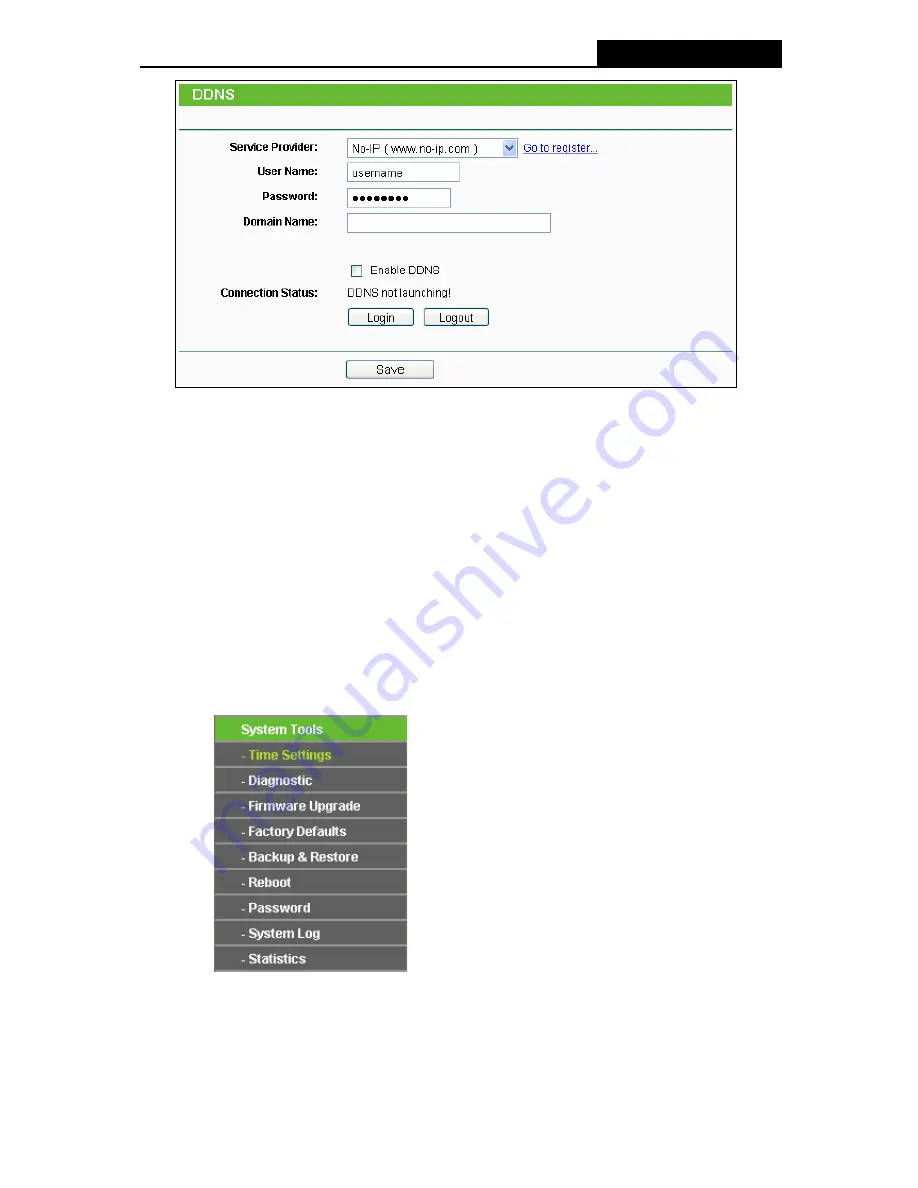
Figure 4-70 No-ip.com DDNS Settings 

To set up for DDNS, follow these instructions: 

1. Type 

the 

User Name

 for your DDNS account.   

2. Type 

the 

Password

 for your DDNS account.   

3. Type 

the 

Domain Name 

you received from dynamic DNS service provider. 

4. Click 

the 

Login 

button to log in the DDNS service. 

Connection Status -

 The status of the DDNS service connection is displayed here. 

Click 

Logout 

to log out the DDNS service. 

4.16 System Tools 


Figure 4-71 The System Tools menu 

Choose menu “

System Tools

”, and you can see the submenus under the main menu:

 Time 

Settings

Diagnostic

Firmware Upgrade

Factory Defaults, Backup & Restore, Reboot, 

Password, System Log 

and 

Statistics. 

Click any of them, and you will be able to configure the 

-81- 

Summary of Contents for TL-WR941ND - Wireless Router

Page 1: ...TL WR941ND Wireless N Router Rev 1 1 0 1910010567...

Page 2: ...rantee that interference will not occur in a particular installation If this equipment does cause harmful interference to radio or television reception which can be determined by turning the equipment...

Page 3: ...tional restrictions This device is intended for home and office use in all EU countries and other countries following the EU directive 1999 5 EC without any limitation except for the countries mention...

Page 4: ...se undesired operation IMPORTANT NOTE Radiation Exposure Statement This equipment complies with Canada radiation exposure limits set forth for an uncontrolled environment This equipment should be inst...

Page 5: ...IV...

Page 6: ...U The above product is in conformity with the following standards or other normative documents ETSI EN 300 328 V1 7 1 2006 ETSI EN 301 489 1 V1 8 1 2008 ETSI EN 301 489 17 V2 1 1 2009 EN 55022 2006 A1...

Page 7: ...n Environment Requirements 6 2 3 Connecting the Router 6 Chapter 3 Quick Installation Guide 8 3 1 TCP IP Configuration 8 3 2 Quick Installation Guide 10 Chapter 4 Configuring the Router 17 4 1 Login 1...

Page 8: ...57 4 9 3 Local Management 58 4 9 4 Remote Management 59 4 10 Parental Control 60 4 11 Access Control 63 4 11 1 Rule 63 4 11 2 Host 66 4 11 3 Target 68 4 11 4 Schedule 70 4 12 Advanced Routing 71 4 12...

Page 9: ...ings 82 4 16 2 Diagnostic 83 4 16 3 Firmware Upgrade 85 4 16 4 Factory Defaults 86 4 16 5 Backup Restore 86 4 16 6 Reboot 87 4 16 7 Password 88 4 16 8 System Log 88 4 16 9 Statistics 91 Appendix A FAQ...

Page 10: ...N Router DC Power Adapter for TL WR941ND Wireless N Router Quick Installation Guide Resource CD for TL WR941ND Wireless N Router including This Guide Other Helpful Information Note Make sure that the...

Page 11: ...ections With multiple protection measures including SSID broadcast control and wireless LAN 64 128 152 bit WEP encryption Wi Fi protected Access WPA2 PSK WPA PSK as well as advanced Firewall protectio...

Page 12: ...access Supports Virtual Server Special Application and DMZ host Supports UPnP Dynamic DNS Static Routing Provides Automatic connection and Scheduled Connection on certain time to the Internet Built in...

Page 13: ...function is disabled WLAN Flashing The Wireless function is enabled Off There is no device linked to the corresponding port On There is a device linked to the corresponding port but there is no activ...

Page 14: ...the power adapter provided with this TL WR941ND Wireless N Router RESET There are two ways to reset to the Router s factory defaults 1 Use the Factory Defaults function on System Tools Factory Defaul...

Page 15: ...ure your PC is connected to the Internet through the broadband service successfully If there is any problem please contact your ISP After that please install the Router according to the following step...

Page 16: ...TL WR941ND Wireless N Router Figure 2 1 Hardware Installation of the TL WR941ND Wireless N Router 7...

Page 17: ...eed instructions as to how to do this please refer to Appendix B Configuring the PC 2 Configure the network parameters The IP address is 192 168 0 xxx xxx is any number from 2 to 254 Subnet Mask is 25...

Page 18: ...means the connection between your PC and the Router is failed Figure 3 2 Failure result of Ping command Please check the connection following these steps 1 Is the connection between your PC and the R...

Page 19: ...based Internet Explorer or Netscape Navigator utility it is easy to configure and manage the TL WR941ND Wireless N Router The Web based utility can be used on any Windows Macintosh or UNIX OS with a W...

Page 20: ...t s recommended that you make use of the Auto Detect function If you are sure of what kind of connection type your ISP provides you can select the very type and click Next to go on configuring 4 If yo...

Page 21: ...he Confirm Password the screen will appear as shown below Click OK and re enter the Password and Confirm Password 2 If the connection type detected is Dynamic IP the next screen will appear as shown i...

Page 22: ...he Internet including your ISP Enter the IP address into the field Subnet Mask The Subnet Mask is used for the WAN IP address it is usually 255 255 255 0 Default Gateway Enter the gateway IP address i...

Page 23: ...ss This value is case sensitive For example TEST is NOT the same as test Region Select your region from the pull down list This field specifies the region where the wireless function of the Router can...

Page 24: ...ord You can enter ASCII or Hexadecimal characters For ASCII the key can be made up of any numbers 0 to 9 and any letters A to Z the length should be between 8 and 63 characters For Hexadecimal the key...

Page 25: ...TL WR941ND Wireless N Router Figure 3 13 Quick Setup Finish 16...

Page 26: ...your successful login you will see the fifteen main menus on the left of the Web based utility On the right there are the corresponding explanations and instructions The detailed explanations for each...

Page 27: ...outer Figure 4 1 Router Status 4 3 Quick Setup Please refer to 3 2 Quick Installation Guide 4 4 QSS This section will guide you add a new wireless device to an existing network quickly by QSS Quick Se...

Page 28: ...ton b To add a new device If the wireless adapter supports Wi Fi Protected Setup WPS you can establish a wireless connection between wireless adapter and Router using either Push Button Configuration...

Page 29: ...e QSS configuration The QSS Configuration Screen of Wireless Adapter Method Two Step 1 Press the QSS button on the front panel of the Router Step 2 For the configuration of the wireless adapter please...

Page 30: ...it for a while until the next screen appears Click Finish to complete the QSS configuration The QSS Configuration Screen of Wireless Adapter Method Three Step 1 Keep the default QSS Status as Enabled...

Page 31: ...k Connect Step 3 For the configuration of the wireless adapter please choose Push the button on my access point in the configuration utility of the QSS as below and click Next The QSS Configuration Sc...

Page 32: ...led and click the Add device button in Figure 4 2 then the following screen will appear Step 2 Choose Enter the new device s PIN and enter the PIN code of the wireless adapter in the field behind PIN...

Page 33: ...rrent PIN code of the Router in Figure 4 2 each Router has its unique PIN code Here takes the PIN code 12345670 of this Router for example Step 2 For the configuration of the wireless adapter please c...

Page 34: ...less Function of the Router is disabled Please make sure the Wireless Function is enabled before configuring the QSS 4 5 Network Figure 4 4 the Network menu There are three submenus under the Network...

Page 35: ...r two DNS addresses select Use These DNS Servers and enter the primary and secondary addresses into the correct fields Otherwise the DNS servers will be assigned dynamically from your ISP Note If you...

Page 36: ...eway IP address in dotted decimal notation provided by your ISP MTU Size The normal MTU Maximum Transmission Unit value for most Ethernet networks is 1500 Bytes It is not recommended that you change t...

Page 37: ...s radio button to use Dynamic IP as the secondary connection to connect to the local area network provided by ISP z Static IP You can check this radio button to use Static IP as the secondary connecti...

Page 38: ...although you specify a time to Max Idle Time since some applications are visiting the Internet continually in the background If you want to do some advanced configurations please click the Advanced b...

Page 39: ...your ISP s primary DNS server If a secondary DNS server address is available enter it as well Click the Save button to save your settings 4 If your ISP provides BigPond Cable or Heart Beat Signal conn...

Page 40: ...matically The connection can be re established automatically when it was down Connect Manually You can click the Connect Disconnect button to connect disconnect immediately This mode also supports the...

Page 41: ...d period of inactivity Max Idle Time If your Internet connection has been terminated due to inactivity Connect on Demand enables the Router to automatically re establish your connection as soon as you...

Page 42: ...ion to remain active at all times enter 0 in the Max Idle Time field Otherwise enter the number in minutes that you wish to have the Internet connecting last unless a new link is requested Caution Som...

Page 43: ...manually After a specified period of inactivity Max Idle Time the Router will disconnect from your Internet connection and you will not be able to re establish your connection automatically as soon a...

Page 44: ...192 168 0 1 Subnet Mask An address code that determines the size of the network Normally use 255 255 255 0 as the subnet mask Note 1 If you change the IP Address of LAN you must use the new IP Address...

Page 45: ...ill in the WAN MAC Address field Click Restore Factory MAC to restore the MAC address of WAN port to the factory default value Click the Save button to save your settings Note Only the PC on your LAN...

Page 46: ...AP will choose the best channel automatically It is not necessary to change the wireless channel unless you notice interference problems with another nearby access point Region Select your region from...

Page 47: ...Mode field the Channel Width selecting field will turn grey and the value will become 20M which is unable to be changed Max Tx Rate You can limit the maximum tx rate of the Router through this field...

Page 48: ...sen if the key type is WEP ASCII or WEP HEX It indicates the authorization type of the Root AP Password If the AP your Router is going to connect needs password you need to fill the password in this b...

Page 49: ...ey Select which of the four keys will be used and enter the matching WEP key that you create Make sure these values are identical on all wireless stations in your network Key Type You can select the W...

Page 50: ...e interval in seconds The value should be 30 or above Enter 0 to disable the update WPA WPA2 Personal Recommended It s the WPA WPA2 authentication type based on pre shared passphrase Version you can c...

Page 51: ...iltering you can control the wireless access by configuring the Wireless MAC Address Filtering function shown in Figure 4 20 Figure 4 20 Wireless MAC address Filtering To filter wireless users by MAC...

Page 52: ...to modify If you want to delete the entry click the Delete 2 Modify the information 3 Click the Save button Click the Enable All button to make all entries enabled Click the Disabled All button to ma...

Page 53: ...d should be similar to the following list 4 6 4 Wireless Advanced Choose menu Wireless Wireless Advanced you can configure the advanced settings of your wireless network Figure 4 22 Wireless Advanced...

Page 54: ...l value You can specify the value between 1 255 Beacon Intervals The default value is 1 which indicates the DTIM Interval is the same as Beacon Interval Enable WMM WMM function can guarantee the packe...

Page 55: ...beyond one page click the Next button to go to the next page and click the Previous button to return the previous page Note This page will be refreshed automatically every 5 seconds 4 7 DHCP Figure 4...

Page 56: ...tion to the Router with their current dynamic IP Address Enter the amount of time in minutes and the user will be leased this dynamic IP Address After the time is up the user will be automatically ass...

Page 57: ...r the dynamic IP address has expired a new dynamic IP address will be automatically assigned to the user You cannot change any of the values on this page To update this page and to show the current at...

Page 58: ...Save button when finished Figure 4 28 Add or Modify an Address Reservation Entry To modify or delete an existing entry 1 Click the Modify in the entry you want to modify If you want to delete the ent...

Page 59: ...The numbers of External Ports You can type a service port or a range of service ports in XXX YYY format XXX is the start port number YYY is the end port number IP Address The IP Address of the PC pro...

Page 60: ...ies Click the Next button to go to the next page and click the Previous button to return the previous page Note If you set the service port of the virtual server as 80 you must set the Web management...

Page 61: ...he outgoing request A response using one of these ports will be forwarded to the PC that triggered this rule You can input at most 5 groups of ports or port section Every group of ports must be set ap...

Page 62: ...onnection is released the according opening ports will be closed 2 Each rule allowed to be used only by one host on LAN synchronously The trigger connection of other hosts on LAN will be refused 3 Inc...

Page 63: ...n the screen shown in Figure 4 35 The UPnP feature allows the devices such as Internet computers to access the local host resources or devices as needed UPnP devices can be automatically discovered by...

Page 64: ...abled means that port is still active Otherwise the port is inactive Click Refresh to update the Current UPnP Settings List 4 9 Security Figure 4 36 The Security menu There are four submenus under the...

Page 65: ...w VPN tunnels using IPSec PPTP or L2TP protocols to pass through the Router s firewall z PPTP Passthrough Point to Point Tunneling Protocol PPTP allows the Point to Point Protocol PPP to be tunneled t...

Page 66: ...across NAT keep the default Enable z H323 ALG To allow Microsoft NetMeeting clients to communicate across NAT keep the default Enable Click the Save button to save your settings 4 9 2 Advanced Securi...

Page 67: ...ocking function immediately Enable TCP SYN FLOOD Attack Filtering Enable or Disable the TCP SYN FLOOD Attack Filtering TCP SYN FLOOD Packets Threshold 5 3600 The default value is 50 Enter a value betw...

Page 68: ...t Only the PCs with MAC address listed can use the password to browse the built in web pages to perform Administrator tasks while all the others will be blocked After click the Add button your PC s MA...

Page 69: ...hen all the hosts can access the Router from internet Note 1 To access the Router you should type your Router s WAN IP address into your browser s address in IE or Location in Navigator box followed b...

Page 70: ...ule Modify Here you can edit or delete an existing entry To add a new entry please follow the steps below 1 Click the Add New button and the next screen will pop up as shown in Figure 4 42 2 Enter the...

Page 71: ...odify Parental Control Entry For example If you desire that the child PC with MAC address 00 11 22 33 44 AA can access www google com on Saturday only while the parent PC with MAC address 00 11 22 33...

Page 72: ...rop down list z In Status field select Enable 4 Click Save to complete the settings Then you will go back to the Parental Control Settings page and see the following list as shown in Figure 4 43 Figur...

Page 73: ...eans that the Router permits the packets to go through the Router Deny means that the Router rejects the packets to go through the Router Status This field displays the status of the rule Enabled mean...

Page 74: ...he Previous button return to the previous page Figure 4 46 Add or Modify Internet Access Control Entry For example If you desire to allow the host with MAC address 00 11 22 33 44 AA to access www goog...

Page 75: ...complete the settings Then you will go back to the Access Control Rule Management page and see the following list 4 11 2 Host Choose menu Access Control Host you can view and set a Host list in the s...

Page 76: ...utton return to the previous page Figure 4 48 Add or Modify a Host Entry Figure 4 49 Add or Modify a Host Entry For example If you desire to restrict the internet activities of host with MAC address 0...

Page 77: ...e a unique description for the target e g Target_1 2 In IP Address field enter the IP address of the target 3 Select a common service from Common Service Port drop down list so that the Target Port wi...

Page 78: ...ddress 00 11 22 33 44 AA in the LAN to access www google com only you should first follow the settings below 1 Click Add New button in Figure 4 50 to enter the Add or Modify an Access Target Entry pag...

Page 79: ...edit or delete an existing schedule To add a new schedule follow the steps below 1 Click Add New button shown in Figure 4 53 and the next screen will pop up as shown in Figure 4 54 2 In Schedule Descr...

Page 80: ...ption field create a unique description for the schedule e g Schedule_1 3 In Day field check the Select Days radio button and then select Sat and Sun 4 In Time field enter 1800 in Start Time field and...

Page 81: ...en Figure 4 57 Add or Modify a Static Route Entry 2 Enter the following data Destination Network The Destination Network is the address of the network or host that you want to assign to a static route...

Page 82: ...em routing table views all of the valid route entries in use The Destination IP address Subnet Mask Gateway and Interface will be displayed for each entry Figure 4 58 System Routing Table Destination...

Page 83: ...right Line Type and ask your ISP for the total bandwidth of the egress and ingress Figure 4 60 Bandwidth Control Settings Enable Bandwidth Control Check this box so that the Bandwidth Control setting...

Page 84: ...n Figure 4 61 you will see a new screen shown in Figure 4 62 Step 2 Enter the information like the screen shown below Figure 4 62 Bandwidth Control Rule Settings Step 3 Click the Save button 4 14IP MA...

Page 85: ...you will go to the next page This page is used for adding or modifying an IP MAC Binding entry shown in Figure 4 65 Figure 4 65 IP MAC Binding Setting Add Modify To add IP MAC Binding entries follow t...

Page 86: ...king the relationship of MAC address and IP address on the ARP list and you could configure the items on the ARP list also This page displays the ARP List it shows all the existing IP MAC Binding entr...

Page 87: ...c DNS and you can configure the Dynamic DNS function The Router offers the DDNS Dynamic Domain Name System feature which allows the hosting of a website FTP server or e mail server with a fixed domain...

Page 88: ...he User Name for your DDNS account 3 Type the Password for your DDNS account 4 Click the Login button to log in to the DDNS service Connection Status The status of the DDNS service connection is displ...

Page 89: ...count 3 Type the Domain Name you received from dynamic DNS service provider here 4 Click the Login button to log in to the DDNS service Connection Status The status of the DDNS service connection is d...

Page 90: ...lick the Login button to log in the DDNS service Connection Status The status of the DDNS service connection is displayed here Click Logout to log out the DDNS service 4 16System Tools Figure 4 71 The...

Page 91: ...d then the Router will get the time from the NTP Server preferentially In addition the Router built in some common NTP Servers so it can get time automatically once it connects the Internet Enable Day...

Page 92: ...end time from the drop down lists in the End field 4 Click the Save button to save the settings Note 1 This setting will be used for some time based functions such as firewall You must specify your t...

Page 93: ...g the domain name is not you might have a name resolution problem In this case ensure that the domain name you are specifying can be resolved by using Domain Name System DNS queries IP Address Domain...

Page 94: ...pgrade you can update the latest version of firmware for the Router on the following screen Figure 4 75 Firmware Upgrade Firmware Version This displays the current firmware version Hardware Version Th...

Page 95: ...s being upgraded otherwise the Router may be damaged 4 The Router will reboot after the upgrading has been finished 4 16 4 Factory Defaults Choose menu System Tools Factory Defaults and you can restor...

Page 96: ...he Router will restart automatically Keep the Router on during the upgrading process to prevent any damage 4 16 6 Reboot Choose menu System Tools Reboot you can click the Reboot button to reboot the R...

Page 97: ...name and password of the Router because all users who try to access the Router s Web based utility or Quick Setup will be prompted for the Router s default user name and password Note The new user nam...

Page 98: ...Log Auto Mail Feature Indicates whether auto mail feature is enabled or not Mail Settings Set the receiving and sending mailbox address server address validation information as well as the timetable f...

Page 99: ...Name and Password in the following fields z User Name Your mail account name filled in the From field The part behind is excluded z Password Your mail account password z Confirm The Password Enter th...

Page 100: ...lue of the last Packets Statistic interval in seconds Figure 4 82 Statistics Current Statistics Status Enable or Disable The default value is disabled To enable click the Enable button If disabled the...

Page 101: ...seconds ICMP Tx The number of ICMP packets transmitted to the WAN per second at the specified Packets Statistics interval It is shown like current transmitting rate Max transmitting rate UDP Tx The nu...

Page 102: ...g Connect Figure A 1 PPPoE Connection Type 4 If your ADSL lease is in pay according time mode select Connect on Demand or Connect Manually for Internet connection mode Type an appropriate number for M...

Page 103: ...MAC Address field The format for the MAC Address is XX XX XX XX XX XX Then click the Save button It will take effect after rebooting Figure A 3 MAC Clone 3 I want to use Netmeeting what do I need to...

Page 104: ...rowser and click DMZ submenu On the DMZ page click Enable radio button and type your IP address into the DMZ Host IP Address field using 192 168 0 198 as an example remember to click the Save button F...

Page 105: ...change the WEB management port number Log in to the Router click the Security menu on the left of your browser and click Remote Management submenu On the Remote Management page type a port number exce...

Page 106: ...P Address assuming 192 168 0 188 for an example remember to Enable and Save Figure A 9 Virtual Servers Figure A 10 Add or Modify a Virtual server Entry 5 The wireless stations cannot connect to the Ro...

Page 107: ...ual if needed 1 Install TCP IP component 1 On the Windows taskbar click the Start button point to Settings and then click Control Panel 2 Click the Network and Internet Connections icon and then click...

Page 108: ...w will display and the IP Address tab is open on this window by default Now you have two ways to configure the TCP IP protocol below Setting IP address automatically Select Obtain an IP address automa...

Page 109: ...dress is 192 168 0 1 specify the IP address as 192 168 0 x x is from 2 to 254 and Subnet mask is 255 255 255 0 3 Type the Router s LAN IP address the default IP is 192 168 0 1 into the Default gateway...

Page 110: ...TL WR941ND Wireless N Router Figure B 4 101...

Page 111: ...Ds PWR SYS WLAN LAN 1 4 WAN QSS Safety Emissions FCC CE Wireless Frequency Band 2 4 2 4835GHz Radio Data Rate 11n up to 300Mbps Automatic 11g 54 48 36 24 18 12 9 6M Automatic 11b 11 5 5 2 1M Automatic...

Page 112: ...for security DDNS Dynamic Domain Name System The capability of assigning a fixed host and domain name to a dynamic Internet IP Address DHCP Dynamic Host Configuration Protocol A protocol that automati...

Page 113: ...Wired Equivalent Privacy A data privacy mechanism based on a 64 bit or 128 bit or 152 bit shared key algorithm as described in the IEEE 802 11 standard Wi Fi A trade name for the 802 11b wireless net...

Reviews: