background image

TL-WR702N

150Mbps Wireless N Nano Router


- 114 - 

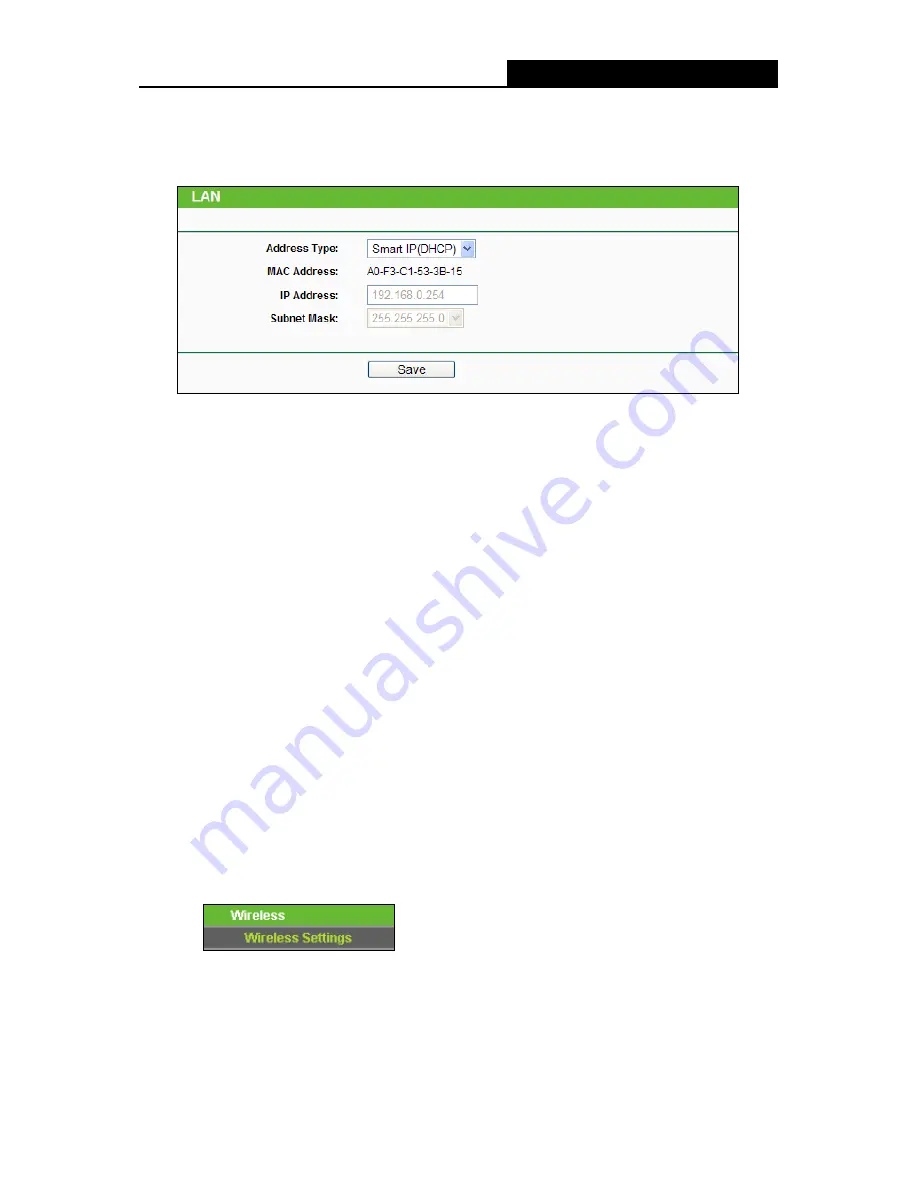
6.5.1  LAN 

Choose menu “

Network 

 LAN

”, and then you can configure the IP parameters of the LAN on 

the screen as below. 


Figure 6-6  LAN 

¾


Address Type -

 Choosing 

Smart IP(DHCP)

 to get IP address from DHCP server, or 

choosing 

Static IP

 to configure IP address manually. 

¾


MAC Address


-

 The physical address of the LAN ports, as seen from the LAN. The value 

can't be changed. 

¾


IP Address -

 Enter the IP address of your Router in dotted-decimal notation (factory default: 

192.168.0.254). 

¾


Subnet Mask -

 An address code that determines the size of the network. Normally use 

255.255.255.0 as the subnet mask.   

)


Note:


1.  If you change the LAN IP address, you must use the new IP address to login to the Router.   

2.  If you select the type of Smart IP (DHCP) and there is a DHCP server forward, the DHCP 

server in this device will not start up.   

3.  If the new LAN IP address you set is not in the same subnet with the previous one, the IP 

Address pool in the DHCP server will be configured automatically, but the Virtual Server and 

DMZ Host will not take effect until they are re-configured. 

6.6  Wireless 


Figure 6-7    Wireless menu 

There is one submenu under the Wireless menu (shown in Figure 6-7): 

Wireless Settings

.


Click 

it, and you will be able to configure the corresponding function.   

Summary of Contents for TL-WR702N

Page 1: ...TL WR702N 150Mbps Wireless N Nano Router Rev 1 1 0 1910010880 ...

Page 2: ...arantee that interference will not occur in a particular installation If this equipment does cause harmful interference to radio or television reception which can be determined by turning the equipment off and on the user is encouraged to try to correct the interference by one or more of the following measures Reorient or relocate the receiving antenna Increase the separation between the equipment...

Page 3: ...ry Canada license exempt RSS standard s Operation is subject to the following two conditions 1 This device may not cause interference and 2 This device must accept any interference including interference that may cause undesired operation of the device Cet appareil est conforme aux norms CNR exemptes de licence d Industrie Canada Le fonctionnement est soumis aux deux conditions suivantes 1 cet app...

Page 4: ...打開機殼 不要嘗試自行維修本產品 請由授權的專業人士進行此項工作 Продукт сертифіковано згідно с правилами системи УкрСЕПРО на відповідність вимогам нормативних документів та вимогам що передбачені чинними законодавчими актами України Safety Information z When product has power button the power button is one of the way to shut off the product when there is no power button the only way to completely shut off power is to disconnect...

Page 5: ...This product can be used in the following countries AT BG BY CA CZ DE DK EE ES FI FR GB GR HU IE IT LT LV MT NL NO PL PT RO RU SE SK TR UA ...

Page 6: ...product within the scope of Council Directives Directives 1999 5 EC Directives 2004 108 EC Directives 2006 95 EC Directives 1999 519 EC Directives 2011 65 EU The above product is in conformity with the following standards or other normative documents ETSI EN 300 328 V1 7 1 2006 ETSI EN 301 489 1 V1 9 2 2011 ETSI EN 301 489 17 V2 2 1 2012 EN 55022 2010 EN 55024 2010 EN 61000 3 2 2006 A1 2009 A2 200...

Page 7: ... 2 3 1 AP Mode 6 2 3 2 Router Mode 6 2 3 3 Repeater Mode 7 2 3 4 Bridge Mode 8 2 3 5 Client Mode 8 Chapter 3 Quick Installation Guide 10 3 1 TCP IP Configuration 10 3 2 Quick Installation Guide 11 3 2 1 AP Mode 13 3 2 2 Router Mode 16 3 2 3 Repeater Mode 19 3 2 4 Bridge Mode 21 3 2 5 Client Mode 24 Chapter 4 Configuration for AP Mode 28 4 1 Login 28 4 2 Status 28 4 3 Quick Setup 30 4 4 Working Mod...

Page 8: ...2 Firmware 47 4 8 3 Factory Defaults 48 4 8 4 Backup Restore 49 4 8 5 Reboot 49 4 8 6 Password 50 4 8 7 System Log 51 Chapter 5 Configuration for Router Mode 52 5 1 Login 52 5 2 Status 52 5 3 Quick Setup 55 5 4 Working Mode 55 5 5 Network 56 5 5 1 WAN 56 5 5 2 LAN 64 5 5 3 MAC Clone 64 5 6 Wireless 65 5 6 1 Wireless Settings 65 5 6 2 Wireless Security 68 5 6 3 MAC Filtering 71 5 6 4 Wireless Advan...

Page 9: ...Filtering 87 5 9 4 MAC Address Filtering 89 5 9 5 Remote Management 90 5 9 6 Advanced Security 91 5 10 Static Routing 93 5 11 IP QoS 94 5 12 IP MAC Binding Setting 96 5 12 1 Binding Setting 96 5 12 2 ARP List 98 5 13 Dynamic DNS 98 5 13 1 No IP DDNS 99 5 13 2 PeanutHull DDNS 99 5 13 3 Comexe DDNS 100 5 13 4 Dyndns DDNS 101 5 14 System Tools 102 5 14 1 Time 103 5 14 2 Diagnostic 104 5 14 3 Firmware...

Page 10: ... 6 1 Wireless Settings 115 6 7 DHCP 116 6 7 1 DHCP Settings 116 6 7 2 DHCP Clients List 118 6 7 3 Address Reservation 118 6 8 System Tools 120 6 8 1 Diagnostic 120 6 8 2 Firmware 122 6 8 3 Factory Defaults 123 6 8 4 Backup Restore 124 6 8 5 Reboot 124 6 8 6 Password 125 6 8 7 System Log 126 Chapter 7 Configuration for Bridge Mode 127 7 1 Login 127 7 2 Status 127 7 3 Quick Setup 129 7 4 Working Mod...

Page 11: ...ore 144 7 8 5 Reboot 144 7 8 6 Password 145 7 8 7 System Log 146 Chapter 8 Configuration for Client Mode 147 8 1 Login 147 8 2 Status 147 8 3 Quick Setup 148 8 4 Working Mode 149 8 5 Network 149 8 5 1 LAN 150 8 6 Wireless 150 8 6 1 Wireless Settings 151 8 7 DHCP 152 8 7 1 DHCP Settings 153 8 7 2 DHCP Clients List 154 8 7 3 Address Reservation 155 8 8 System Tools 156 8 8 1 Diagnostic 156 8 8 2 Fir...

Page 12: ... VI 8 8 5 Reboot 160 8 8 6 Password 161 8 8 7 System Log 162 Appendix A FAQ 163 Appendix B Configuring the PC 168 Appendix C Specifications 172 Appendix D Glossary 173 ...

Page 13: ...s N Nano Router Quick Installation Guide One Power Adapter One USB Cable One RJ 45 Ethernet Cable One Resource CD for TL WR702N 150Mbps Wireless N Nano Router including User Guide Other Helpful Information Note Make sure that the package contains the above items If any of the listed items is damaged or missing please contact your distributor ...

Page 14: ...r for they both make the TL WR702N able to extend the existing wireless network In Client mode TL WR702N acts as a wireless station to enable the wired host s to access AP With multiple protection measures including SSID broadcast control and wireless LAN 64 128 152 bit WEP encryption WiFi protected Access WPA2 PSK WPA PSK as well as advanced Firewall protections the TL WR702N 150Mbps Wireless N N...

Page 15: ...eatures Complies with IEEE 802 11n g b Wireless speed up to 150Mbps Powered by external power adapter or USB connection to computer Travel size design ideal for home or travel use Compact and portable powerful wireless signal as well Perfectly compatible with almost all the 2 4GHz Wi Fi devices Supports AP Router Repeater Bridge and Client modes Supports WEP WPA WPA2 WPA PSK WPA2 PSK encryptions 1...

Page 16: ...bles you connect the DSL cable Modem or Ethernet Power This port is used to connect the provided power adapter Reset It is used to reset the Router to its factory defaults With the Router powered on use a pin to press and hold the Reset button about 5 seconds until the SYS LED becomes quick flash from slow flash And then release the button and wait the Router to reboot to its factory default setti...

Page 17: ... direct irradiation of any strong light such as sunlight Keep at least 2 inches 5 cm of clear space around the Router Operating Temperature 0 40 32 104 Operating Humidity 10 90 RH Non condensing 2 3 Connecting the Router Before installing the Router please make sure your broadband service provided by your ISP is available If there is any problem please contact with your ISP To connect the Router p...

Page 18: ... default and the default password is the last unique eight numbers of each Router s MAC address Figure 2 1 Hardware Installation of the TL WR702N in AP Mode 1 Connect the LAN port of TL WR702N to the wired network port with an Ethernet cable 2 Plug the power plug of TL WR702N in electrical wall socket 3 Power on the PC s and notebook s 2 3 2 Router Mode As a wireless router TL WR702N enables multi...

Page 19: ...et 4 Power on the DSL Cable Modem PC s and notebook s 2 3 3 Repeater Mode TL WR702N is used to extend the range of wireless signal of the existing AP or wireless router On this mode the only wired port works as LAN Computer could connect to the device by either wired or wireless way The SSID of TL WR702N should be the same as that of the device you repeat Figure 2 3 Hardware Installation of the TL...

Page 20: ...s as LAN Computer could connect to the device by either wired or wireless way Figure 2 4 Hardware Installation of the TL WR702N in Bridge Mode 1 Plug the power plug of TL WR702N in electrical wall socket 2 Power on the notebook s Note It is recommended that you connect a PC notebook to the LAN port of the Router with an Ethernet cable and then login the Router from the PC notebook to set the Route...

Page 21: ...of the TL WR702N in Client Mode 1 Connect the PC to the LAN WAN port of TL WR702N router with an Ethernet cable 2 Plug the power plug of TL WR702N in electrical wall socket 3 Power on the PC s Note TL WR702N can be powered by external power adapter or USB connection to computer ...

Page 22: ...llowing way Obtain an IP address automatically 1 Set up the TCP IP Protocol in Obtain an IP address automatically mode on your PC If you need instructions as to how to do this please refer to Appendix B Configuring the PC 2 Then the built in DHCP server will assign IP address for the PC Now you can run the Ping command in the command prompt to verify the network connection between your PC and the ...

Page 23: ...2 168 0 253 3 2 Quick Installation Guide With a Web based utility it is easy to configure and manage the TL WR702N 150Mbps Wireless N Nano Router The Web based utility can be used on any Windows Macintosh or UNIX OS with a Web browser such as Microsoft Internet Explorer Mozilla Firefox or Apple Safari 1 To access the configuration utility open a web browser and type in the default address http tpl...

Page 24: ... set to a proxy Go to Tools menu Internet Options Connections LAN Settings in the screen that appears cancel the Using Proxy checkbox and click OK to finish it 2 After a successfully login you can click the Quick Setup menu to quickly configure your Router Figure 3 4 Quick Setup 3 Click Next and then Working Mode page will appear shown in Figure 3 5 ...

Page 25: ...ess the Internet via DSL Cable Modem In Repeater mode the device will relay data to an associated root AP In Bridge mode the device bridges to another AP In Client mode the device will act as a wireless station to enable wired host s to access AP You can configure your device quickly by the following steps in different modes 3 2 1 AP Mode When you choose AP on Working Mode page in Figure 3 5 take ...

Page 26: ... region from the pull down list This field specifies the region where the wireless function of the Router can be used It may be illegal to use the wireless function of the Router in a region other than one of those specified in this field If your country or region is not listed please contact your local government agency for assistance Channel This field determines which operating frequency will b...

Page 27: ...owing options to enable security WPA PSK WPA2 PSK Select WPA based on pre shared passphrase PSK Password You can enter ASCII or Hexadecimal characters The default password is the last unique eight numbers of each Router s MAC address For ASCII the key can be made up of any numbers 0 to 9 and any letters A to Z the length should be between 8 and 63 characters For Hexadecimal the key can be made up ...

Page 28: ...king Mode page in Figure 3 5 take the following steps 1 Click Next in Figure 3 5 and you will see the following screen The wireless settings on Router mode are the same as that on AP mode Figure 3 9 Quick Setup Wireless Router 2 Click Next in Figure 3 9 and then WAN Connection Type page will appear as shown in Figure 3 10 ...

Page 29: ...ial up service you should choose this type Under this condition you should fill in both the User Name and Password that the ISP supplied then click Next and proceed to Figure 3 14 Please note that these fields are case sensitive Figure 3 11 Quick Setup PPPoE Dynamic IP Your ISP uses a DHCP service to assign your Router an IP address for connecting to the Internet When the Router connects to a DHCP...

Page 30: ...u should fill in the IP address Subnet Mask Default Gateway and DNS IP address manually which are specified by your ISP Then click Next and proceed to Figure 3 14 Figure 3 13 Quick Setup Static IP 3 Click Next you will see the Finish page as shown in Figure 3 14 Click the Reboot button to make your wireless configuration take effect and finish the Quick Setup Figure 3 14 Quick Setup Finish ...

Page 31: ...ther than one of those specified in this field If your country or region is not listed please contact your local government agency for assistance Survey Click this button you can search the AP which runs in the environment Security Options This option should be chosen according to the security configuration of the AP you want to access It is recommended that the security type is the same as your A...

Page 32: ...rget network s SSID will be automatically filled into the corresponding box which is shown as the Figure 3 15 Figure 3 16 AP List Note If you know the SSID of the desired AP you can also input it into the field SSID manually 2 Click the Next button in Figure 3 15 You will then see the Finish page Because something has changed on the Wireless Repeater page you will see the Finish page as shown in F...

Page 33: ...e 3 18 Quick Setup Wireless Bridge SSID Enter a string of up to 32 characters The same name of SSID Service Set Identification must be assigned to all wireless devices in your network The default SSID is set to be TP LINK_XXXXXX XXXXXX indicates the last unique six numbers of each Router s MAC address But it is recommended strongly that you change your networks name SSID to a different value This ...

Page 34: ... Router When 802 11n mode is selected only 802 11n wireless stations can connect to the AP It is strongly recommended that you set the Mode to 802 11b g n and all of 802 11b 802 11g and 802 11n wireless stations can connect to the Router Channel width Select the channel width from the pull down list The default setting is auto which can automatically adjust the channel width for your clients Note ...

Page 35: ...en AP List page will appear as shown in Figure 3 19 Find the SSID of the Access Point you want to access and click Connect in the corresponding row For example the third item is selected The target network s SSID will be automatically filled into the corresponding box which is shown as the Figure 3 18 Figure 3 19 AP List 2 Click Next in Figure 3 18 and then Wireless Security Settings page will app...

Page 36: ... up of any numbers 0 to 9 and any letters A to Z the length should be between 8 and 63 characters For Hexadecimal the key can be made up of any numbers 0 to 9 and letters A to F the length should be between 8 and 64 characters Please also note the key is case sensitive this means that upper and lower case keys will affect the outcome It would also be a good idea to write down the key and all relat...

Page 37: ... the security configuration of the AP you want to access It is recommended that the security type is the same as your AP s security type WEP Key Index This option should be chosen if the key type is WEP ASCII or WEP HEX It indicates the index of the WEP key Authentication Type This option should be chosen if the key type is WEP ASCII or WEP HEX It indicates the authorization type of the Root AP Pa...

Page 38: ...o Router 26 Figure 3 23 AP List 3 Click the Next button in Figure 3 24 You will then see the Finish page Click the Reboot button to make your wireless configuration take effect and finish the Quick Setup Figure 3 24 Quick Setup Finish ...

Page 39: ...lace your Router z Near the center of the area in which your wireless stations will operate z In an elevated location such as a high shelf z Away from the potential sources of interference such as PCs microwaves and cordless phones z Away from large metal surfaces Failure to follow these guidelines can result in significant performance degradation or inability to wirelessly connect to the Router ...

Page 40: ...nfigure and manage the device There are main menus on the left of the web based utility Submenus will be available after you click one of the main menus On the right there are the corresponding explanations and instructions Figure 4 1 The detailed explanations for each Web page s key function are listed below 4 2 Status The Status page provides the current status information about the Router on AP...

Page 41: ...he Router as seen from the LAN IP address The LAN IP address of the Router Subnet Mask The subnet mask associated with LAN IP address Wireless This field displays basic information or status for wireless function you can configure them in the Wireless Wireless Settings page Wireless Mode The current wireless working mode in use Wireless Radio Indicates whether the wireless radio feature of the AP ...

Page 42: ...Router Repeater Bridge and Client Please select one your want Click Save to save your choice which is shown as Figure 4 3 Figure 4 3 Wireless Working Mode Settings AP The wireless access point mode Router The wireless Router Mode In this mode the device enables multi user to share Internet via DSL Cable Modem The only wired port works as WAN Repeater The wireless Repeater Mode It could extend the ...

Page 43: ...n t be changed IP Address Enter the IP address of your Router in dotted decimal notation factory default 192 168 0 254 Subnet Mask An address code that determines the size of the network Normally use 255 255 255 0 as the subnet mask Note 1 If you change the LAN IP address you must use the new IP address to login to the Router 2 If you select the type of Smart IP DHCP and there is a DHCP server for...

Page 44: ...nction 4 6 1 Wireless Settings Choose menu Wireless Wireless Settings and then you can configure the basic settings for the wireless network on this page Figure 4 8 Wireless Settings AP SSID Enter a string of up to 32 characters The same name of SSID Service Set Identification must be assigned to all wireless devices in your network The default SSID is set to be TP LINK_XXXXXX XXXXXX indicates the...

Page 45: ...11g wireless clients 11bgn mixed Select if you are using a mix of 802 11b 11g and 11n wireless clients Select the desired wireless mode When 802 11g mode is selected only 802 11g wireless stations can connect to the Router When 802 11n mode is selected only 802 11n wireless stations can connect to the AP It is strongly recommended that you set the Mode to 802 11b g n and all of 802 11b 802 11g and...

Page 46: ... the AP s security configuration It is recommended that the security type is the same as your AP s security type WEP Index This option should be chosen if the key type is WEP ASCII or WEP HEX It indicates the index of the WEP key Authentication Type This option should be chosen if the key type is WEP ASCII or WEP HEX It indicates the authorization type of the Root AP Password If the AP your Router...

Page 47: ...y and then you can configure the security settings of your wireless network There are three wireless security modes supported by the Router WEP Wired Equivalent Privacy WPA WPA2 and WPA PSK WPA2 PSK Figure 4 9 Wireless Security Disable Security The wireless security function can be enabled or disabled If disabled the wireless stations will be able to connect the Router without encryption But it s ...

Page 48: ...bination of 0 9 a f A F zero key is not promoted or 5 ASCII characters 128 bit You can enter 26 hexadecimal digits any combination of 0 9 a f A F zero key is not promoted or 13 ASCII characters 152 bit You can enter 32 hexadecimal digits any combination of 0 9 a f A F zero key is not promoted or 16 ASCII characters Note If you do not set the key the wireless security function is still disabled eve...

Page 49: ...length should be between 8 and 63 characters For Hexadecimal the key can be made up of any numbers 0 to 9 and letters A to F the length should be between 8 and 64 characters Please also note the key is case sensitive this means that upper and lower case keys will affect the outcome It would also be a good idea to write down the key and all related wireless security settings Group Key Update Period...

Page 50: ...ield The format of the MAC Address is XX XX XX XX XX XX X is any hexadecimal digit For example 00 0A EB B0 00 0B 2 Give a simple description for the wireless station in the Description field For example Wireless station A 3 Select Enabled or Disabled for this entry on the Status pull down list 4 Click the Save button to save this entry To modify or delete an existing entry 1 Click the Modify in th...

Page 51: ...dio button Allow the stations specified by any enabled entries in the list to access for Filtering Rules 3 Delete all or disable all entries if there are any entries already 4 Click the Add New button Enter the MAC address 00 0A EB B0 00 0B 00 0A EB 00 07 5F in the MAC Address field Enter wireless station A B in the Description field Select Enabled in the Status pull down list Click the Save butto...

Page 52: ...alue is the maximum size determining whether packets will be fragmented Setting the Fragmentation Threshold too low may result in poor network performance because of excessive packets 2346 is the default setting and is recommended DTIM Interval This value determines the interval of the Delivery Traffic Indication Message DTIM A DTIM field is a countdown field informing clients of the next window f...

Page 53: ... and Sent Packets for each connected wireless station Figure 4 13 Wireless Statistics MAC Address The connected wireless station s MAC address Current Status The connected wireless station s running status one of STA AUTH STA ASSOC STA JOINED WPA WPA PSK WPA2 WPA2 PSK AP UP AP DOWN Disconnected Received Packets Packets received by the station Sent Packets Packets sent by the station You cannot cha...

Page 54: ...you can see the page as shown in Figure 4 15 if you have chose Smart IP DHCP in Network LAN in which situation the device will help you configure the DHCP automatically as you need If you have chose Static IP in Network LAN you can see the page as shown in Figure 4 16 and then you can configure the DHCP Server on this page The Router is set up by default as a DHCP Dynamic Host Configuration Protoc...

Page 55: ...connection to the Router with their current dynamic IP Address Enter the amount of time in minutes and the user will be leased this dynamic IP Address After the time is up the user will be automatically assigned a new dynamic IP address The range of the time is 1 2880 minutes The default value is 120 minutes Default Gateway Optional It is suggested to input the IP address of the LAN port of the Ro...

Page 56: ...mic IP address will be automatically assigned to the user You cannot change any of the values on this page To update this page and to show the current attached devices click the Refresh button 4 7 3 Address Reservation Choose menu DHCP Address Reservation and then you can view and add a reserved address for clients via the next screen shown in Figure 4 18 When you specify a reserved IP address for...

Page 57: ...ou want to reserve an IP address 3 Click the Save button Figure 4 19 Add or Modify an Address Reservation Entry To modify or delete an existing entry 1 Click the Modify in the entry you want to modify If you want to delete the entry click the Delete 2 Modify the information 3 Click the Save button Click the Enable Disabled All button to make all entries enabled disabled Click the Delete All button...

Page 58: ...nectivity of your network in the following screen Figure 4 21 Diagnostic Tools Diagnostic Tool Check the radio button to select one diagnostic tool Ping This diagnostic tool troubleshoots connectivity reachability and name resolution to a given host or gateway Traceroute This diagnostic tool tests the performance of a connection Note You can use ping traceroute to test both numeric IP address or d...

Page 59: ...r a Traceroute connection The default is 20 Click Start to check the connectivity of the Internet The Diagnostic Results page displays the result of diagnosis If the result is similar to the following screen the connectivity of the Internet is fine Figure 4 22 Diagnostic Results Note Only one user can use this tool at one time Options Number of Pings Ping Size and Ping Timeout are used for Ping fu...

Page 60: ...n experiencing problems caused by the Router rather than the configuration you can try to upgrade the firmware 2 When you upgrade the Router s firmware you may lose its current configurations so before upgrading the firmware please write down some of your customized settings to avoid losing important settings 3 Do not turn off the Router or press the Reset button while the firmware is being upgrad...

Page 61: ...the Router s configuration follow these instructions Click the Browse button to locate the update file for the Router or enter the exact path to the Setting file in the text box Click the Restore button Note The current configuration will be covered by the uploading configuration file The upgrade process lasts for 20 seconds and the Router will restart automatically Keep the Router on during the u...

Page 62: ...nu System Tools Password and then you can change the factory default user name and password of the Router in the next screen as shown in Figure 4 27 Figure 4 27 Password It is strongly recommended that you should change the factory default user name and password of the Router because all users who try to access the Router s Web based utility or Quick Setup will be prompted for the Router s default...

Page 63: ...tem Log Choose menu System Tools System Log and then you can view the logs of the Router Figure 4 28 System Log Refresh Refresh the page to show the latest log list Clear All All the logs will be deleted from the Router permanently not just from the page ...

Page 64: ...configure and manage the device There are main menus on the left of the web based utility Submenus will be available after you click one of the main menus On the right there are the corresponding explanations and instructions Figure 5 1 The detailed explanations for each Web page s key function are listed below 5 2 Status The Status page provides the current status information about the Router on ...

Page 65: ...TL WR702N 150Mbps Wireless N Nano Router 53 Figure 5 2 Firmware Version The version information of the Router s firmware Hardware Version The version information of the Router s hardware ...

Page 66: ... or information for the WAN you can configure them in the Network WAN page MAC Address The physical address of the WAN port as seen from the Internet IP Address The current WAN Internet IP Address This field will be blank or 0 0 0 0 if the IP Address is assigned dynamically and there is no connection to the Internet Subnet Mask The subnet mask associated with the WAN IP Address Default Gateway The...

Page 67: ... select one your want Click Save to save your choice which is shown as Figure 5 3 Figure 5 3 Wireless Working Mode Settings AP The wireless access point mode Router The wireless Router Mode In this mode the device enables multi user to share Internet via DSL Cable Modem The only wired port works as WAN Repeater The wireless Repeater Mode It could extend the range of wireless network Bridge The wir...

Page 68: ...y of them and you will be able to configure the corresponding function 5 5 1 WAN Choose menu Network WAN and then you can configure the IP parameters of the WAN on the screen below 1 If your ISP provides the DHCP service please choose Dynamic IP type and the Router will automatically get IP parameters from your ISP You can see the page as follow Figure 5 6 Figure 5 6 WAN Dynamic IP ...

Page 69: ...ry and secondary addresses into the correct fields Otherwise the DNS servers will be assigned dynamically from your ISP Note If you find error when you go to a website after entering the DNS addresses it is likely that your DNS servers are set up improperly You should contact your ISP to get DNS server addresses Host Name This option specifies the Host Name of the Router Get IP with Unicast DHCP A...

Page 70: ...ytes It is not recommended that you change the default MTU Size unless required by your ISP Primary Secondary DNS Optional Enter one or two DNS addresses in dotted decimal notation provided by your ISP Click the Save button to save your settings 3 If your ISP provides a PPPoE connection select PPPoE Russia PPPoE option Then you should enter the following parameters Figure 5 8 Figure 5 8 WAN PPPoE ...

Page 71: ...ld Otherwise enter the number of minutes you want to have elapsed before your Internet access disconnects Connect Automatically The connection can be re established automatically when it was down Time based Connecting The connection will only be established in the period from the start time to the end time both are in HH MM format Note Only when you have configured the system time on System Tools ...

Page 72: ...fied by ISP check box and enter the IP address provided by your ISP in dotted decimal notation Detect Online Interval The Router will detect Access Concentrator online at every interval The default value is 0 You can input the value between 0 and 120 The value 0 means no detect Primary DNS Secondary DNS If your ISP does not automatically assign DNS addresses to the Router during login please click...

Page 73: ...ter a specified period of inactivity Max Idle Time If your Internet connection has been terminated due to inactivity Connect on Demand enables the Router to automatically re establish your connection as soon as you attempt to access the Internet again If you wish to activate Connect on Demand check the radio button If you want your Internet connection to remain active at all times enter 0 in the M...

Page 74: ...ou want your Internet connection to remain active at all times enter 0 in the Max Idle Time field Otherwise enter the number of minutes that you wish to have the Internet connecting last unless a new link is requested Caution Sometimes the connection cannot be disconnected although you specify a time to Max Idle Time because some applications are visiting the Internet continually in the background...

Page 75: ...Internet connection to remain active at all times enter 0 in the Max Idle Time field Otherwise enter the number of minutes you want to have elapsed before your Internet connection terminates Connect Automatically Connect automatically after the Router is disconnected To use this option check the radio button Connect Manually You can configure the Router to make it connect or disconnect manually Af...

Page 76: ...code that determines the size of the network Normally use 255 255 255 0 as the subnet mask Note 1 If you change the IP Address of LAN you must use the new IP Address to login to the Router 2 If the new LAN IP Address you set is not in the same subnet with the previous one the IP Address pool in the DHCP server will be configured automatically while the Virtual Server and DMZ Host will not take eff...

Page 77: ... the WAN MAC Address field Click Restore Factory MAC to restore the MAC address of WAN port to the factory default value Click the Save button to save your settings Note 1 Only the PC on your LAN can use the MAC Address Clone function 2 If you change WAN MAC Address when the WAN connection is PPPoE it will not take effect until the connection is re established 5 6 Wireless Figure 5 14 Wireless men...

Page 78: ...may be illegal to use the wireless function of the Router in a region other than one of those specified in this field If your country or region is not listed please contact your local government agency for assistance Channel This field determines which operating frequency will be used The default channel is set to Auto It is not necessary to change the wireless channel unless you notice interferen...

Page 79: ...wireless router will broadcast its name SSID on the air Enable WDS You can select to enable WDS With this function the Router can bridge two or more WLANs If this checkbox is selected you will have to set the following parameters as shown below Make sure the following settings are correct SSID to be bridged The SSID of the AP your Router is going to connect to as a client You can also use the sear...

Page 80: ... varies significantly based on the physical placement of the Router For best results place your Router z Near the center of the area in which your wireless stations will operate z In an elevated location such as a high shelf z Away from the potential sources of interference such as PCs microwaves and cordless phones z Away from large metal surfaces 2 Failure to follow these guidelines can result i...

Page 81: ...t is based on the IEEE 802 11 standard Type you can choose the type for the WEP security on the pull down list The default setting is Automatic which can select Shared Key or Open System authentication type automatically based on the wireless station s capability and request WEP Key Format Hexadecimal and ASCII formats are provided here Hexadecimal format stands for any combination of hexadecimal ...

Page 82: ...ist The default setting is Automatic which can select WPA Wi Fi Protected Access or WPA2 WPA version 2 automatically based on the wireless station s capability and request Encryption You can select Automatic TKIP or AES Radius Server IP Enter the IP address of the Radius server Radius Port Enter the port that Radius server used Radius Password Enter the password for the Radius server Group Key Upd...

Page 83: ... The value should be 30 or above Enter 0 to disable the update Be sure to click the Save button to save your settings on this page 5 6 3 MAC Filtering Choose menu Wireless MAC Filtering and then you can control the wireless access by configuring the Wireless MAC Filtering function as shown in Figure 5 17 Figure 5 17 Wireless MAC Filtering To filter wireless users by MAC Address click Enable The de...

Page 84: ...ify If you want to delete the entry click the Delete 2 Modify the information 3 Click the Save button Click the Enable All button to make all entries enabled Click the Disabled All button to make all entries disabled Click the Delete All button to delete all entries Click the Next button to go to the next page Click the Previous button to return to the previous page For example If you desire that ...

Page 85: ...abled in the Status pull down list 4 Click the Save button 5 Click the Back button The filtering rules that configured should be similar to the following list 5 6 4 Wireless Advanced Choose menu Wireless Wireless Advanced and then you can configure the advanced settings of your wireless network Figure 5 19 Wireless Advanced Transmit Power Here you can specify the transmit power of Router You can s...

Page 86: ...e next window for listening to broadcast and multicast messages When the Router has buffered broadcast or multicast messages for associated clients it sends the next DTIM with a DTIM Interval value You can specify the value between 1 255 Beacon Intervals The default value is 1 which indicates the DTIM Interval is the same as Beacon Interval Enable WMM WMM function can guarantee the packets with hi...

Page 87: ... stations click on the Refresh button If the numbers of connected wireless stations go beyond one page click the Next button to go to the next page and click the Previous button to return the previous page Note This page will be refreshed automatically every 5 seconds 5 7 DHCP Figure 5 21 Figure 5 21The DHCP menu There are three submenus under the DHCP menu shown in DHCP Settings DHCP Clients List...

Page 88: ...is the default end address Address Lease Time The Address Lease Time is the amount of time a network user will be allowed connection to the Router with their current dynamic IP Address Enter the amount of time in minutes and the user will be leased this dynamic IP Address After the time is up the user will be automatically assigned a new dynamic IP address The range of the time is 1 2880 minutes T...

Page 89: ...ocated to the DHCP client Lease Time The time of the DHCP client leased After the dynamic IP address has expired a new dynamic IP address will be automatically assigned to the user You cannot change any of the values on this page To update this page and to show the current attached devices click the Refresh button 5 7 3 Address Reservation Choose menu DHCP Address Reservation and then you can view...

Page 90: ...format and IP address in dotted decimal notation of the computer for which you want to reserve an IP address 3 Click the Save button Figure 5 25 Add or Modify an Address Reservation Entry To modify or delete an existing entry 1 Click the Modify in the entry you want to modify If you want to delete the entry click the Delete 2 Modify the information 3 Click the Save button Click the Enable Disabled...

Page 91: ...erver is defined as a service port and all requests from the Internet to this service port will be redirected to the computer specified by the server IP Any PC that was used for a virtual server must have a static or reserved IP Address because its IP Address may be changed when using the DHCP function Figure 5 27 Virtual Servers Service Port The numbers of External Ports You can type a service po...

Page 92: ...P or All 5 Select the Enable to enable the virtual server 6 Click the Save button Figure 5 28 Add or Modify a Virtual Server Entry Note If your computer or server has more than one type of available service please select another service and enter the same IP Address for that computer or server To modify or delete an existing entry 1 Click the Modify in the entry you want to modify If you want to d...

Page 93: ...igger Port field 2 The Router records this connection opens the incoming port or ports associated with this entry in the Port Triggering table and associates them with the local host 3 When necessary the external host will be able to connect to the local host using one of the ports defined in the Incoming Ports field Trigger Port The port for outgoing traffic An outgoing connection using this port...

Page 94: ...for Trigger Port from the Trigger Protocol drop down list either TCP UDP or All 4 Select the protocol used for Incoming Ports from the Incoming Protocol drop down list either TCP or UDP or All 5 Select Enable in Status field 6 Click the Save button to save the new rule Figure 5 30 Add or Modify a Port Triggering Entry To modify or delete an existing entry 1 Click the Modify in the entry you want t...

Page 95: ...me Any PC whose port is being forwarded must have its DHCP client function disabled and should have a new static IP Address assigned to it because its IP Address may be changed when using the DHCP function Figure 5 31 DMZ To assign a computer or server to be a DMZ server 1 Check the Enable radio button 2 Enter the IP Address of a local host in the DMZ Host IP Address field 3 Click the Save button ...

Page 96: ...plication Internal Port The Internal port the Router opens for local host IP Address The IP address of the UPnP device that is currently accessing the Router Status The status of the port is displayed here Enabled means that the port is still active Otherwise the port is inactive Click Refresh to update the Current UPnP Settings List 5 9 Security Figure 5 33 The Security menu There are six submenu...

Page 97: ...ess Filtering set IP Address Filtering is enabled or disabled There are two default filtering rules of IP Address Filtering either Allow or Deny passing through the router Enable Domain Filtering set Domain Filtering is enabled or disabled Enable MAC Filtering set MAC Address Filtering is enabled or disabled You can select the default filtering rules of MAC Address Filtering either Allow or Deny a...

Page 98: ...03 1705 the entry will take effect from 08 03 to 17 05 2 LAN IP Address Enter a LAN IP Address or a range of LAN IP addresses in the field in dotted decimal notation format For example 192 168 0 20 192 168 0 30 Keep the field open which means all LAN IP Addresses have been put into the field 3 LAN Port Enter a LAN Port or a range of LAN ports in the field For example 1030 2000 Keep the field open ...

Page 99: ...ete All button to delete all entries You can change the entry s order as desired Fore entries are before hind entries Enter the ID number in the first box you want to move and another ID number in second box you want to move to and then click the Move button to change the entry s order Click the Next button to the next page and click the Previous button to return to the previous page For example I...

Page 100: ...or the entry to take effect For example if you enter 0803 1705 than the entry will take effect from 08 03 to 17 05 2 Domain Name Type the domain or key word as desired in the field A blank in the domain field means all websites on the Internet For example www xxyy com cn net 3 Status Select Enabled or Disabled for this entry on the Status pull down list 4 Click the Save button to save this entry T...

Page 101: ...ist 5 9 4 MAC Address Filtering Like the IP Address Filtering page the MAC Address Filtering page allows you to control access to the Internet by users on your local network based on their MAC Address Figure 5 39 MAC address Filtering Before setting up MAC Filtering entries you must ensure that Enable Firewall and Enable MAC Filtering have been selected on the Firewall page To Add a MAC Address fi...

Page 102: ...delete the entry click the Delete 2 Modify the information 3 Click the Save button Click the Enable All button to make all entries enabled Click the Disabled All button to make all entries disabled Click the Delete All button to delete all entries Click the Next button to go to the next page and click the Previous button to return to the previous page Fox example If you want to block the PC with M...

Page 103: ... It means this function is disabled To enable this function change the default IP Address to another IP Address as desired To access the router you will type your router s WAN IP Address into your browser s Address in IE or Location in Navigator box followed by a colon and the custom port number For example if your Router s WAN address is 202 96 12 8 and you use port number 8080 enter in your brow...

Page 104: ...d 5 3600 The default value is 50 Enter a value between 5 3600 packets When the current ICMP FLOOD Packets numbers is beyond the set value the router will start up the blocking function immediately Enable UDP FLOOD Filtering Enable or Disable the UDP FLOOD Filtering UDP FLOOD Packets threshold 5 3600 The default value is 50 Enter a value between 5 3600 packets When the current UPD FLOOD Packets num...

Page 105: ...ll appear Figure 5 43 Blocked DoS Host Table This page shows Host IP Address and Host MAC Address for each host blocked by the router Host IP Address The IP address that blocked by DoS are displayed here Host MAC Address The MAC address that blocked by DoS are displayed here To update this page and to show the current blocked host click on the Refresh button Click the Clear All button to clear all...

Page 106: ...ice that allows for contact between the router and the network or host 3 Select Enabled or Disabled for this entry on the Status pull down list 4 Click the Save button to save it Figure 5 45 Add or Modify a Static Route Entry To modify or delete an existing entry 1 Click the Modify in the entry you want to modify If you want to delete the entry click the Delete 2 Modify the information 3 Click the...

Page 107: ...rantee and Maximum Bandwidth Limit Bandwidth The bandwidth you supply to this entry Description The description for this entry Click Enable to enable this entry Click the Clear button to clear a single entry Click the Clear All button to clear all entries Click the Save button to save all configurations Note 1 The conversion relation of bandwidth 1Mbps 1000Kbps 2 Please choose the Network Connecti...

Page 108: ...ion The detailed explanations for each submenu are provided below 5 12 1 Binding Setting This page displays the IP MAC Binding Setting table you can operate it in accord with your desire Figure 5 48 IP MAC Binding Setting MAC Address The MAC address of the controlled computer in the LAN IP Address The assigned IP address of the controlled computer in the LAN Bind Whether or not enable the ARP bind...

Page 109: ... To modify or delete an existing entry 1 Find the desired entry in the table 2 Click Modify or Delete as desired on the Modify column To find an existing entry 1 Click the Find button shown in Figure 5 48 2 Enter the MAC Address or IP Address 3 Enter the Find button in the next page shown in Figure 5 50 Figure 5 50 Find IP MAC Binding Entry Click the Enable All button to make all entries enabled C...

Page 110: ...st Delete Delete the item 1 Click the Bind All button to bind all the current items available after enable 2 Click the Load All button to load all items to the IP MAC Binding list 3 Click the Refresh button to refresh all items Note An item could not be loaded to the IP MAC Binding list if the IP address of the item has been loaded before Error warning will prompt as well Likewise Load All only lo...

Page 111: ...r Name for your DDNS account 2 Type the Password for your DDNS account 3 Type the Domain Name you received from dynamic DNS service provider 4 Click the Login button to log in the DDNS service Connection Status The status of the DDNS service connection is displayed here Click Logout to log out the DDNS service Note If you want to login again with another account after a successful login please cli...

Page 112: ...he DDNS service connection is displayed here Service Type The type of service is displayed here Domain Name The domain names are displayed here Click the Logout button to logout of the DDNS service Note If you want to login again with another account after a successful login please click the Logout button then input your new username and password and click the Login button 5 13 3 Comexe DDNS If th...

Page 113: ...4 Click the Login button to log in to the DDNS service Connection Status The status of the DDNS service connection is displayed here Click Logout to log out of the DDNS service Note If you want to login again with another account after a successful login please click the Logout button then input your new username and password and click the Login button 5 13 4 Dyndns DDNS If the dynamic DNS Service...

Page 114: ...ed from dynamic DNS service provider here 4 Click the Login button to log in to the DDNS service Connection Status The status of the DDNS service connection is displayed here Click Logout to logout of the DDNS service Note If you want to login again with another account after a successful login please click the Logout button then input your new username and password and click the Login button 5 14...

Page 115: ... pull down list Date Enter your local date in MM DD YY into the right blanks Time Enter your local time in HH MM SS into the right blanks To set time manually follow the steps below 1 Select your local time zone 2 Enter the Date in Month Day Year format 3 Enter the Time in Hour Minute Second format 4 Click Save For automatic time synchronization 1 Enter the address of the NTP Server I or NTP Serve...

Page 116: ...gnostic Tool Check the radio button to select one diagnostic too Ping This diagnostic tool troubleshoots connectivity reachability and name resolution to a given host or gateway Traceroute This diagnostic tool tests the performance of a connection Note You can use ping traceroute to test both numeric IP address or domain name If pinging tracerouting the IP address is successful but pinging tracero...

Page 117: ... Traceroute Max TTL The max number of hops for a Traceroute connection Click Start to check the connectivity of the Internet The Diagnostic Results page displays the result of diagnosis If the result is similar to the following screen the connectivity of the Internet is fine Figure 5 59 Diagnostic Results Note Only one user can use this tool at one time Ping Count Ping Packet Size and Ping Timeout...

Page 118: ... where you save the downloaded file on the computer into the File blank 3 Click the Upgrade button Firmware Version Displays the current firmware version Hardware Version Displays the current hardware version The hardware version of the upgrade file must accord with the current hardware version Note The firmware version must correspond to the hardware The upgrade process takes a few minutes and th...

Page 119: ...want to restore Click the Restore button Note The current configuration will be covered with the uploading configuration file The restoration process lasts for 20 seconds and the router will restart automatically Keep the router on during the restoring process to prevent any damage 5 14 6 Reboot This page allows you to reboot the router Figure 5 63 Reboot the router Click the Reboot button to rebo...

Page 120: ...Figure 5 64 Password It is recommended strongly that you change the factory default user name and password of the router All users who try to access the router s Web based utility or Quick Setup will be prompted Note The new user name and password must not exceed 14 characters in length and must not include any spaces Enter the new Password twice to confirm it Click the Save button when finished C...

Page 121: ...ing total traffic and traffic of the last Packets Statistic interval seconds Figure 5 66 Statistics Current Statistics Status Enable or Disable The default value is disabled To enable click the Enable button If disabled the function of DoS protection in Security settings will be ineffective Packets Statistics Interval The default value is 10 Select a value between 5 and 60 seconds in the pull down...

Page 122: ... of bytes received and transmitted in the last Packets Statistic interval seconds ICMP Tx The total amount of the ICMP packets transmitted to WAN in the last Packets Statistic interval seconds UDP Tx The total amount of the UDP packets transmitted to WAN in the last Packets Statistic interval seconds Current TCP SYN Tx The total amount of the TCP SYN packets transmitted to WAN in the last Packets ...

Page 123: ... configure and manage the device There are main menus on the left of the web based utility Submenus will be available after you click one of the main menus On the right there are the corresponding explanations and instructions Figure 6 1 The detailed explanations for each Web page s key function are listed below 6 2 Status The Status page provides the current status information about the Router on...

Page 124: ...address of the Router Subnet Mask The subnet mask associated with LAN IP address Wireless This field displays basic information or status for wireless function you can configure them in the Wireless Wireless Settings page Wireless Mode The current wireless working mode in use Name SSID The SSID of Root AP MAC address The physical address of the Router as seen from the WLAN System Up Time The lengt...

Page 125: ...ti user to share Internet via DSL Cable Modem The only wired port works as WAN Repeater The wireless Repeater Mode It could extend the range of wireless network Bridge The wireless Bridge Mode It could communicate with another wireless network Client The Client Mode The computer connected by Ethernet could get access to an AP by Client mode Click OK in the following screen and then the Router will...

Page 126: ... determines the size of the network Normally use 255 255 255 0 as the subnet mask Note 1 If you change the LAN IP address you must use the new IP address to login to the Router 2 If you select the type of Smart IP DHCP and there is a DHCP server forward the DHCP server in this device will not start up 3 If the new LAN IP address you set is not in the same subnet with the previous one the IP Addres...

Page 127: ...e specified in this field If your country or region is not listed please contact your local government agency for assistance Survey Click this button you can search the AP which runs in the environment WDS Mode This field determines which WDS Mode will be used It is not necessary to change the WDS Mode unless you notice network communication problems with root AP If you select Auto then Router wil...

Page 128: ...m large metal surfaces 2 Failure to follow these guidelines can result in significant performance degradation or inability to wirelessly connect to the Router 6 7 DHCP Figure 6 9 The DHCP menu There are three submenus under the DHCP menu shown in Figure 6 9 DHCP Settings DHCP Clients List and Address Reservation Click any of them and you will be able to configure the corresponding function 6 7 1 D...

Page 129: ...ddress for the DHCP Server to start with when assigning IP addresses 192 168 0 100 is the default start address End IP Address Specify an IP address for the DHCP Server to end with when assigning IP addresses 192 168 0 199 is the default end address Address Lease Time The Address Lease Time is the amount of time a network user will be allowed connection to the Router with their current dynamic IP ...

Page 130: ...an IP Address automatically 6 7 2 DHCP Clients List Choose menu DHCP DHCP Clients List and then you can view the information about the clients attached to the Router in the screen as shown in Figure 6 12 Figure 6 12 DHCP Clients List Client Name The name of the DHCP client MAC Address The MAC address of the DHCP client Assigned IP The IP address that the Router has allocated to the DHCP client Lea...

Page 131: ...dress reserved for the PC by the Router Status The status of this entry either Enabled or Disabled To Reserve an IP address 1 Click the Add New button Then Figure 4 19 will pop up 2 Enter the MAC address in XX XX XX XX XX XX format and IP address in dotted decimal notation of the computer for which you want to reserve an IP address 3 Click the Save button Figure 6 14 Add or Modify an Address Reser...

Page 132: ...6 15 The System Tools menu Choose menu System Tools and then you can see the submenus under the main menu Diagnostic Firmware Factory Defaults Backup Restore Reboot Password and System Log Click any of them and you will be able to configure the corresponding function The detailed explanations for each submenu are provided below 6 8 1 Diagnostic Choose menu System Tools Diagnostic and then you can ...

Page 133: ...IP address is successful but pinging tracerouting the domain name is not you might have a name resolution problem In this case ensure that the domain name you are specifying can be resolved by using Domain Name System DNS queries IP Address Domain Name Type the destination IP address e g 202 108 22 5 or Domain name e g http www tp link com Pings Count The number of Ping packets for a Ping connecti...

Page 134: ...ze and Ping Timeout are used for Ping function Option Tracert Hops are used for Tracert function 6 8 2 Firmware Choose menu System Tools Firmware Upgrade and then you can update the latest version of firmware for the Router on the following screen Figure 6 18 Firmware Upgrade Firmware Version This displays the current firmware version Hardware Version This displays the current hardware version The...

Page 135: ...s so before upgrading the firmware please write down some of your customized settings to avoid losing important settings 3 Do not turn off the Router or press the Reset button while the firmware is being upgraded otherwise the Router may be damaged 4 The Router will reboot after the upgrading has been finished 6 8 3 Factory Defaults Choose menu System Tools Factory Defaults and you can restore the...

Page 136: ...ton to locate the update file for the Router or enter the exact path to the Setting file in the text box Click the Restore button Note The current configuration will be covered by the uploading configuration file The upgrade process lasts for 20 seconds and the Router will restart automatically Keep the Router on during the upgrading process to prevent any damage 6 8 5 Reboot Choose menu System To...

Page 137: ... change the factory default user name and password of the Router in the next screen as shown in Figure 6 22 Figure 6 22 Password It is strongly recommended that you should change the factory default user name and password of the Router because all users who try to access the Router s Web based utility or Quick Setup will be prompted for the Router s default user name and password Note The new user...

Page 138: ...stem Log Choose menu System Tools System Log and then you can view the logs of the Router Figure 6 23 System Log Refresh Refresh the page to show the latest log list Clear All All the logs will be deleted from the Router permanently not just from the page ...

Page 139: ...configure and manage the device There are main menus on the left of the web based utility Submenus will be available after you click one of the main menus On the right there are the corresponding explanations and instructions Figure 7 1 The detailed explanations for each Web page s key function are listed below 7 2 Status The Status page provides the current status information about the Router on ...

Page 140: ...he Router as seen from the LAN IP address The LAN IP address of the Router Subnet Mask The subnet mask associated with LAN IP address Wireless This field displays basic information or status for wireless function you can configure them in the Wireless Wireless Settings page Wireless Mode The current wireless working mode in use Wireless Radio Indicates whether the wireless radio feature of the AP ...

Page 141: ...ode types AP Router Repeater Bridge and Client Please select one your want Click Save to save your choice which is shown as Figure 7 3 Figure 7 3 Working Mode AP The wireless access point mode Router The wireless Router Mode In this mode the device enables multi user to share Internet via DSL Cable Modem The only wired port works as WAN Repeater The wireless Repeater Mode It could extend the range...

Page 142: ...P server or choosing Static IP to configure IP address manually MAC Address The physical address of the LAN ports as seen from the LAN The value can t be changed IP Address Enter the IP address of your Router in dotted decimal notation factory default 192 168 0 254 Subnet Mask An address code that determines the size of the network Normally use 255 255 255 0 as the subnet mask Note 1 If you change...

Page 143: ...d DMZ Host will not take effect until they are re configured 7 6 Wireless Figure 7 7 Wireless menu There are two submenus under the Wireless menu shown in Figure 7 7 Wireless Settings and Wireless Security Click any of them and you will be able to configure the corresponding function 7 6 1 Wireless Settings Choose menu Wireless Wireless Settings and then you can configure the basic settings for th...

Page 144: ...ect if all of your wireless clients are 802 11b 11g only Select if all of your wireless clients are 802 11g 11n only Select only if all of your wireless clients are 802 11n 11bg mixed Select if you are using both 802 11b and 802 11g wireless clients 11bgn mixed Select if you are using a mix of 802 11b 11g and 11n wireless clients Select the desired wireless mode When 802 11g mode is selected only ...

Page 145: ...going to connect needs password you need to fill the password in this blank Be sure to click the Save button to save your settings on this page Note 1 The operating distance or range of your wireless connection varies significantly based on the physical placement of the Router For best results place your Router z Near the center of the area in which your wireless stations will operate z In an elev...

Page 146: ...t is based on the IEEE 802 11 standard Type you can choose the type for the WEP security on the pull down list The default setting is Automatic which can select Shared Key or Open System authentication type automatically based on the wireless station s capability and request WEP Key Format Hexadecimal and ASCII formats are provided here Hexadecimal format stands for any combination of hexadecimal ...

Page 147: ...list The default setting is Automatic which can select WPA Wi Fi Protected Access or WPA2 WPA version 2 automatically based on the wireless station s capability and request Encryption You can select Automatic TKIP or AES Radius Server IP Enter the IP address of the Radius server Radius Port Enter the port that Radius server used Radius Password Enter the password for the Radius server Group Key Up...

Page 148: ...ck the Save button to save your settings on this page 7 7 DHCP Figure 7 10 The DHCP menu There are three submenus under the DHCP menu shown in Figure 7 10 DHCP Settings DHCP Clients List and Address Reservation Click any of them and you will be able to configure the corresponding function 7 7 1 DHCP Settings Choose menu DHCP DHCP Settings and you can see the page as shown in Figure 7 11 if you hav...

Page 149: ...er manually Start IP Address Specify an IP address for the DHCP Server to start with when assigning IP addresses 192 168 0 100 is the default start address End IP Address Specify an IP address for the DHCP Server to end with when assigning IP addresses 192 168 0 199 is the default end address Address Lease Time The Address Lease Time is the amount of time a network user will be allowed connection ...

Page 150: ...if your ISP provides two DNS servers Note To use the DHCP server function of the Router you must configure all computers on the LAN as Obtain an IP Address automatically 7 7 2 DHCP Clients List Choose menu DHCP DHCP Clients List and then you can view the information about the clients attached to the Router in the screen as shown in Figure 7 13 Figure 7 13 DHCP Clients List Client Name The name of ...

Page 151: ...Reservation MAC Address The MAC address of the PC for which you want to reserve an IP address Reserved IP Address The IP address reserved for the PC by the Router Status The status of this entry either Enabled or Disabled To Reserve an IP address 1 Click the Add New button Then Figure 4 19 will pop up 2 Enter the MAC address in XX XX XX XX XX XX format and IP address in dotted decimal notation of ...

Page 152: ...7 8 System Tools Figure 7 16 The System Tools menu Choose menu System Tools and then you can see the submenus under the main menu Diagnostic Firmware Factory Defaults Backup Restore Reboot Password and System Log Click any of them and you will be able to configure the corresponding function The detailed explanations for each submenu are provided below 7 8 1 Diagnostic Choose menu System Tools Diag...

Page 153: ...IP address is successful but pinging tracerouting the domain name is not you might have a name resolution problem In this case ensure that the domain name you are specifying can be resolved by using Domain Name System DNS queries IP Address Domain Name Type the destination IP address e g 202 108 22 5 or Domain name e g http www tp link com Pings Count The number of Ping packets for a Ping connecti...

Page 154: ...ze and Ping Timeout are used for Ping function Option Tracert Hops are used for Tracert function 7 8 2 Firmware Choose menu System Tools Firmware Upgrade and then you can update the latest version of firmware for the Router on the following screen Figure 7 19 Firmware Upgrade Firmware Version This displays the current firmware version Hardware Version This displays the current hardware version The...

Page 155: ...s so before upgrading the firmware please write down some of your customized settings to avoid losing important settings 3 Do not turn off the Router or press the Reset button while the firmware is being upgraded otherwise the Router may be damaged 4 The Router will reboot after the upgrading has been finished 7 8 3 Factory Defaults Choose menu System Tools Factory Defaults and you can restore the...

Page 156: ...n to locate the update file for the Router or enter the exact path to the Setting file in the text box Click the Restore button Note The current configuration will be covered by the uploading configuration file The upgrade process lasts for 20 seconds and the Router will restart automatically Keep the Router on during the upgrading process to prevent any damage 7 8 5 Reboot Choose menu System Tool...

Page 157: ... change the factory default user name and password of the Router in the next screen as shown in Figure 7 23 Figure 7 23 Password It is strongly recommended that you should change the factory default user name and password of the Router because all users who try to access the Router s Web based utility or Quick Setup will be prompted for the Router s default user name and password Note The new user...

Page 158: ...stem Log Choose menu System Tools System Log and then you can view the logs of the Router Figure 7 24 System Log Refresh Refresh the page to show the latest log list Clear All All the logs will be deleted from the Router permanently not just from the page ...

Page 159: ...configure and manage the device There are main menus on the left of the web based utility Submenus will be available after you click one of the main menus On the right there are the corresponding explanations and instructions Figure 8 1 The detailed explanations for each Web page s key function are listed below 8 2 Status The Status page provides the current status information about the Router on ...

Page 160: ...address of the Router Subnet Mask The subnet mask associated with LAN IP address Wireless This field displays basic information or status for wireless function you can configure them in the Wireless Wireless Settings page Wireless Mode The current wireless working mode in use Name SSID The SSID of Root AP MAC address The physical address of the Router as seen from the WLAN System Up Time The lengt...

Page 161: ...lti user to share Internet via DSL Cable Modem The only wired port works as WAN Repeater The wireless Repeater Mode It could extend the range of wireless network Bridge The wireless Bridge Mode It could communicate with another wireless network Client The Client Mode The computer connected by Ethernet could get access to an AP by Client mode Click OK in the following screen and then the Router wil...

Page 162: ...rmines the size of the network Normally use 255 255 255 0 as the subnet mask Note 1 If you change the LAN IP address you must use the new IP address to login to the Router 2 If you select the type of Smart IP DHCP and there is a DHCP server forward the DHCP server in this device will not start up 3 If the new LAN IP address you set is not in the same subnet with the previous one the IP Address poo...

Page 163: ... Router s MAC address But it is recommended strongly that you change your networks name SSID to a different value This value is case sensitive For example TEST is NOT the same as test MAC of AP The MAC address of AP that you want to access Region Select your region from the pull down list This field specifies the region where the wireless function of the Router can be used It may be illegal to use...

Page 164: ...ur Router is going to connect needs password you need to fill the password in this blank Be sure to click the Save button to save your settings on this page Note 1 The operating distance or range of your wireless connection varies significantly based on the physical placement of the Router For best results place your Router z Near the center of the area in which your wireless stations will operate...

Page 165: ...p you configure the DHCP automatically as you need If you have chose Static IP in Network LAN you can see the page as shown in Figure 8 11 and then you can configure the DHCP Server on this page The Router is set up by default as a DHCP Dynamic Host Configuration Protocol server which provides the TCP IP configuration for all the PC s that are connected to the Router in the LAN Figure 8 10 DHCP Se...

Page 166: ...e time is up the user will be automatically assigned a new dynamic IP address The range of the time is 1 2880 minutes The default value is 120 minutes Default Gateway Optional It is suggested to input the IP address of the LAN port of the Router The default value is 192 168 0 254 Default Domain Optional Input the domain name of your network Primary DNS Optional Input the DNS IP address provided by...

Page 167: ...wn in Figure 8 13 When you specify a reserved IP address for a PC on the LAN that PC will always receive the same IP address each time when it accesses the DHCP server Reserved IP addresses should be assigned to the servers that require permanent IP settings Figure 8 13 Address Reservation MAC Address The MAC address of the PC for which you want to reserve an IP address Reserved IP Address The IP ...

Page 168: ...the Next button to go to the next page and Click the Previous button to return the previous page 8 8 System Tools Figure 8 15 The System Tools menu Choose menu System Tools and then you can see the submenus under the main menu Diagnostic Firmware Factory Defaults Backup Restore Reboot Password and System Log Click any of them and you will be able to configure the corresponding function The detaile...

Page 169: ...IP address is successful but pinging tracerouting the domain name is not you might have a name resolution problem In this case ensure that the domain name you are specifying can be resolved by using Domain Name System DNS queries IP Address Domain Name Type the destination IP address e g 202 108 22 5 or Domain name e g http www tp link com Pings Count The number of Ping packets for a Ping connecti...

Page 170: ...ze and Ping Timeout are used for Ping function Option Tracert Hops are used for Tracert function 8 8 2 Firmware Choose menu System Tools Firmware Upgrade and then you can update the latest version of firmware for the Router on the following screen Figure 8 18 Firmware Upgrade Firmware Version This displays the current firmware version Hardware Version This displays the current hardware version The...

Page 171: ...s so before upgrading the firmware please write down some of your customized settings to avoid losing important settings 3 Do not turn off the Router or press the Reset button while the firmware is being upgraded otherwise the Router may be damaged 4 The Router will reboot after the upgrading has been finished 8 8 3 Factory Defaults Choose menu System Tools Factory Defaults and you can restore the...

Page 172: ...n to locate the update file for the Router or enter the exact path to the Setting file in the text box Click the Restore button Note The current configuration will be covered by the uploading configuration file The upgrade process lasts for 20 seconds and the Router will restart automatically Keep the Router on during the upgrading process to prevent any damage 8 8 5 Reboot Choose menu System Tool...

Page 173: ... change the factory default user name and password of the Router in the next screen as shown in Figure 8 22 Figure 8 22 Password It is strongly recommended that you should change the factory default user name and password of the Router because all users who try to access the Router s Web based utility or Quick Setup will be prompted for the Router s default user name and password Note The new user...

Page 174: ...stem Log Choose menu System Tools System Log and then you can view the logs of the Router Figure 8 23 System Log Refresh Refresh the page to show the latest log list Clear All All the logs will be deleted from the Router permanently not just from the page ...

Page 175: ...e in the User Name field and password in the Password field and the Confirm Password field and finish it by clicking Connect Figure A 1 PPPoE Connection Type 4 If your ADSL lease is in pay according time mode select Connect on Demand or Connect Manually for Internet connection mode Type an appropriate number for Max Idle Time to avoid wasting paid time Otherwise you can select Auto connecting for ...

Page 176: ...your PC s MAC address will fill in the WAN MAC Address field Or else type the MAC Address into the WAN MAC Address field The format for the MAC Address is XX XX XX XX XX XX Then click the Save button It will take effect after rebooting Figure A 3 MAC Clone 3 I want to use NetMeeting what do I need to do 1 If you start NetMeeting as a sponsor you don t need to do anything with the Router 2 If you s...

Page 177: ... your WAN IP which is displayed on the Status page 4 How to enable DMZ Host Log in to the Router click the Forwarding menu on the left of your browser and click DMZ submenu On the DMZ page click Enable radio button and type your IP address into the DMZ Host IP Address field using 192 168 0 169 as an example remember to click the Save button Figure A 6 DMZ ...

Page 178: ... such as 88 into the Web Management Port field Click Save and reboot the Router Figure A 7 Remote Management Note If the above configuration takes effect configure to the Router by typing 192 168 0 188 the Router s LAN IP address Web Management Port in the address field of the Web browser 3 Log in to the Router click the Forwarding menu on the left of your browser and click the Virtual Servers sub...

Page 179: ...ter 1 Make sure the Enable Wireless Router Radio is checked 2 Make sure that the wireless stations SSID accord with the Router s SSID 3 Make sure the wireless stations have right KEY for encryption when the Router is encrypted 4 If the wireless connection is ready but you can t access the Router check the IP Address of your wireless stations ...

Page 180: ...he adapter s manual if necessary 1 Configure TCP IP component 1 On the Windows taskbar click the Start button and then click Control Panel 2 Click the Network and Internet Connections icon and then click on the Network Connections tab in the appearing window 3 Right click the icon that showed below select Properties on the prompt page Figure B 1 4 In the prompt page that showed below double click ...

Page 181: ...rties window will display and the IP Address tab is open on this window by default Now you have two ways to configure the TCP IP protocol below Setting IP address automatically Select Obtain an IP address automatically Choose Obtain DNS server automatically as shown in the Figure below ...

Page 182: ...items available 2 If the Router s LAN IP address is 192 168 0 254 specify the IP address as 192 168 0 x x is from 1 to 253 and the Subnet mask as 255 255 255 0 3 Type the Router s LAN IP address the default IP is 192 168 0 254 into the Default gateway field 4 Select Use the following DNS server addresses In the Preferred DNS Server field you can enter the same value as the Default gateway or type ...

Page 183: ...TL WR702N 150Mbps Wireless N Nano Router 171 Now Click OK to keep your settings ...

Page 184: ...mm Safety Emissions FCC CE Wireless Frequency Band 2 4 2 4835GHz Radio Data Rate 11n up to 150Mbps Automatic 11g 54 48 36 24 18 12 9 6M Automatic 11b 11 5 5 2 1M Automatic Frequency Expansion DSSS Direct Sequence Spread Spectrum Modulation DBPSK DQPSK CCK 16 QAM 64 QAM BPSK QPSK Security 64 128 152 bit WEP WPA WPA2 WPA2 PSK WPA PSK Sensitivity PER 135M 70dBm 10 PER 65M 73dBm 10 PER 54M 76dBm 10 PE...

Page 185: ...odulation and operating in the unlicensed radio spectrum at 2 4GHz and backward compatibility with IEEE 802 11b devices and WEP encryption for security DDNS Dynamic Domain Name System The capability of assigning a fixed host and domain name to a dynamic Internet IP Address DHCP Dynamic Host Configuration Protocol A protocol that automatically configure the TCP IP parameters for the all the PC s th...

Page 186: ...configuration parameter for a wireless PC card It corresponds to the ESSID in the wireless Access Point and to the wireless network name WEP Wired Equivalent Privacy A data privacy mechanism based on a 64 bit or 128 bit or 152 bit shared key algorithm as described in the IEEE 802 11 standard Wi Fi A trade name for the 802 11b wireless networking standard given by the Wireless Ethernet Compatibilit...

Reviews: