background image

Archer C55 

AC1200 Wireless Dual Band Gigabit Router 


- 64 - 

4.9.3 

Address Reservation 

Choose menu “

DHCP 

  Address Reservation

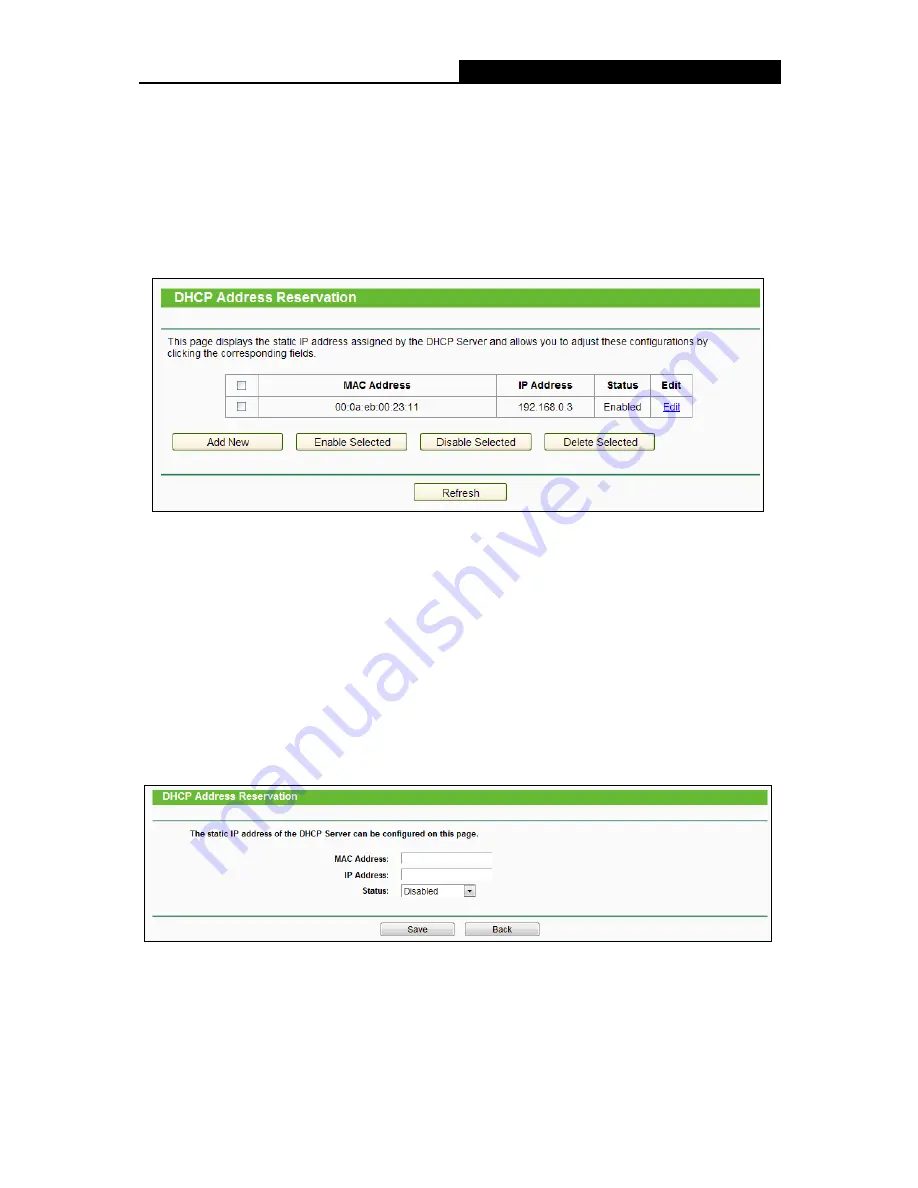
”, you can view and add a reserved address for 

clients via the next screen (shown in the following figure).  When you specify a reserved IP 
address for a PC on the LAN, that PC will always receive the same IP address each time when it 
accesses the DHCP server. Reserved IP addresses should be assigned to the  servers  that 
require permanent IP settings.   


MAC Address -

 The MAC address of the PC for which you want to reserve an IP address. 


IP Address - 

The IP address reserved for the PC by the router. 


Status


-

 The status of this entry, either 

Enabled

 or 

Disabled

To Reserve an IP address:


1.  Click the

 Add New 

button. Then the following figure will pop up. 

2.  Enter the MAC address (in XX:XX:XX:XX:XX:XX format.) and IP address (in dotted-decimal 

notation) of the computer for which you want to reserve an IP address.   

3.  Click the 

Save

 button.   


To modify or delete an existing entry: 

1.  Click the 

Edit 

in the entry you want to modify. If you want to delete the entry, click the

 Delete

2.  Modify the information.   

3.  Click the 

Save

 button. 

Summary of Contents for Archer C55

Page 1: ...Archer C55 AC1200 Wireless Dual Band Gigabit Router REV1 0 0 1910011879...

Page 2: ...are trademarks or registered trademarks of their respective holders No part of the specifications may be reproduced in any form or by any means or used to make any derivative such as translation tran...

Page 3: ...7 2 3 Connecting the Router 7 Chapter 3 Quick Installation Guide 9 3 1 TCP IP Configuration 9 3 2 Quick Installation Guide 10 Chapter 4 Configuring the router 21 4 1 Login 21 4 2 Status 22 4 3 Quick S...

Page 4: ...rtual Servers 65 4 11 2 Port Triggering 67 4 11 3 DMZ 70 4 11 4 UPnP 70 4 12 Security 71 4 12 1 Basic Security 71 4 12 2 Advanced Security 73 4 12 3 Local Management 74 4 12 4 Remote Management 75 4 1...

Page 5: ...3 IPv6 LAN 100 4 20 System Tools 101 4 20 1 Time Settings 101 4 20 2 Diagnostic 103 4 20 3 Firmware Upgrade 104 4 20 4 Factory Defaults 105 4 20 5 Backup Restore 106 4 20 6 Reboot 107 4 20 7 Password...

Page 6: ...in your package Archer C55 AC 1200 Wireless Dual Band Gigabit Router DC Power Adapter for Archer C55 AC 1200 Wireless Dual Band Gigabit Router Quick Installation Guide Note Make sure that the package...

Page 7: ...much faster than 802 11n It is also compatible with all IEEE 802 11n IEEE 802 11a IEEE 802 11b and IEEE 802 11g products With multiple protection measures including SSID broadcast control and wireles...

Page 8: ...ting Dynamic IP Static IP PPPoE PPTP L2TP BigPond Internet access Supports simultaneous 2 4GHz and 5GHz connections for 1200Mbps of total available bandwidth Supports Virtual Server Special Applicatio...

Page 9: ...or upgrading On Power is on 2 4G Wireless Off 2 4G wireless is disabled On 2 4G wireless is working properly 5G Wireless Off 5G wireless is disabled On 5G wireless is working properly Internet Off Th...

Page 10: ...to the network by WPS function the WPS LED will keep on for about 5 minutes and then turn off 2 The router is set to work concurrently in 2 4GHz and 5GHz by default If you desire to choose the working...

Page 11: ...wered on press and hold the Reset button approximately 5 seconds until all LEDs are lit And then release the button and wait for the router to reboot to its factory default settings Power On Off The s...

Page 12: ...Keep at least 2 inches 5 cm of clear space around the router Operating Temperature 0 40 32 104 Operating Humidity 10 90 RH Non condensing 2 3 Connecting the Router Before installing the router make s...

Page 13: ...be on in a few seconds Please follow the steps below to mount the router to the wall if you need 105 8 3 5 2 5 1 2 D X X 20mm Note The diameter of the screw ranges from 3 5 mm to 8 mm and the distanc...

Page 14: ...ss for your PC by the following method Set up the TCP IP Protocol in Obtain an IP address automatically mode on your PC If you need instructions as to how to do this please refer to Appendix B Configu...

Page 15: ...uter is 192 168 0 x the default LAN IP of the router will automatically switch from 192 168 0 1 to 192 168 1 1 to avoid IP conflict Therefore in order to verify the network connection between your PC...

Page 16: ...Enter key Note If the above screen does not pop up it means that your Web browser has been set to a proxy Go to Tools menu Internet Options Connections LAN Settings in the screen that appears cancel...

Page 17: ...cable is securely plugged into the Internet port before detection The appropriate configuration page will be displayed when an active Internet service is successfully detected by the router Note If Au...

Page 18: ...Subnet Mask The Subnet Mask is used for the WAN IP address Your IPS will provide you with the subnet mask which is usually 255 255 255 0 Default Gateway Your ISP will provide you with the Gateway addr...

Page 19: ...is recommended Dynamic IP You can check this radio button to use Dynamic IP as the secondary connection to connect to the local area network provided by ISP Static IP You can check this radio button...

Page 20: ...n in the following figure Configure the following parameters and then click Next to continue Username Password Enter the Username and Password provided by your ISP These fields are case sensitive If y...

Page 21: ...re we take 2 4GHz and 5GHz for example Click Next to continue 2 4GHz You can use the 2 4GHz band to connect to many classic wireless devices like gaming consoles laptops DVRs etc 5GHz This band is les...

Page 22: ...reless Security The wireless security function can be enabled or disabled If disabled the wireless stations will be able to connect the router without encryption The above settings are only for basic...

Page 23: ...ure and then click Next Wireless Network Name Also called the SSID Service Set Identification Enter a value of up to 32 characters The same name must be assigned to all wireless devices in your networ...

Page 24: ...nnel Width Select any channel width from the drop down list The default setting is Auto which can adjust the channel width for your clients automatically Channel This field determines which operating...

Page 25: ...Archer C55 AC1200 Wireless Dual Band Gigabit Router 20...

Page 26: ...ach key function of the Web page and its configuration method 4 1 Login After your successful login you will see the main menus on the left of the Web based utility On the right there are the correspo...

Page 27: ...Archer C55 AC1200 Wireless Dual Band Gigabit Router 22 4 2 Status The Status page provides the current status information about the router All information is read only...

Page 28: ...Archer C55 AC1200 Wireless Dual Band Gigabit Router 23 4 3 Quick Setup Please refer to 3 2 Quick Installation Guide...

Page 29: ...uter will automatically get IP parameters from your ISP You can see the page as follows This page displays the WAN IP parameters assigned dynamically by your ISP including IP address Subnet Mask Defau...

Page 30: ...erver manually and enter the primary and secondary addresses into the correct fields Otherwise the DNS servers will be assigned automatically from your ISP Note If you find error when you go to a webs...

Page 31: ...the default MTU size unless required by your ISP Enable IGMP Proxy IGMP Internet Group Management Protocol is used to manage multicasting on TCP IP networks Some ISPs use IGMP to perform remote config...

Page 32: ...er a specified inactivity period Max Idle Time and be re established when you attempt to access the Internet again If you want your Internet connection keeps active all the time please enter 0 in the...

Page 33: ...P address specified by ISP If your ISP does not automatically assign IP addresses to the router during login please click Use IP address specified by ISP check box and enter the IP address provided by...

Page 34: ...t networks is 1500 Bytes It is not recommended that you change the default MTU value unless required by your ISP Enable IGMP Proxy IGMP Internet Group Management Protocol is used to manage multicastin...

Page 35: ...ty period and re established when you attempt to access the Internet again Click the Connect button to connect immediately Click the Disconnect button to disconnect immediately Caution Sometimes the c...

Page 36: ...tion as soon as you attempt to access the Internet again If you wish to activate Connect on Demand check the radio button If you want your Internet connection to remain active at all times enter 0 in...

Page 37: ...on Click the Connect button to connect immediately Click the Disconnect button to disconnect immediately MTU Bytes The default MTU size is 1420 bytes which is usually fine It is not recommended that y...

Page 38: ...e Max Idle Time field Otherwise enter the number in minutes that you wish to have the Internet connecting last unless a new link is requested Caution Sometimes the connection cannot be disconnected al...

Page 39: ...ceiving traffic for a multicast group they have not explicitly joined IGMP snooping is especially useful for bandwidth intensive IP multicast applications such as IPTV Note 1 If you change the IP Addr...

Page 40: ...n and you can choose the working frequency for your router It is recommended that your computers and devices running video and voice applications use the 5GHz band while your guest access and computer...

Page 41: ...is case sensitive For example TEST is NOT the same as test Mode Select the desired mode 11bg mixed Select if you are using both 802 11b and 802 11g wireless clients 11bgn mixed Select if you are using...

Page 42: ...ng parameters as shown in the following figure Make sure the following settings are correct SSID to be bridged The SSID of the AP your router is going to connect to as a client You can also use the se...

Page 43: ...ult Generate New PIN Click this button and then you can get a new random value for the router s PIN You can ensure the network security by generating a new PIN Disable device PIN If this box is checke...

Page 44: ...ollowing figure Step 2 Press and hold the WPS button of the client device Step 3 The Wi Fi Protected Setup LED flashes for two minutes during the Wi Fi Protected Setup process Step 4 When the WPS LED...

Page 45: ...tom of the router Step 2 The Wi Fi Protected Setup LED flashes for two minutes during the Wi Fi Protected Setup process Step 3 When the WPS LED is on the client device has successfully connected to th...

Page 46: ...security WPA WPA2 Personal It s the WPA WPA2 authentication type based on pre shared passphrase The router is configured by this security type by default Authentication Type you can choose the versio...

Page 47: ...oup key update interval in seconds The value should be 30 or above Enter 0 to disable the update WPA WPA2 Enterprise It s based on Radius Server Version you can choose the version of the WPA security...

Page 48: ...f keyboard characters in the specified length WEP Key Select which of the four keys will be used and enter the matching WEP key that you create Make sure these values are identical on all wireless sta...

Page 49: ...scription of the wireless station To Add a Wireless MAC Address filtering entry click the Add New button The Add or Modify Wireless MAC Address Filtering entry page will appear shown in the following...

Page 50: ...address 00 0A EB B0 00 0B and the wireless station B with MAC address 00 0A EB 00 07 5F are able to access the router but all the other wireless stations cannot access the router you can configure th...

Page 51: ...ere you can specify the transmit power of router You can select High Middle or Low which you would like High is the default setting and is recommended Beacon Interval Enter a value between 20 1000 mil...

Page 52: ...ify the value between 1 15 Beacon Intervals The default value is 1 which indicates the DTIM Interval is the same as Beacon Interval Enable Short GI This function is recommended for it will increase th...

Page 53: ...click the Next button to go to the next page and click the Previous button to return the previous page Note This page will be refreshed automatically every 5 seconds 4 7 Wireless 5GHz There are six s...

Page 54: ...ou set the Mode 11a n ac mixed all of 802 11a 802 11n and 802 11ac wireless stations can connect to the router Channel This field determines which operating frequency will be used The default channel...

Page 55: ...t the security type is the same as your AP s security type WEP Index This option should be chosen if the key type is WEP ASCII or WEP HEX It indicates the index of the WEP key Authentication Type This...

Page 56: ...ensure the network security by generating a new PIN Add device You can add a new device to the existing network manually by clicking this button If the wireless adapter supports Wi Fi Protected Setup...

Page 57: ...p 2 The Wi Fi Protected Setup LED flashes for two minutes during the Wi Fi Protected Setup process Step 3 When the WPS LED is on the client device has successfully connected to the router II Enter the...

Page 58: ...two minutes during the Wi Fi Protected Setup process Step 3 When the WPS LED is on the client device has successfully connected to the router Note 1 The WPS LED on the router will light green for fiv...

Page 59: ...d on pre shared passphrase The router is configured by this security type by default Authentication Type you can choose the version of the WPA PSK security on the drop down list The default setting is...

Page 60: ...ter 0 to disable the update WPA WPA2 Enterprise It s based on Radius Server Authentication Type you can choose the version of the WPA security on the drop down list The default setting is Automatic wh...

Page 61: ...ecimal digits 0 9 a f A F in the specified length ASCII format stands for any combination of keyboard characters in the specified length WEP Key Select which of the four keys will be used and enter th...

Page 62: ...at you want to filter Status The status of this entry either Enabled or Disabled Host The host network for the filetring rules Description A simple description of the wireless station To Add a Wireles...

Page 63: ...o return to the previous page For example If you desire that the wireless station A with MAC address 00 0A EB B0 00 0B and the wireless station B with MAC address 00 0A EB 00 07 5F are able to access...

Page 64: ...by the router to synchronize a wireless network Beacon Interval value determines the time interval of the beacons The default value is 100 RTS Threshold Here you can specify the RTS Request to Send T...

Page 65: ...ess devices will be able to communicate with the router but not with each other To use this function check this box AP Isolation is disabled by default Note If you are not familiar with the setting it...

Page 66: ...ts can communicate with hosts Guest Network Isolation If enabled guests are isolated from each other Guest Network Bandwidth Control If enabled the Guest Network Bandwidth Control rules will take effe...

Page 67: ...ck any of them and you will be able to configure the corresponding functions 4 9 1 DHCP Settings Choose menu DHCP DHCP Settings you can configure the DHCP Server on the page as shown in the following...

Page 68: ...your network DNS Server Optional Input the DNS IP address provided by your ISP or consult your ISP Secondary DNS Server Optional Input the IP address of another DNS server if your ISP provides two DN...

Page 69: ...ngs MAC Address The MAC address of the PC for which you want to reserve an IP address IP Address The IP address reserved for the PC by the router Status The status of this entry either Enabled or Disa...

Page 70: ...enabled the Hardware NAT feature will take effect Disable Hardware NAT Control If disabled neither Hardware NAT feature will take effect 4 11 Forwarding There are four submenus under the Forwarding me...

Page 71: ...l used for this application either TCP UDP or All all protocols supported by the router Status The status of this entry Enabled means the virtual server entry is enabled Common Service Port Some commo...

Page 72: ...ed Click the Delete Selected button to delete selected entries Note If you set the service port of the virtual server as 80 you must set the Web management port on Security Remote Management page to b...

Page 73: ...Status The status of this entry Enabled means the Port Triggering entry is enabled Edit To modify or delete an existing entry Common Applications Some popular applications already listed in the drop d...

Page 74: ...ing connection to an external host using a destination port number defined in the Trigger Port field 2 The router records this connection opens the incoming port or ports associated with this entry in...

Page 75: ...DHCP function To assign a computer or server to be a DMZ server 1 Click the Enable button 2 Enter the IP address of a local PC that is set to be DMZ host in the DMZ Host IP Address field 3 Click the S...

Page 76: ...Enabled or Disabled Enabled means that the port is still active otherwise the port is inactive Click the Enable button to enable UPnP Click the Disable button to disable UPnP Click the Refresh button...

Page 77: ...t be enabled if you want to allow VPN tunnels using VPN protocols to pass through the router PPTP Passthrough Point to Point Tunneling Protocol PPTP allows the Point to Point Protocol PPP to be tunnel...

Page 78: ...ALG To allow Microsoft NetMeeting clients to communicate across NAT click Enable SIP ALG To allow SIP clients and servers to communicate across NAT click Enable RTSP ALG To allow some media player cl...

Page 79: ...ion immediately Enable TCP SYN FLOOD Attack Filtering Enable or Disable the TCP SYN FLOOD Attack Filtering TCP SYN FLOOD Packets Threshold 5 3600 The default value is 50 Enter a value between 5 3600 W...

Page 80: ...figure the Remote Management function in the screen as shown in the following figure This feature allows you to manage your router from a remote location via the Internet Web Management Port Web brows...

Page 81: ...l the Internet activities of the child limit the child to access certain websites and restrict the time of surfing Parent Control Check Enable if you want this function to take effect otherwise check...

Page 82: ...ve button Click the Delete Selected button to delete the selected entries in the table For example If you desire that the child PC with MAC address 00 11 22 33 44 AA can access www tp link com on Satu...

Page 83: ...Archer C55 AC1200 Wireless Dual Band Gigabit Router 78...

Page 84: ...own in the following figure Enable Internet Access Control Select the check box to enable the Internet Access Control function so the Default Filter Policy can take effect Description Here displays th...

Page 85: ...list or click Add LAN Host 4 Select a target from the Target drop sown list or click Add Target 5 Select a schedule from the Schedule drop down list or click Add Schedule 6 In the Status field select...

Page 86: ...d a new entry with the Schedule Description is Schedule_1 Day is Sat and Sun Start Time is 1800 and Stop Time is 2000 6 Click the submenu Rule of Access Control in the left Click Add New button to add...

Page 87: ...table To add a new entry please follow the steps below 1 Click the Add New button 2 In the Mode field select IP Address or MAC Address 1 If you select IP Address the screen shown is Figure 4 79 In Des...

Page 88: ...1 4 In MAC Address field enter 00 11 22 33 44 AA 5 Click Save to complete the settings Then you will go back to the Host Settings page and see the following list 4 14 3 Target Choose menu Access Contr...

Page 89: ...n for the target e g Target_1 II In IP Address field enter the IP address of the target III Specify the Target Port manually 2 If you select MAC Address the screen shown is the figure above I In Descr...

Page 90: ...the settings below 1 Click Add New button to enter the Add or Modify an Access Target Entry page 2 In Mode field select URL Address from the drop down list 3 In Description field create a unique desc...

Page 91: ...ete Selected button to delete selected entries in the table For example If you desire to restrict the internet activities of host with MAC address 00 11 22 33 44 AA to access www tp link com only from...

Page 92: ...c route in the next screen shown in the following figure A static route is a pre determined path that network information must travel to reach a specific host or network To add static route entries 1...

Page 93: ...nu Advanced Routing System Routing Table and then you can view the System Routing Table in the next screen shown in the following figure System routing table views all of the valid route entries in us...

Page 94: ...Ingress Bandwidth The download speed through the Internet port Click Save to make the settings take effect Description This is the information about the rules such as address range Priority The prior...

Page 95: ...le to scan or configure the corresponding function The detailed explanations for each submenu are provided below 4 17 1 Binding Settings This page displays the IP MAC Binding Setting table you can ope...

Page 96: ...ind checkbox 4 Click the Save button to save it To modify or delete an existing entry follow the steps below 1 Find the desired entry in the table 2 Click Edit or Delete as desired on the Edit column...

Page 97: ...function The router offers the DDNS Dynamic Domain Name System feature which allows the hosting of a website FTP server or e mail server with a fixed domain name named by yourself and a dynamic IP ad...

Page 98: ...username and password and click the Login button 4 18 2 Comexe cn DDNS If the dynamic DNS Service Provider you select is www comexe cn the page will appear as shown in the following figure To set up...

Page 99: ...e To set up for DDNS follow these instructions 1 Enter the Domain Name you received from dynamic DNS service provider 2 Enter the Username for your DDNS account 3 Enter the Password for your DDNS acco...

Page 100: ...lanations for each submenu are provided below 4 19 1 IPv6 Status The IPv6 Status page displays the router s current IPv6 status and configuration All information is read only WAN Connection Type The I...

Page 101: ...ress 4 19 2 IPv6 WAN Connection Type Choose the correct WAN connection type based on your ISP network topology Dynamic IPv6 Connections which use dynamic IPv6 address assignment Static IPv6 Connection...

Page 102: ...But this is rarely required and should not be done unless you are sure it is necessary for your ISP connection If your ISP gives you one or two DNS IPv6 addresses select Set IPv6 DNS Server manually...

Page 103: ...DNS IPv6 address provided by your ISP Secondary IPv6 DNS Server Enter another DNS IPv6 address provided by your ISP MTU Bytes The normal MTU Maximum Transmission Unit value for most Ethernet networks...

Page 104: ...HCPv6 Dynamic Host Configuration Protocol for IPv6 Server MTU Bytes The normal MTU Maximum Transmission Unit value for most Ethernet networks is 1500 Bytes For some ISPs you may need to modify the MTU...

Page 105: ...LAN connection is IPv6 WAN Connection Display the available wan connection Click the Save button to save your settings 4 19 3 IPv6 LAN Address Auto Configuration Type Choose the IPv6 address auto conf...

Page 106: ...atistics Click any of them and you will be able to configure the corresponding functions The detailed explanations for each submenu are provided below 4 20 1 Time Settings Choose menu System Tools Tim...

Page 107: ...ld and the time in the last field End The time to end the Daylight Saving Select the month in the first field the week in the second field the day in the third field and the time in the last field To...

Page 108: ...the Internet if it is configured accordingly 4 The Daylight Saving will take effect one minute after the configurations are completed 4 20 2 Diagnostic Choose menu System Tools Diagnostic and then yo...

Page 109: ...he number of data bytes to be sent The default is 64 Ping Timeout Time to wait for a response in milliseconds The default is 800 Traceroute Max TTL Set the maximum number of hops max TTL to be reached...

Page 110: ...here is no need to upgrade the firmware unless the new firmware has a new feature you want to use However when experiencing problems caused by the router rather than the configuration you can try to u...

Page 111: ...own in the following figure Click the Backup button to save all configuration settings as a backup file in your local computer To upgrade the router s configuration follow these instructions Click the...

Page 112: ...h the file system will reboot automatically 4 20 7 Password Choose menu System Tools Password and then you can change the factory default user name and password of the router in the next screen as sho...

Page 113: ...only logs of this level will be shown Refresh Refresh the page to show the latest log list Clear Log All the logs will be deleted from the router permanently not just from the page Save Log Click to s...

Page 114: ...received and transmitted by the router Current Packets The total number of packets received and transmitted in the last Packets Statistic interval seconds Bytes The total number of bytes received and...

Page 115: ...Archer C55 AC1200 Wireless Dual Band Gigabit Router 110 4 21 Logout Choose Logout and you will be back to the login screen as shown in the following figure...

Page 116: ...rd field again finish by clicking Connect 4 If your ADSL lease is in pay according time mode select Connect on demand or Connect manually for Internet connection mode Type an appropriate number for Ma...

Page 117: ...dress field The format for the MAC Address is XX XX XX XX XX XX Then click the Save button It will take effect after rebooting 3 I want to use Netmeeting what do I need to do 1 If you start Netmeeting...

Page 118: ...owser and click DMZ submenu On the DMZ page click Enable radio button and type your IP address into the DMZ Host IP Address field using 192 168 0 169 as an example remember to click the Save button 5...

Page 119: ...number Log in to the router click the Security menu on the left of your browser and click Remote Management submenu On the Remote Management page type a port number except 80 such as 88 into the Web...

Page 120: ...on the Add or Modify a Virtual Server page enter 80 into the blank next to the Service Port and your IP address next to the IP Address assuming 192 168 0 188 for an example remember to Enable and Sav...

Page 121: ...to the adapter s manual if needed 1 Install TCP IP component 1 On the Windows taskbar click the Start button point to Settings and then click Control Panel 2 Click the Network and Internet Connections...

Page 122: ...igabit Router 117 5 The following TCP IP Properties window will display and the IP Address tab is open on this window by default 6 Select Obtain an IP address automatically and Obtain DNS server autom...

Page 123: ...the unlicensed radio spectrum at 2 4GHz and WEP encryption for security 802 11b networks are also referred to as Wi Fi networks 802 11g specification for wireless networking at 54 Mbps using direct se...

Page 124: ...all devices must be configured with the same SSID This is typically the configuration parameter for a wireless PC card It corresponds to the ESSID in the wireless Access Point and to the wireless net...

Reviews: