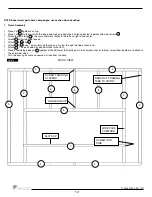
NOTE: Sheet metal parts have sharp edges, use caution when handling.
1. Frame Assembly
•
Place 2 of #4 together as a top.
•
Place 1 of #6 into the joint with the long edge facing up. Align the 3 holes and screw together with wafer screw #1.
•
Attach the remaining #6 in the same manner at holes to the left and right of the center.
•
Attach #2 with wide edge face up.
•
Attach #5 to #6 and #2.
•
Attach #7 to #2 using 1 screw through the top and 1 screw through the side at each end.
•
Attach #3 , 1 on each side with bend out tabs to the front.
•
Place 2 remaining pieces of #4 together at the bottom of the framing kit in the same manner as the top, screw them together and attach to
the inner steel studs.
•
Turn the framing kit over and secure all studs from the back.
2
2
3
3
4
4
4
4
5
6
6
6
7
FRONT VIEW
SCREW THROUGH
3 LAYERS
BEND OUT FRAMING
TABS TO FRONT
WIDE FACE
FORWARD
SCREW INTO
SIDE
SLOTS UP
LONG EDGE UP
Fig. #12
4
4
6
6
6
1
2
2
2
5
7
3
12
TCWS.54CSTE 110712-72
Summary of Contents for TCWS54ST SERIES D
Page 70: ...70 TCWS 54CSTE 110712 72 ...

