background image

45

Maintenance

44

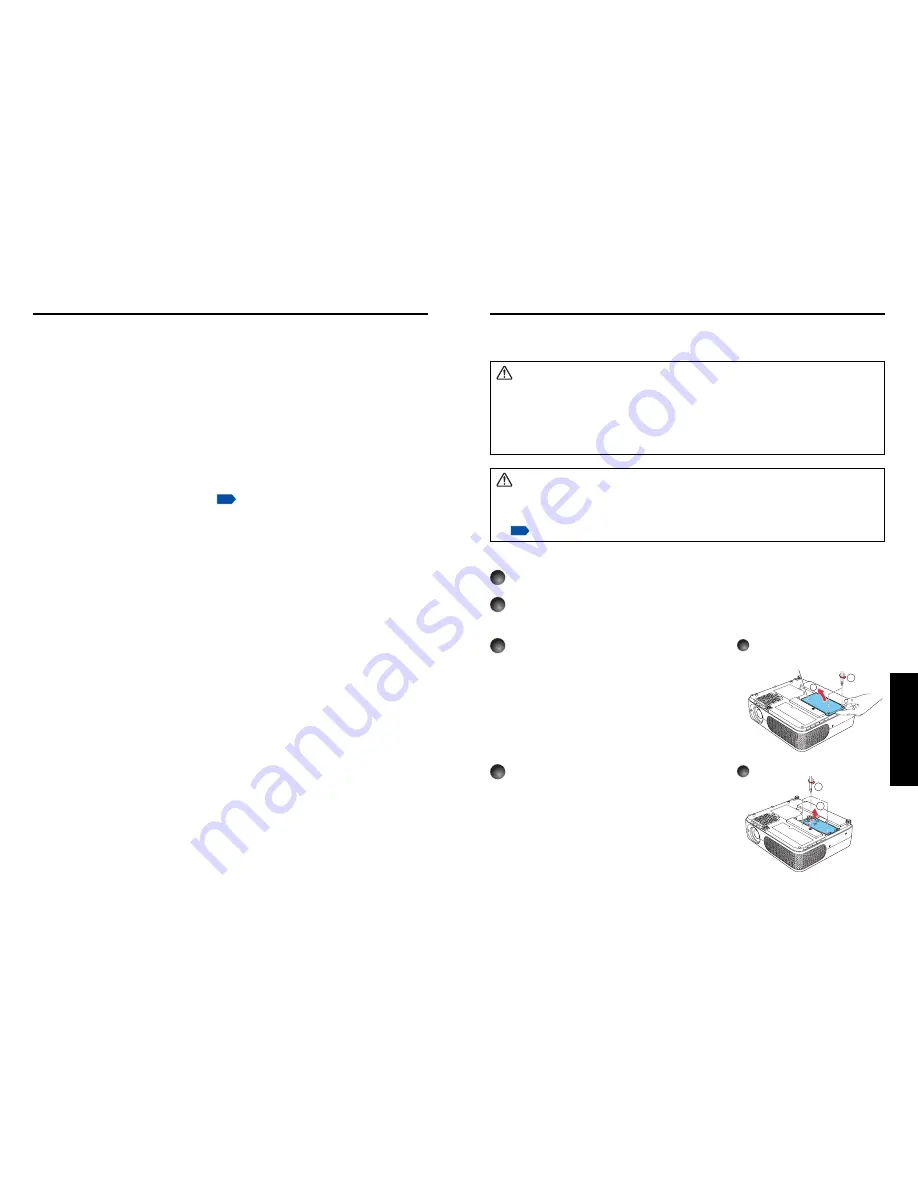
1

Unplug power cord.

2

Wait until lamp is sufficiently cooled.

Wait for at least 1 hour.

3

Remove the lamp cover.

Loosen the two screws, raise the lamp cover
with your fingers as shown to remove the lamp
cover. Use care to avoid any damage to nails
and/or tip of your finger(s). If you have any
difficulty in removal, you can use a screwdriver
or any other smaller tool for your convenience.

4

Pull out the lamp.

Loosen the three lamp locking screws, pull up the
handle, and remove the lamp.

Lamp cover

2

1

1

2

3

4

A lamp is consumable supplies. If used for extended periods, images will appear dark, and
the lamp could burn out. This is characteristic of a lamp, and is not malfunction. (The lifetime
of the lamp depends on condition of use.) If this happens, replace it with a new one.

 WARNING

If the projector is mounted on the ceiling, it is recommended to use your Toshiba dealer-
ship when the lamp has to be exchanged.

Uncovering the lamp while the projector is mounted on a ceiling may lead to a danger
of damage from falling pieces of glass if the lamp is broken. Besides, working at high
elevations can also be hazardous. Do not attempt to replace the lamp by yourself.

When replacement is required, be sure to use TLPLW11 (sold separately).

 CAUTION

• If you have been using the projector, the lamp will be very hot, and may cause burn

injuries. Wait for the lamp to cool (for longer than 1 hour) before replacing it.

• If the lamp should break, please handle with care to avoid injury due to broken pieces

(

p.44

) and contact your dealer for repair service.

Lamp replacement

The product’s light source is a mercury lamp that lights at increased internal pressure. Be sure
to fully understand the following characteristics of the lamp and handle it with extreme care.

• The lamp may burst with a loud noise due to impact or deterioration, or fail to light at

the expiration of its life.

• How long it takes before the lamp bursts or the life expires may vary greatly by lamp.

Some may burst shortly after first use.

• Burst is likely to happen if the lamp is used after the replacement period has elapsed.
• When the lamp bursts, the broken pieces of glass may get inside the product or be

released outside from the openings for ventilation.

• When the lamp bursts, a slight amount of mercury gas enclosed in the lamp along with

glass dust may be released from the openings for ventilation.

Immediately replace the lamp when a sign appears on the screen.

• When the replacement time approaches, a message will appear on the screen.
• The risk of burst will increase if the lamp is continuously used without being replaced.
• Frequently check the used hours and prepare spares when the replacement time

approaches. (Refer to “Status display”. 

p.43

)

When the lamp is broken

• If glass components, including a lamp and a lens, should break, handle the broken

pieces with care to avoid injury and contact your dealer for repair service.

• In the event of lamp burst, unplug the product from the wall outlet, leave and completely

ventilate the room. Then, thoroughly clean the area around the projector and discard
any edible items placed in that area.

• When the lamp bursts, consult a doctor if glass dust or mercury gas gets into your eyes

or you breathe it.

About lamp

Maintenance

Summary of Contents for TLP-WX2200

Page 1: ...Others Maintenance Operations Preparations Before Using OWNER S MANUAL 3LCD DATA PROJECTOR TLP WX2200 ...

Page 2: ...nce received including interference that may cause undesired operation This equipment has been tested and found to comply with the limits for a Class B digital device pursuant to part 15 of the FCC Rules These limits are designed to provide reasonable protection against harmful interference in a residential installation This equipment generates uses and can radiate radio frequency energy and if no...

Page 3: ...BSERVE ALL WARNINGS AND INSTRUCTIONS GIVEN IN THIS OWNER S MANUAL AND THOSE MARKED ON THE UNIT RETAIN THIS BOOKLET FOR FUTURE REFERENCE This unit is fully transistorized and does not contain any parts that can be repaired by the user DO NOT REMOVE THE CABINET COVER OR YOU MAY BE EXPOSED TO DANGEROUS VOLTAGE REFER SERVICING TO QUALIFIED SERVICE PERSONNEL ONLY 1 Read Owner s Manual After unpacking t...

Page 4: ...uld break please handle with care to avoid injury and contact your dealer for repair service The broken pieces of glass may cause to injury In the unlikely event of the lamp rupturing thoroughly clean the area around the projector and discard any edible items placed in that area 18 Servicing Do not attempt to service this product yourself as opening or removing covers may expose you to dangerous v...

Page 5: ... a TV or radio may cause interference to the images or audio sound If this happens move it away from the TV or radio Moving the projector from a low temperature room to a high temperature room may cause condensation on the lens or internal parts in the instrument If you continue to use it in that situation the malfunction may result Ensure to wait until the condensation naturally disappears In a h...

Page 6: ...e dispose of this product or used lamps in accordance with local regulations Following information is only for EU member states The use of the symbol indicates that this product may not be treated as household waste By ensuring this product is disposed of correctly you will help prevent potential negative consequences for the environment and human health which could otherwise be caused by inapprop...

Page 7: ...to setting 28 Correcting the keystone distortion 28 Resizing image 29 Cutting off the picture and sound temporarily Mute 30 Changing picture mode 30 Changing screen size 31 Freezing the image Freeze 31 Setting the password 32 Using the menus 35 How to use the menus 35 The image adjustment menu 36 The display setting menu 38 The default setting menu 41 Displaying Information Status display 43 Maint...

Page 8: ...14 12 11 13 12 4 8 5 6 10 9 7 Name Function 1 Infrared remote sensor Senses commands from the remote control p 19 2 Foot adjuster release button Press to set up or stow the foot adjuster p 27 3 Air intake Draws in air from outside the projector 4 Control panel Operates the projector p 16 5 Zooming lever Adjusts screen size p 27 6 Focusing ring Adjusts screen focus p 27 7 Antitheft lock hole Attach...

Page 9: ...irect the laser pointer toward a person or a mirror Handling and adjusting other than described here may lead to dangerous exposure to laser Name Main Function 13 AUTO SET button Sets up input from computer p 28 14 Laser indicator Lights when laser is on 15 Mouse control button Controls a mouse pointer p 20 16 PAGE button Proceeds PowerPoint slides p 20 17 MUTE button Cuts off the picture and soun...

Page 10: ...part In rare cases ambient conditions could impede the operation of the remote control If this happens point the remote control at the main unit again and repeat the operation Preparing and using the remote control When operating the remote control from behind the projector the light is reflected on the projecting surface and may travel a shorter distance to reach the projector depending on the sh...

Page 11: ...emote control This function is available on any computer with the Windows 98 98SE Windows Me Windows 2000 Windows XP or Windows Vista OS that is equipped with a USB port which can support USB1 1 The mouse remote control receiver is also supported on OS 9 or OS X for the Macintosh However please note that Toshiba does not guarantee the operation of all computers 1 Connecting a computer Connect the ...

Page 12: ...io input White L Red R AV cable not supplied To video output Audio cable not supplied Audio cable not supplied To audio output To Y CB CR output Green Y Blue CB Red CR To audio output White L Red R It is necessary to switch to MONITOR OUT by the switch Monitor p 18 Notes When COMPUTER 2 IN terminal also used for MONITOR OUT terminal is used as MONITOR OUT terminal the signal which is input to COMP...

Page 13: ...to cool before plugging it back in If the lamp overheats it may fail to light LCD Panels LCD panels wear out In order to prolong the lifetime of your LCD panel take the following precautions In order to extend the lifetime of the LCD panel always turn off the power when not in use and make sure that the lamp is off Keeping the lamp off is also very effective at saving electricity If the air filter...

Page 14: ...jecting the No signal will appear If a signal not supported by the projector is input the Unsupport signal will appear If an unavailable operation button is pressed the icon will appear 1 Turn on the power Turn on the power by following the instructions in Turning the power on p 24 2 Select the language and the lamp power When using the first time When the projector is used for the first time afte...

Page 15: ...riginal size Remote Control Using auto setting Only for input from computer This function sets up the projector to the optimum state such as sampling phase frequency screen position and clamp for each type of the input signal by using simple operations Press the remote control s AUTO SET button For computer input the icon will appear during processing You can set as well by selecting Auto setting ...

Page 16: ...or cable broadcasting except for the purpose of your private viewing and listening it may infringe the copyright protected by the copyright laws Remote Control Remote Control Notes The icon appears while resizing Operating a function other than Mute will release resizing As zooming is processed digitally the image quality is degraded in larger zoom ratio During resizing or moving the zooming area ...

Page 17: ...ter standby mode Note Even if you have forgot the password setting the password setting can be forcibly set to On by detaching the control panel from the projector first when the power is turned back on after the power cord has been unplugged If you can not change the previous password please input 0000 4 zeros using numeric keys of the remote control Using handy features Continued Setting the pas...

Page 18: ...turn to previous item press the RETURN button Item Adjustment Setting Value These marks signify the items can be adjusted set by using These marks signify the items can be selected from the list by using After an item is selected apply it by pressing Press or to open the menu Default setting 2 menu p 42 Status display menu p 43 These marks signify that there are options Press or to display a list ...

Page 19: ...ust the brightness of the image Yes Yes Yes Yes Darker Brighter Color Adjust the color of the image No Yes Yes Yes Lighter Deeper Sharpness Adjust the sharpness of the image Yes Yes Yes Yes Softer Sharper Noise Set the function to reduce screen noise No Yes Yes Yes reduction 1 On Enable Off Disable NCE mode Press Toggle the NCE mode with Yes Yes Yes Yes 1 2 3 R level Adjust red of the image color ...

Page 20: ...OSHIBA is set for Logo by factory setting If user s logo has been registered it is displayed when Logo is set for background Start up screen If user s logo has been registered and this setting is On the logo is displayed at start up User logo Registers a part of the image that is input from computer as a stationary picture and displays it as a logo at start up and when no signal is input Using the...

Page 21: ...stration How to register user logo 1 Select User logo in the Display setting menu and press the or button 2 Select Logo registration from the displayed menu list and press the button 3 The registration area is displayed for confirmation Select OK or Cancel and press the button If the registered picture does not fall within the display area operate the computer to scroll the screen 4 Select Yes to ...

Page 22: ... with a dealer about getting replacement for lamp TLPLW11 sold separately 4 Version shows the version of the projector s internal control program This version is referred to for customer service etc Note The displayed information will not be refreshed if the status changes To refresh the information dismiss the display then display it again Default setting 2 menu Description Item Sets projection m...

Page 23: ...tact your dealer for repair service Lamp replacement The product s light source is a mercury lamp that lights at increased internal pressure Be sure to fully understand the following characteristics of the lamp and handle it with extreme care The lamp may burst with a loud noise due to impact or deterioration or fail to light at the expiration of its life How long it takes before the lamp bursts o...

Page 24: ... the new lamp until the bottom is reached and lock in place using the three lamp locking screws 6 Replace the lamp cover Align the cover and press it in then tighten the screws loosened in step 3 until the lamp cover is no longer loose 7 Reset the lamp time See the lamp s manual for instructions on resetting the lamp time Notes and Precautions The Lamp time item in the Status display menu indicate...

Page 25: ... reattach the lamp cover p 46 The abnormal display will not disappear until the power cord is unplugged You can not turn on the power during abnormal display Power went out during use Problem inside the projector Unplug the power cord and wait for a short while then turn the power back on If the above action will not clear the problem unplug the power cord and contact your dealer The icon will app...

Page 26: ...g service personnel Is the power cord plugged in Is it connected to the projector Is the lamp cover attached properly p 46 Is the ambient temperature high p 49 Is the air intake or air exhaust blocked p 49 Is the projector turned on When Auto input search is Off p 26 Is the mute function on p 30 Is the brightness setting minimized p 36 Are the connections set up correctly p 22 Are all the connecte...

Page 27: ...g List of supported signals RGB signals This projector supports the following RGB signals Note however that depending on the computer model the screen may show flicker or streaking Please adjust the projector if this happens Resolution 720 x 400 640 x 480 800 x 600 832 x 624 1024 x 768 1152 x 864 1280 x 800 1280 x 960 1280 x 1024 1400 x 1050 1600 x 1200 Mode 720x400_85 VGA_60 VGA_72 VGA_75 VGA_85 ...

Page 28: ...lid per communication 3 Data format For input commands only ASCII compliant all uppercase alphanumeric characters supported 4 Replies Acknowledge ACK 06h CR 0Dh Data Normally ended ACK 06h ESC 1Bh Aborted No acknowledge NAK 15h If commands are to be sent consecutively wait for the response from the projector before sending the next command Main Commands Item Command Power on PON Power off POF Icon...

Page 29: ......

Reviews: