21
20
Preparations
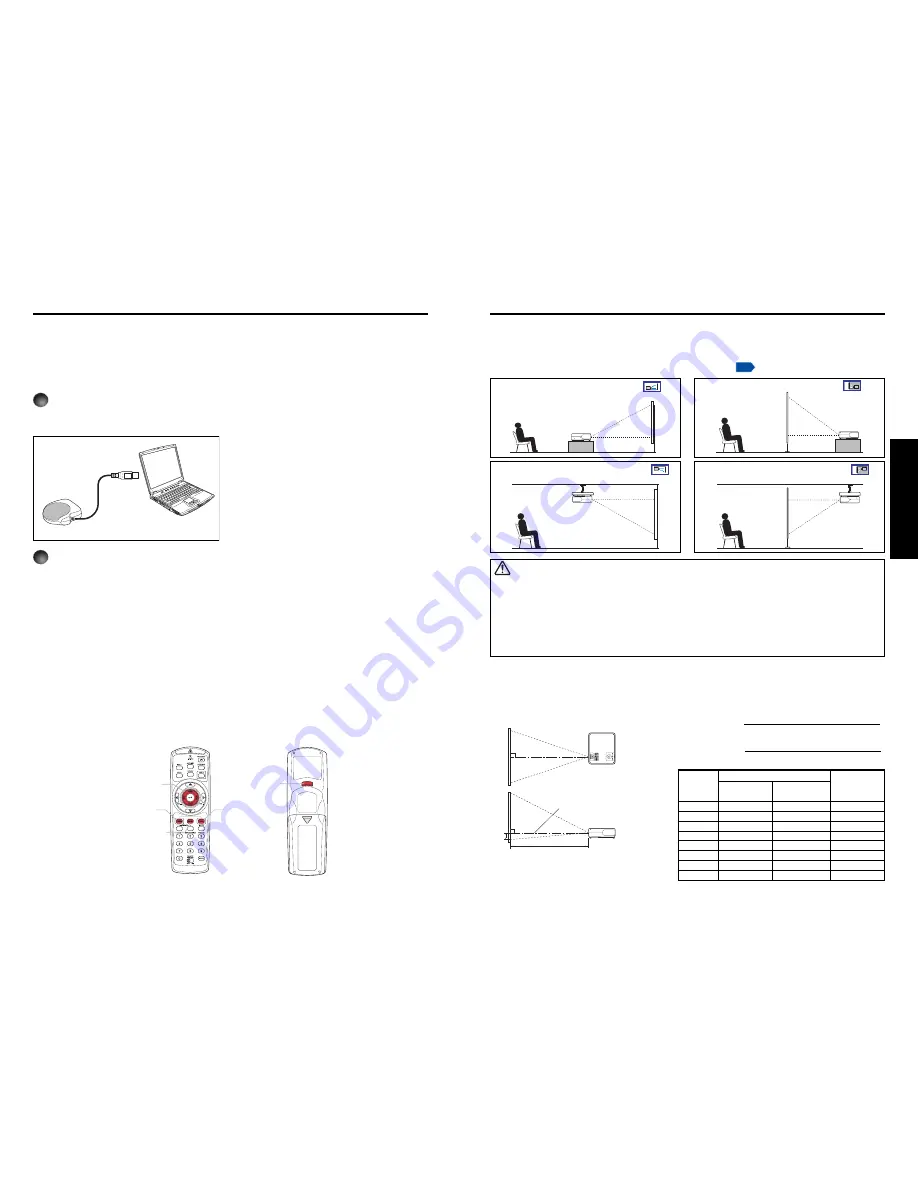
Placement Styles
As shown in the figures below, this device can be placed in 4 different styles.
The factory setting is “floor-mounted front projection.” Set the [
Projection mode
]
in the
Default setting 2
menu, in accordance with your needs.
p.42
Placement
WARNING
• Always obey the instructions listed in IMPORTANT SAFETY INSTRUCTIONS when placing the unit.
Attempting to clean/replace the lamp at a high site by yourself may cause you to drop down, thus
resulting in injury.
• If you wish to mount the projector on the ceiling, be sure to ask your dealer to do so. Mounting the
projector on a ceiling requires special ceiling brackets (sold separately) and specialized knowledge.
Improper mounting could cause the projector to fall, resulting in an accident.
• If the projector is ceiling-mounted, install the breaker for turning off the power in case of anomaly. Let
everyone involved with the use of the projector know that fact.
Floor-mounted front projection
Floor-mounted rear projection
Ceiling-mounted front projection
Ceiling-mounted rear projection
Projection Distance and Size
Use the figures, tables, and formulas below to determine the projection size and projection
distance. (Projection sizes are approximate values for full-size picture with no keystone
adjustment.)
Screen
As seen from above
As seen from the side
90
°
90
°
a
H
Lens center
a (min length) =
projection size (inches) – 0.9521
30.244
a (max length) =
projection size (inches) – 0.7895
25.078
a
is the distance between the lens and the screen,
and corresponds to a range of 1.29 m (4.23 ft.) to
11.93 m (39.14 ft.).
H
is the height from the image
bottom to the center of the lens.
Operating a computer using the remote control
A computer can be operated using the projector’s remote control. This function is available
on any computer with the Windows
®
98/98SE, Windows
®
Me, Windows
®
2000, Windows
®
XP, or Windows Vista™ OS, that is equipped with a USB port which can support USB1.1
(The mouse remote control receiver is also supported on OS 9 or OS X for the Macintosh).
However, please note that Toshiba does not guarantee the operation of all computers.
1
Connecting a computer
Connect the mouse remote control receiver (supplied) to a computer.
Mouse remote control receiver
To USB port
2
Operating a computer
Operate remote control’s buttons towards the mouse remote control receiver.
●
Moving the mouse pointer
Press the mouse control button in the direction you wish the mouse pointer to move,
then press.
●
To left click
Press the L-CLICK button.
●
To right click
Press the R-CLICK button.
●
To drag and drop
Holding down the L-CLICK button, move the mouse control button until the mouse
pointer is over the desired location, then release the L-CLICK button.
●
Using the computer’s page up
[
↑
]
and down
[
↓
]
function
Press the PAGE+ and PAGE- buttons to switch PowerPoint
®
slides.
The remote control may fail to operate
if the mouse remote control receiver is
exposed to bright sunlight or
fluorescent lighting.
In such a case, change position or
direction of the mouse remote control
receiver and retry.
Mouse control
Remote Control Front
Remote Control Rear
PAGE –
PAGE +
R-CLICK
L-CLICK
projection
projection distance a
height (H)
min length
max length
size
(zooming max)
(zooming min)
40 inches 1.29 m (4.23 ft.) 1.56 m (5.12 ft.)
1.8 cm (0.06 ft.)
60 inches 1.95 m (6.40 ft.) 2.36 m (7.74 ft.)
2.6 cm (0.09 ft.)
80 inches 2.61 m (8.56 ft.) 3.16 m (10.37 ft.)
3.5 cm (0.11 ft.)
100 inches 3.27 m (10.73 ft.) 3.96 m (12.99 ft.)
4.4 cm (0.14 ft.)
150 inches 4.93 m (16.17 ft.) 5.95 m (19.52 ft.)
6.6 cm (0.22 ft.)
200 inches 6.58 m (21.59 ft.) 7.94 m (26.05 ft.)
8.8 cm (0.29 ft.)
250 inches 8.23 m (27.00 ft.) 9.94 m (32.61 ft.) 11.0 cm (0.36 ft.)
300 inches 9.89 m (32.45 ft.) 11.93 m (39.14 ft.) 13.1 cm (0.43 ft.)
Summary of Contents for TLP-WX2200
Page 29: ......


