4 Replacement Procedures
Error! Style not defined. Error! Style not defined.
4.
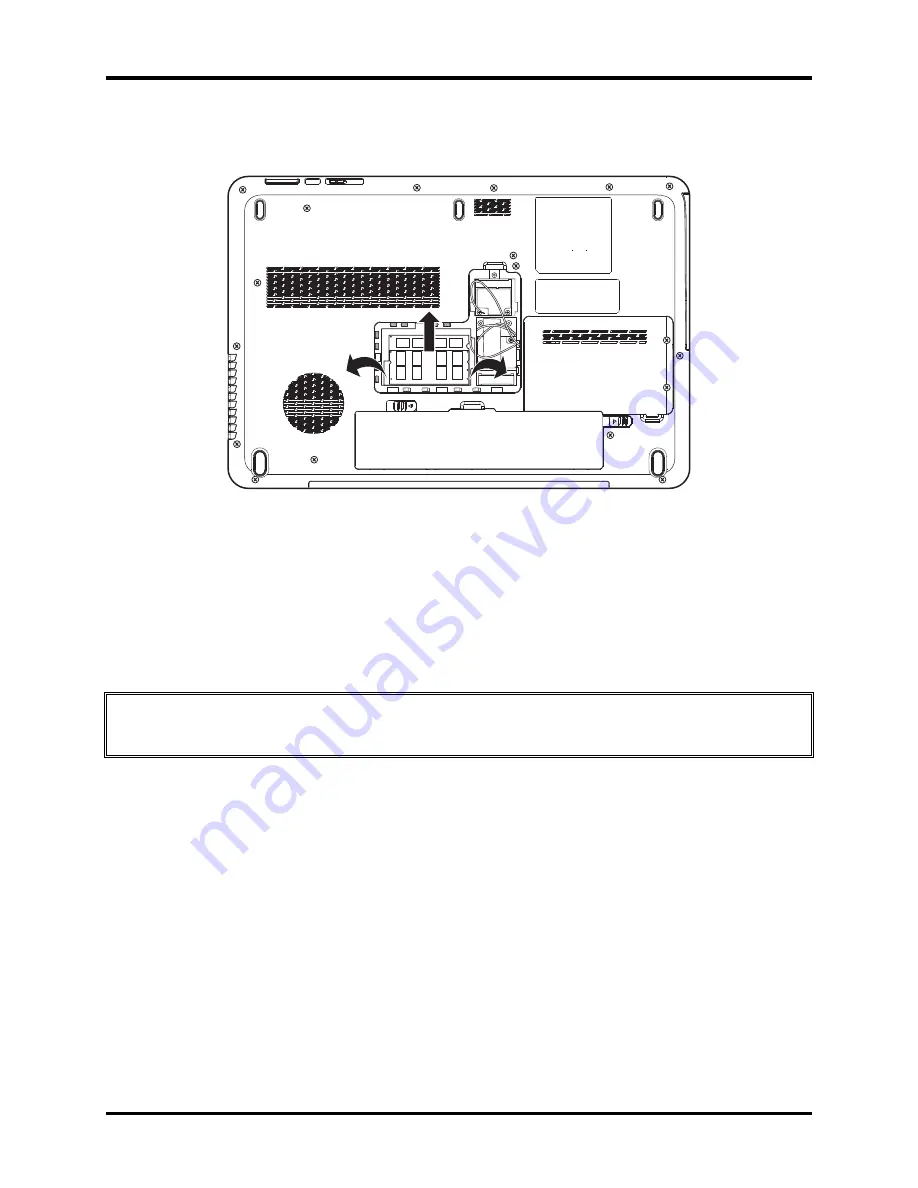
Spread out the two memory lock latches so that the memory pops up. Please follow the
procedure as shown in Figure 4.6.
Figure 4.6 Removing the RAM from the connectors
5.
Pull the memory up and out at an angle, using care to avoid touching the connectors.
Installing the Optional Memory
Install the optional memory according to the following procedures after checking that the laptop
is turned off.
CAUTION: Install the optional memory after turning off the laptop. If this is violated, the
laptop or memory can be damaged.
1.
Insert the memory into the connector at an angle of 45 degrees.
2.
Press down on the memory module so that it is secured with both memory lock latches.
3.
Reinstall the optional RAM door.
4.
Secure the RAM door with one M2.5x5 screw.
After the laptop is turned on, check the hardware configuration in the Hardware Setup or
TESTUP program to make sure that the installed memory has been recognized by the system. If
it has not been recognized yet, check the connections.
Satellite A500D Maintenance Manual
4-14
Summary of Contents for Satellite Pro A500D series
Page 1: ...Toshiba Personal Computer Satellite Maintenance Manual TOSHIBA CORPORATION CONFIDENTIAL ...
Page 14: ...Chapter 1 Hardware Overview ...
Page 17: ......
Page 35: ...Chapter 2 Troubleshooting Procedures ...
Page 36: ......
Page 143: ...Chapter 4 Replacement Procedures ...
Page 150: ......
Page 252: ...C 22 CONFIDENTIAL SatelliteA500D ProA500D Maintenance Manual 11 USB20_P1_R 12 GND ...
Page 262: ...Figure TI keyboard 4 Korean KO Keyboard Figure KO keyboard 5 United Kingdom UK Keyboard ...
Page 263: ...Figure UK keyboard 6 US International UI Keyboard Figure UI keyboard 7 Hebrew HB Keyboard ...
Page 264: ...Figure HB keyboard 8 Danish DM Keyboard Figure DM keyboard 9 Swiss SW Keyboard ...
Page 265: ...Figure SW keyboard 10 Arabic ARE Keyboard Figure ARE keyboard 11 Czech CZ Keyboard ...
Page 266: ...Figure CZ keyboard 12 Russian RU Keyboard Figure RU keyboard 13 Portuguese PO Keyboard ...
Page 267: ...Figure PO keyboard 14 Slovakian SL Keyboard Figure SL keyboard 15 Italian IT Keyboard ...
Page 268: ...Figure IT keyboard 16 French FR Keyboard Figure FR keyboard 17 German GR Keyboard ...
Page 269: ...Figure GR keyboard 18 Greek GK Keyboard Figure GK keyboard 19 Hungarian HG Keyboard ...
Page 270: ...Figure HG keyboard 20 Spanish SP Keyboard Figure SP keyboard 21 Turkish TR Keyboard ...
Page 271: ...Figure TR d 22 Turkish F TF F Keyboard keyboar Figure TF F keyboard 23 Swedish SD Keyboard ...
Page 272: ...Figure SD keyboard 24 Belgian BE Keyboard Figure BE keyboard 25 Yugoslavian YU Keyboard ...
Page 273: ...Figure YU keyboard 26 Norwegian NW Keyboard Figure NW keyboard 27 Scandinavian ND Keyboard ...
Page 275: ...Figure CB keyboard 30 Romania RO Keyboard Figure RO keyboard 31 Bulgaria BU Keyboard ...
Page 276: ...Figure BU keyboard 32 Japanese JP Keyboard Figure JP eyboard k ...


