117
No.
X
Part name
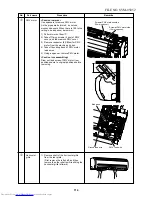
Cross-flow fan
Procedure
6) Slide the fan motor rightward to remove it.
7) Take off fixing screws (2 pcs.) from fixing
support at right side of the heat ex-
changer.
8) Lift up the left side of the heat exchanger
toward you, and then remove the cross-
flow fan.
<Caution to reassembling>
a) When assembling the bearing base, check
the drain pipe is surely incorporated to the
rear plate.
(Otherwise water leak may be caused.)
b) When assembling the fan motor, remove
fan motor rubber (shaft center side),
mount it in the position in the following
figure, and then mount the fan motor.
• Mount the cross-flow fan so that the right
end of joint which is first one from right
of the cross-flow fan is set at position
70.5mm apart from wall of the rear side
of the main unit.
• Mount the cross-flow fan so that D-cut
part at the center comes to the mounting
hole of set screw.
• Determine the position of fan motor as
shown in the figure for mounting.
(Perform work of item
W
.)
c) When attaching motor band (Right),
perform work of item b), set the hooking
claws (2 positions) of the motor band
(Right) in the main unit, and then perform
reverse procedure of item 6).
Remarks
Cross-flow fan
Joint
33
Central D-cut part
Motor band
(Right)
Hooking claws
(2 positions)
FILE NO. SVM-05052
Summary of Contents for MMK-AP0072H
Page 125: ...TOSHIBA CARRIER CORPORATION ...


