background image

46 


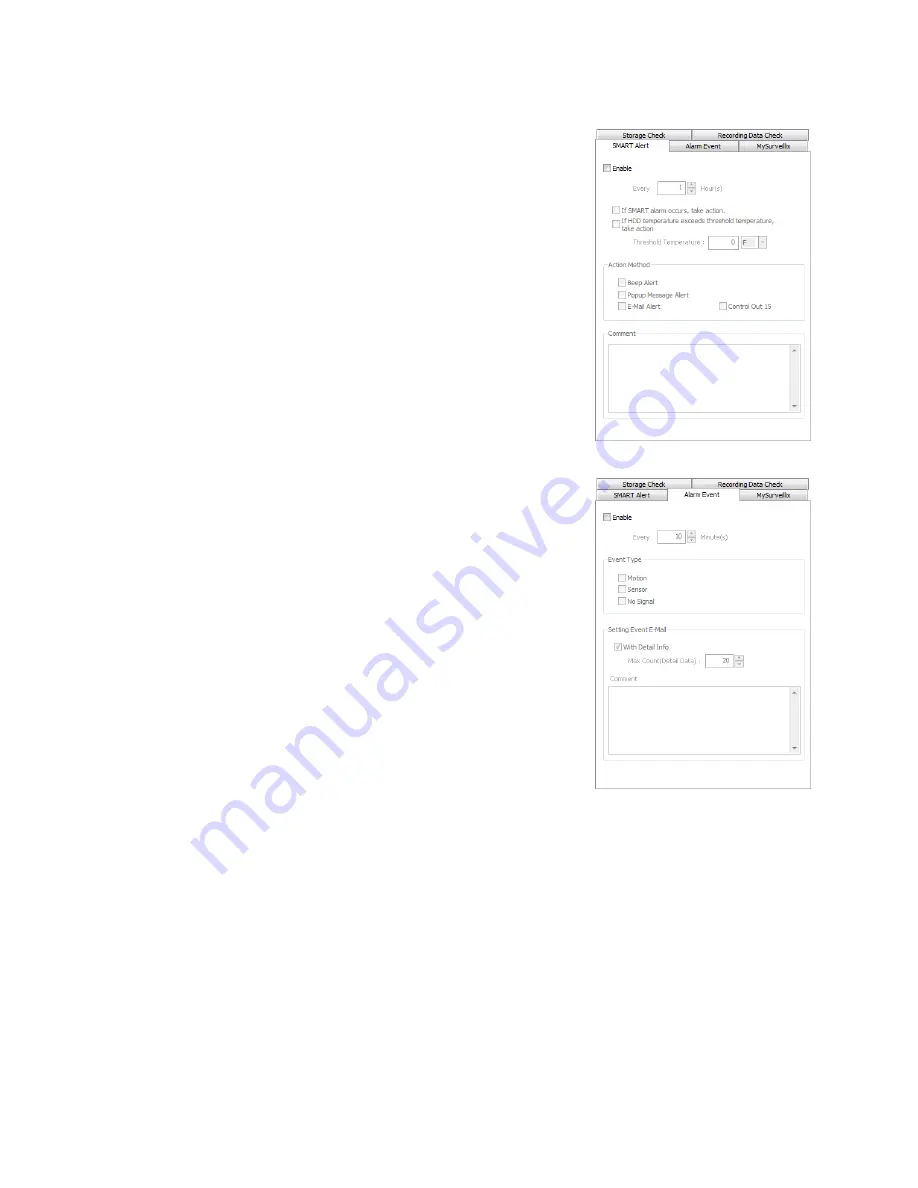
SMART Alert 

1.


Set up the 

General

 and 

Users

 tabs first. 

2.


Click the 

SMART Alert

 tab. 

3.


Select 

Enable

4.


Define the frequency of SMART status checks (in hours). 

5.


Select the type of SMART event to trigger an action. 

6.


If selecting for temperature checks, define the maximum HDD temperature. 

Note

  Surveillix recommends a temperature threshold of 150° F (65° C) if you choose to 

use this function. 

7.


Select an 

Action Method

Beep Alert

Popup Message Alert

, or 

Email Alert

8.


Add a 

Comment

 that will be seen in the email message if desired. 

9.


Click 

Apply

 to save your settings. 


Alarm Event 

1.


Set up the 

General

 and 

Users

 tabs first. 

2.


Click the 

Alarm Event

 tab. 

3.


Select 

Enable

4.


Define the frequency to send email alerts (in minutes). 

5.


Select the 

Event Type

Motion

Sensor

No Signal

 (video loss). 

6.


Select 

With Detail Info

 to receive a still image attachment of the associated 

camera in the email message. 

7.


Max Count

 defines the number of message that will contain detailed data 

within the frequency time frame. 

8.


Add a 

Comment 

that will be seen in the email message if desired. 

9.


Click 

Apply

 to save your settings. 

Summary of Contents for IPSe16-X

Page 1: ...e NVSPro Network Video Recorder Software Manual IPSe8 X IPSe16 X IPSe32 X NVSProX 2U X NVSProX 4U X model no Please carefully read these instructions before using this product Save this manual for future use ...

Page 2: ... OF BUSINESS PROFITS BUSINESS INTERRUPTION OR LOSS OF BUSINESS INFORMATION EVEN IF TOSHIBA HAS BEEN ADVISED OF THE POSSIBILITY OF SUCH DAMAGES AND WHETHER IN AN ACTION OR CONTRACT OR TORT INCLUDING NEGLIGENCE This software and documentation are copyrighted All other rights including ownership of the software are reserved to DVR Support Center TOSHIBA and Surveillix are registered trademarks of TOS...

Page 3: ...ions 16 SETUP OPTIONS 17 Setup Overview 18 Setup Menu Overview 18 Network Camera Setup 19 Connecting a Network Device 19 Connecting Manually 19 Connecting with Find Cameras 20 Naming Camera Channels 20 Assigning Dual Streams 20 Removing a Camera 21 Assigning Audio Channels to a Network Device 21 Alarm Recording Mode 22 Camera Status and Information 23 NVR Registration and Upgrade 24 Locating the S...

Page 4: ...Daytime Motion Detection Example 35 Setting Nighttime Continuous Recording 36 Setting Weekend Motion Recording 36 Creating a Sensor Schedule Example 37 Special Day Schedule 38 Creating Editing a Special Day Schedule 38 Deleting a Special Day Schedule 38 Alarm Options 39 Setting a Restart Schedule 40 Create System Restart Schedule 40 Network Setup 41 User Management 42 Add a New User 42 User Rank 4...

Page 5: ...6 Zooming in on a Portion of an Image 56 Open Video from a Saved Location 56 Sync 56 Clean Image 56 Instant recording 57 Activate Instant Recording 57 Searching Instant Recorded Video 57 Performing a Basic Search 57 Printing an Image 57 Daylight SAVIng Time 58 exporting image or video files 59 Bookmarks 60 Modify Bookmarks 60 Clip Backup 61 Single Clip Backup Using Bookmark Data 61 Index Search 62...

Page 6: ... Overview 76 Activating Scheduled Backup 76 Specifying Scheduled Backup Drives 76 Performing a Scheduled Backup 77 LAN ISDN PSTN CONNECTIONS 78 LAN Overview 79 Connecting to a LAN Using TCP IP 79 Configuring TCP IP Settings 79 LDAP INTEGRATION 80 Features 81 Installing Active Directory 81 WEB VIEWER 83 Web Viewer Overview 84 Configuring the Recorder for Remote Connection 85 Connecting to a Recorde...

Page 7: ...reate a New Remote Connection 92 Configuring the Recorder 93 Digital Verifier Overview 94 Installing the Digital Verifier 94 Using the Digital Verifier 94 Backup Viewer Overview 95 Installing Backup Viewer 95 Loading Video from DVD or Hard Drive 95 ADDITIONAL SOFTWARE 96 SCS Overview 97 Purchasing SCS Software Upgrade 97 Connecting to a Recorder 97 ...

Page 8: ...32338AC 9 NVR BASICS This chapter includes the following information Becoming familiar with the Display screen Defining Screen Divisions ...

Page 9: ...o Windows by clicking Exit on the Display screen then and select Restart in Windows Mode 2 Click the Start button All Programs Surveillix vFormat 3 Click Export in the System Setting tool section 4 Select a location to save the settings file and click Save The DVR Utility will export the NVR settings and automatically close Importing NVR Settings 1 Exit to Windows by clicking Exit on the Display s...

Page 10: ...meter to monitor the system resources on your recorder GREEN System configuration OK YELLOW Caution evaluate system configuration and consider decreasing system loading RED System configuration has been exceeded which may affect stability decrease system loading or upgrade system with CPU performance package Opens Search PTZ Controller Setup Backup Login Exit Current Date Time Sensor Status Relay ...

Page 11: ...TZ function on a 360 camera View type Select the view for a 360 camera Mount Type Select the type of mount that matches the location of your 360 camera Projection type Dewarp your 360 camera image in Spherical or Flat view Panogenics cameras only Oncam SDK Select to dewarp video footage from an Oncam 360 IP camera Panamorph SDK Select to dewarp video footage from an Immervision 360 camera Panogeni...

Page 12: ...e two types of Special Recording Text is displayed on the camera display area indicating what type of Special Recording is activated SENSOR Sensor is displayed when a sensor associated with the camera is activated INSTANT Instant Recording is a manual activation of the recording for the selected camera Regardless of the recording method Instant Recording will start the camera recording and also fl...

Page 13: ...splay Area To return to a different Multi Camera View select a different Screen Division option from the Screen Division menu 2nd Four Cameras View Displays cameras 5 8 in the Video Display Area To return to a different Multi Camera View select a different Screen Division option from the Screen Division menu 3rd Four Cameras View Displays cameras 9 12 in the Video Display Area To return to a diffe...

Page 14: ...ese instructions 1 On the Live screen click the additional screen division buttons First Sixteen Last Sixteen etc 2 Select your desired screen division for those sixteen channels 3 Double click a camera channel to enlarge it to full screen Screen Division buttons Toggle between first and second 16 screen divisons ...

Page 15: ...ions 1 On the Display screen click Setup and then click General Setup 2 Click the Sequencing tab 3 Drag and drop cameras from the Channel List to the desired location within the Division Group 6 Select the screen intervals you want to display in each division area 7 Set the Interval time in seconds This determines how long each sequence screen will appear on the Live display 8 To save your setting...

Page 16: ...C 17 SETUP OPTIONS This chapter includes the following information Setup Overview Network Cameras Motion Detection PTZ Camera Setup Alarms Recording Schedule Network Setup Storage Management Instant Recording ...

Page 17: ...s saved on the recorder by optimizing the recording schedule Optimize the type of recording done by adding motion detection to this as well again increasing the amount of useful video Camera Naming Name each camera so the location can be easily identified and include any other pertinent information that may be helpful when viewing it on the Video Display Area Configure Network Cameras Connect to a...

Page 18: ... will appear Connecting a Network Device Connecting Manually 1 On the Display screen click Setup 2 Click Camera Setup and then click IP Cameras 3 Click Manually Add Camera 4 Select the Vendor and Model of your network device from the Device Type list 5 Type a Device Name 6 Type the IP URL address Port User ID and Password of the device 7 Click Add 8 Double click in the Channel field and then selec...

Page 19: ...ra you want to name 5 Type a name for your camera 6 Click Apply to save the name Assigning Dual Streams Dual stream support enables you to take advantage of two different streams from an IP camera One stream can be high definition forensic video while the other stream can be a lower resolution for live display This allows SCS or Remote Viewer software to display more cameras while utilizing lower ...

Page 20: ...Remove Device 4 Click Yes to finish removing the camera 5 Click Apply to save your settings Assigning Audio Channels to a Network Device 1 In the Display screen click Setup 2 Click IP Cameras 3 Click the Camera Setup tab 4 Click the Advanced Camera Setup tab 5 Select the camera you want to record audio from in the Network Cameras Currently in Use field 6 Select Record Network Audio 7 To be able to...

Page 21: ...ecording 5 On the Configuration menu tree click IP Cameras 6 Click the Camera Setup tab 7 Click the Advanced Camera Setup tab 8 Select the camera you want to record audio from in the Network Cameras Currently in Use field 9 Select your desired Intensive Recording Mode Accelerate on Motion Alarm Accelerate on Sensor Alarm or Accelerate on User Input Instant Alarm 10 Click Apply to save your setting...

Page 22: ...atus and Information The Camera Status and Information tab displays information on all cameras connected to the recorder 1 In the Display screen click Setup 2 Click IP Cameras 3 Click the Camera Status and Information tab ...

Page 23: ...stem ID The System ID is a number that is generated by the recorder This is a unique code generated using the MAC address of the recorder Locating the System ID 1 On the Display screen click Setup 2 Click IP Cameras 3 Click the License tab Obtaining the License Key 1 Open an Internet browser and go to http register surveillixdvrsupport com 2 Enter the Product Serial Number and System ID 3 Click Su...

Page 24: ...stration Site into the License Key box 3 Click Register and confirm that the new License Key is listed in the Channel Connection License box 4 Click OK 5 Click Apply 6 Click Exit Setup Unlocking Additional Network Devices Follow the instructions above for Registration and Upgrade to unlock any additional network devices ...

Page 25: ...guring and installing your PTZ camera refer to the camera manual Enabling an IP PTZ Camera 1 Ensure that you have properly connected your IP PTZ camera to the network 2 On the Display screen click Setup 3 Click IP Cameras and then click the Advanced Camera Setup tab 4 Select the IP camera form the Network Cameras Currently in Use list 5 Select PTZ Camera 6 Click Apply to save your settings ...

Page 26: ... To create a polygon shape click the mouse at each point and double click to close the shape 9 Click OK 10 Move the sliders to adjust motion sensitivity and the noise filter 11 Define the pre alarm and post alarm recording time for a motion event Pre Alarm Recording 0 120 Seconds The number of seconds the recorder records before motion is detected to ensure any motion occurring between I frames is...

Page 27: ...etection 6 Click Apply to save your settings Etc Additional motion detection configuration options are found on the Etc tab Use this tab to set a camera channel to appear at full screen in the Display screen when a motion or sensor event is detected You can also set your recorder to enable motion detection even during continuous recording or play an audio warning when an alarm event is detected No...

Page 28: ...or event occurs This file can be a custom created sound file that is unique to the application The selected WAV file is played through speakers attached to the recorder 1 Click Browse and then locate your wav file 2 Click Play to test the file 3 Select Activate on Motion or Activate on Sensor Alarm to activate this warning whenever that event occurs 4 Click Apply to save your settings Audio Channe...

Page 29: ... Full Screen 2 To manually select a resolution clear Force Window to Full Screen and then click Select Resolution 3 To change the font of your On Screen Display click Select 4 Select your desired Font and Size Select Bold if desired 5 When you have selected your font click OK 6 Select Hide Network Connectivity Status from Live View if desired 7 Click Apply to save your settings General Use the Gen...

Page 30: ...roup view All selected screen divisions will be shown when AutoSequence is enabled on the Live View Be sure to clear any screen division you do not want to be displayed during AutoSequence viewing 1 On the Display screen click Setup and then click General Setup 2 Click the Sequencing tab 3 Drag and drop cameras from the Channel List to the desired location within the Division Group 4 Select the sc...

Page 31: ... Sensor Name and then type an appropriate name for your alarm sensor 2 Double click Type and then select the contact type for this alarm Normally Open N0 or Normally Closed NC 3 Double click Relay and type the time in seconds you want to elapse between the detection of the sensor and when the alarm is activated 4 Click Apply to save your settings Activate PTZ Preset Use this function to activate a...

Page 32: ...ensors tab 3 In the Hybrid Sensor Setup area click Setup 4 Select a camera from the Network Device List 5 Double click DVR Relay No and then select a relay to assign to this camera 6 Click Apply 7 Click Apply again to save your settings Relays 1 Click Setup 2 Click Alarms Sensor and then click the Relays tab 3 Double click Relay Name for each relay to assign a name 4 Click Apply to save your setti...

Page 33: ...utomatically Note Schedules are prioritized in descending numerical order If there is an overlap the schedule with the higher priority will override the other schedule Example If there is an overlap in Schedules 1 and 2 Schedule 1 will take priority Default Schedules These are pre set schedules Click Default Schedule 1 or Default Schedule 2 to choose either of the following settings When you have ...

Page 34: ...nderstand the process of creating a schedule you will want to create one to suit your specific needs This example schedule will be as follows MON FRI 9AM 5 59PM all 4 cameras will record using MOTION recording MON FRI 6PM 8 59AM all 4 cameras will record using CONTINUOUS recording SAT SUN 12AM 11 59PM all 4 cameras will record using MOTION recording Setting Daytime Motion Detection Example 1 In th...

Page 35: ...d C continuous appears 4 Repeat for 2 4 in the Camera section 5 Click Apply to save Setting Weekend Motion Recording 1 In the Schedule Number list select Sch03 2 Clear Mon Fri and then select Sun and Sat 3 On the Sch03 row click and drag your mouse to select the entire row and then click Set 4 Click 1 in the Camera section repeatedly until a green M motion appears 5 Repeat for 2 4 in the Camera se...

Page 36: ...e detail This schedule example will be as follows SUN SAT 12AM 11 59 PM cameras 1 and 2 will be activated by Sensor 3 and Sensor 4 1 Select Sch01 in the Schedule Number list 2 Click the Single Selection Mode button to enable Multi Selection Mode 3 Select Sun Mon Tue Wed Thu Fri and Sat 4 In the Sch01 row click and drag your mouse to select the entire row 5 Click 1 and 2 in the Camera section repea...

Page 37: ...n the Special Day Schedule To edit this schedule select it and then and repeat steps 1 and 2 6 Click save Special Day When a confirmation message appears click OK 7 To continue setting normal schedules click Special Day Mode to enable Normal Day Mode Note When you are making changes in Normal Day Mode the dates in the Special Day list will appear dimmed They are still saved but you cannot access t...

Page 38: ...on select Sensor Event Motion Event or both 4 Once you have selected an Event option you can select alarm options Map Alarm Enable this camera to work the the Map Alarm function of SCS remote monitoring software Emergency Alarm Send video to a PC running Emergency Agent software 5 Set the Transmission Duration in seconds for this alarm 6 Enter up to five Emergency IP of PCs running Emergency Agent...

Page 39: ...t Schedule 1 In the Display screen click Setup 2 Click Recording Schedule 3 Click Power Off Options 4 Select Enable for each day of the week that a restart is desired 5 Specify the time of day to schedule the system restart 6 Select either Restart or Off Note If Off is selected the recorder will shut down at the specified time but not restart 7 Click OK 8 Click Apply to save your settings ...

Page 40: ... Image Port Transfers the video to the Surveillix remote software default port 2002 Search Port Transfers search information to the Surveillix remote software default port 2003 Note If connecting to the recorder through a firewall the above ports must be open to incoming and outgoing traffic Health Check Port Enable SCS to receive information regarding the health of the recorder default port 2005 ...

Page 41: ...utton immediately deletes the user use cautiously Add a New User 1 In the Display screen click Setup 2 Click User Management 3 Click Add User 4 Type a User Name and Password 5 Type the password again in the Confirm Password field 6 Enable the appropriate Permissions 7 Select Camera or Audio channels to hide those channels from the user 8 Assign a User Rank Note See the User Rank section of this ma...

Page 42: ...y NOT save when a higher ranked user kicks the lower ranked user out of the Setup menu PTZ Control The recorder software can only have one user using the PTZ controls at any given time A user with a higher rank will kick another user out of the PTZ controls 1 Log into your recorder as an Administrator 2 In the Display screen click Setup 3 Click User Management 4 Select a user from the Select User ...

Page 43: ...TP information for the email account that will be used to send emails from the recorder Contact your administrator for this information if necessary 8 If using a secondary email account select Use Secondary SMTP and complete the SMTP information 9 Click Test to send a test message to either address 10 Click Apply to save your settings Users 1 On the Display screen click Setup 2 Click Storage Manag...

Page 44: ...Add a Comment that will be seen in the email message if desired 7 Click Apply to save your settings Recording Data Check 1 Set up the General and Users tabs first 2 Click the Recording Data Check tab 3 Select Enable 4 Define the frequency of data checks in hours 5 Select the Action Method Popup Message Alert Beep Alert or Email Alert 6 Add a Comment that will be seen in the email message if desire...

Page 45: ...r Email Alert 8 Add a Comment that will be seen in the email message if desired 9 Click Apply to save your settings Alarm Event 1 Set up the General and Users tabs first 2 Click the Alarm Event tab 3 Select Enable 4 Define the frequency to send email alerts in minutes 5 Select the Event Type Motion Sensor No Signal video loss 6 Select With Detail Info to receive a still image attachment of the ass...

Page 46: ... the recorder will send updates to MySurveillix 6 Select Send notification to MySurveillix on alarm events if you want the recorder to report alarm events to MySurveillix 7 Type a new MAC Address if necessary 8 To set a custom time to send updates to MySurveillix select Custom Day Night and then select your desired Day and Night times 9 To send updates to a custom URL select Send to Custom URL and...

Page 47: ...software with a recorder Delete Recorded Data 1 To delete data select Enable 2 Select the timeframe of data to delete by selecting the appropriate number of Days you want to retain saved data 3 Select Delete Data or Hide Data 4 Click Apply to delete the data File Management 1 Click View File Info to view all file information 2 To export file info click Export and then browse to your desired locati...

Page 48: ... number information and see the currently running server software version Site Code A user specified unique identification name used by other recorder software to identify the recorder Remote Emergency Agent SCS Digital Signature Verifier Contact Information Attach contact information as a digital signature to exported video Other Management Click Program Management to access External Program Mana...

Page 49: ...follow the steps below 1 On the Display screen click Exit and choose Restart in Windows Mode 2 Right click My Network Places and click Properties 3 On the General tab click Internet Protocol TCP IP and then click Properties 4 Select Use the following IP address 5 Enter values for the IP Address Subnet Mask and Default Gateway these may be specified by the department responsible for network adminis...

Page 50: ...ve screen click Setup and then click System Information 2 Click the Log Files tab 3 Click Select Log Type and then select the type of log you want to see System Event Alarm or Drive Check 4 Use the Calendar to select the date you want to review 5 Scroll through the System Log Files list to view your files Exporting Log Files 1 Select a Start Date and an End Date 2 Click Export Log Data Text or Exp...

Page 51: ...e Option to enable 5 Select Overwrite or Do Not Overwrite 6 If Overwrite is selected a Enter a maximum Log File Size b Choose a number of days to keep logs Delete Log File Older Than Note Log files can also be manually deleted Simply select the log you want to delete on the bottom portion of the window then click Delete All 7 Click OK to save the settings and close the window ...

Page 52: ...ew Upgrade Version is available it will display 4 Click the Release Notes button to view the release notes for the upgrade 5 Click the Start Upgrade button Local Software Upgrade 1 In the System Information menu click the Upgrade Information tab 2 If a new Upgrade Version is available it will display 3 Click the Release Notes button to view the release note for the upgrade 4 Click the Start Upgrad...

Page 53: ...ARCH This chapter includes the following information Search Overview Basic Search Printing an Image Daylight Savings Time Index Search Preview Search Status Search Object Search Motion Search Search in Live ...

Page 54: ... describes how to use the Search features Note Audio Channel buttons are only viewable when one camera is selected Play Controls Back Frame Moves video back one frame Rewind Rewinds video Stop Stops video playback Play Plays video Forward Frame Moves video forward one frame Rewind Stop Play Back Frame Forward Frame Current Date Time Playback date time Remove after image Hour Minute control bar Scr...

Page 55: ...ze Open Video from a Saved Location Previously saved video clips or backup files can be searched for content Find file by date and time or by name 1 Click Open File to search for the saved file 2 Select a file from the list of saved clips and backup files or search by start hour 3 Click OK to open the saved file Sync The Time Sync option synchronizes a single channel of video to playback in real t...

Page 56: ...ing option and then click OK See the Search chapter for more information PERFORMING A BASIC SEARCH There are several different types of searches that can be performed on the recorder The most basic involves selecting the date time camera and clicking play 1 Click Select Date 2 Select a date on the calendar 3 Select a time by clicking the up and down arrows to the right of the time display 4 Click ...

Page 57: ...ould be recorded over The recorder actually records both hours and allows the user to select which hour to play if the need arises To access the lost hour 1 On the Search screen click Select Date 2 Select the date when Daylight Saving time lost an hour The Daylight Saving option appears 3 To play back the lost hour select Daylight Saving select 02 00 2AM for the time 4 Click OK to confirm the date...

Page 58: ...uncompressed but it is typically compressed using a Windows supplied or third party compression and decompression module called a codec AVI is used to export a video clip 1 Locate your desired video or frame using the Search screen Note To save a JPG or AVI file you can only search one camera channel at a time 2 Click Save 3 Select the Export Type Image File JPG PNG or BMP or AVI File 4 If you are...

Page 59: ... the bookmark in the Title field 8 Type a memo or notes in the More Information box 9 You may also select additional channels to include video at different locations recorded at the same time 10 Click Create Modify Bookmarks You can modify a previously created bookmark to change the start or end time of the clip add additional comments change the title or add additional cameras 1 In the Search scr...

Page 60: ...lip on virtually any Windows workstation 7 Click Add Memo to include additional information 8 Click Backup to start the backup Note If backing up a removable USB device click the Unplug or Eject Hardware button after backup is complete to safely remove the device Single Clip Backup Using Bookmark Data 1 From the Search screen click Save 2 Select the drive from the file tree to save data to Hard di...

Page 61: ...nsor Motion Instant Record or select the All Event Types option 7 Click OK There may be a delay while results are returned Results will be displayed in a column on the right side of the screen Each line represents a segment of video If no results are found NO IMAGE FOUND will appear in the column 8 Once the results are displayed double click any result to play the associated video 9 Once your desi...

Page 62: ...layed These example images show how the Preview Search functions The first screen that appears has 24 images displayed Each image represents the first second of recorded video in each hour If there is no image recorded during that period then nothing will be displayed When an hour is selected by double clicking on the image a new screen appears with 6 images Each of these images represents the fir...

Page 63: ... return to the previous 10 image view by double right clicking on the image 6 Use the Play controls to play the video of the selected segment 7 To exit out of the Preview search with the current image still selected click Preview again STATUS SEARCH The Status Search option displays video in graph format Performing a Status Search 1 Click Status on the Search screen 2 Click the calendar icon to se...

Page 64: ...ine a motion region area Resize by pulling on the small square boxes located on the outer perimeter of the area 5 Click Start Search the Object Search Filter Information window will open 6 Select an End date time 7 Adjust the sensitivity if necessary 8 Click OK 9 Select a motion event from the search results list displayed on the right 10 Click Apply to Main Search to display the selected image in...

Page 65: ...recorded video it is not compatible with video recorded prior to installing version 3 6 Performing a Motion Search 1 In the Live screen click Search 2 Select a single camera channel 3 Click Motion 4 Click the calendar icon to select a day 5 Adjust the motion level line 6 Adjust the timeline display settings 7 Click the Play button to start playback 8 To exit Motion search with the current image st...

Page 66: ...ve the mouse cursor over the desired live video display on the Live Display screen 2 Right click and choose Search In Live or click the scroll wheel on the mouse 3 The Search In Live controls will display at the bottom of the image 4 Use the controls to pause rewind move frame by frame or resume playing as desired 5 To exit Search in Live click the scroll wheel on the mouse in the camera area you ...

Page 67: ...th a particular line of receivers that support 2 ID addresses The PT Driver Address is associated with the PTZ ID address set on the camera The addresses must match for the recorder to communicate with the proper PTZ camera This is especially important when a large number of PTZ cameras are connected to the recorder Note To select a PT Driver Address of 129 256 manually enter the ID in the box Adj...

Page 68: ...era channel on the Display screen 2 Click Pan Tilt to enable the Graphical PTZ Controller 3 Click your desired Preset number on the controller ACCESSING PTZ MENUS Some protocols support the ability to access the Internal PTZ Onscreen menu Since every PTZ camera is different the function of these options can vary slightly Your recorder provides an easy way to access the camera options For explanati...

Page 69: ...ply 6 Close the Setup window to return to the Live screen 7 Click Pan Tilt 8 Control the PTZ camera by clicking and dragging the mouse on the screen in the desired direction Note A green line will appear to show the direction in which the PTZ camera will move The shorter the line the less the PTZ will move The longer the line the more the PTZ will travel in the specified direction Understanding To...

Page 70: ...want to configure from the Select Channel list 3 Click Tour Schedule to open the PTZ Tour Schedule window 4 Click and drag the pointer to select blocks of time hours 0 24 on the desired days of the week 5 Click Select 6 When finished click OK to save changes and close the window Days of the week Hours 0 23 24 hours ...

Page 71: ...72 BACKING UP VIDEO DATA This chapter includes the following information Overview Saving Video to a DVD Saving Video from a Single Camera Scheduling Regular Video Backup ...

Page 72: ...The recorder backs up video data using a proprietary compression format that can only be read by the Surveillix Backup Viewer software This ensures the integrity of the data Throughout the backup process the recorder will continue recording data without interruption This is the result of the tremendous multiplexing power of the recorder which allows it to perform virtually all functions without di...

Page 73: ...ckup 1 In the Display screen click Backup 2 Select the date or dates to back up using the calendar Dates highlighted in blue contain recorded data 3 Select the blocks of time to back up using the Hour Minute grid Blocks of time with recorded video are highlighted in green Blocks of time selected for backup are highlighted in red 4 To select video from another date click your desired date in the ca...

Page 74: ... the cameras to back up in the Channel Selection box 5 Select the Backup Drive to save the backup video to 6 Type the Folder Name for the clip files under Clip Name 7 Select Include Viewer to include the Backup Viewer software 8 Enter pertinent clip information into the Clip Information section in the Description box 9 Click Backup Size Check to confirm the file size of the clip backup 10 Click Ba...

Page 75: ...the default Password is dvr4321 6 Click OK 7 Close the DVR Utility window and then double click Surveillix Server to restart your Server software Specifying Scheduled Backup Drives In order to use the Scheduled Backup feature one or more storage drives or partitions connected to the recorder must be specified as a backup drive 1 From the Live screen click Exit and choose Restart in Windows Mode 2 ...

Page 76: ...4 Set the Backup Time to perform the backup 5 Set the Repeat Backup Daily time to specify the number of hours between backup procedures between 1 and 24 hours 6 Select the Backup Drive to save the backup video under Select Backup Media or click Network Drive To save to a local drive or partition you must first rename the location BACKUP 7 Select Overwrite on Disk Full to overwrite previous backup ...

Page 77: ...78 LAN ISDN PSTN CONNECTIONS This chapter includes the following information Overview Configuring TCP IP Settings Connecting to a LAN LAN ISDN PSTN Connections ...

Page 78: ...to create or connect to a LAN CONNECTING TO A LAN USING TCP IP The networking options of the recorder can be created and modified via the standard networking options available on Windows 7 Embedded The recorder comes equipped with a 10 100 1000 Network Interface Card NIC This card uses a standard RJ 45 connector and should be connected using CAT5 Ethernet cable to achieve optimal communication spe...

Page 79: ...80 LDAP INTEGRATION This chapter includes the following information Installing LDAP ...

Page 80: ...ill be used initially to create the OU s and Groups within LDAP 1 Verify that the recorder server is connected to a network that has a valid LDAP server Ensure that the TCP IP settings are configured correctly for DNS resolution and gateway if needed Check to verify that you can ping the LDAP server without issues 2 Set up DVR Site Code to be used for LDAP authorization The default will be 100 000...

Page 81: ...dio channel XX for site code 100 000 DVR_HIDE_CAMERA_0XX_100 000 Hides camera XX for DVRs site code 100 000 DVR_INSTANT_100 000 Instant recording access to DVR DVR_PTZ_100 000 PTZ access to DVRs site code 100 000 DVR_PTZEX_100 000 Access to advanced PTZ control DVR_RELAYOUT_100 000 Access to toggle relays from live view DVR_SEARCH_100 000 Access to search on DVRs site code 100 000 DVR_SETUP_100 00...

Page 82: ...32338AC 83 WEB VIEWER This chapter includes the following information Overview Configuring the Web Viewer ...

Page 83: ...y secure way to view live video from virtually any computer with an internet connection using Microsoft Internet Explorer In order to log in to the recorder server a user account must be made for the user This ensures that only authorized personnel are allowed to log in In addition each user can be assigned different privileges that allow them or deny them access to different cameras For example a...

Page 84: ... Using Web Viewer 1 Open Microsoft Internet Explorer 2 Type the IP address of the recorder into the Address Bar 3 When attempting this for the first time on a workstation a prompt will ask you to accept an ActiveX installation Select Yes Note If you receive a message saying Internet Explorer security settings do not allow you to download ActiveX components then you will need to adjust the browser ...

Page 85: ...86 INCLUDED SOFTWARE SETUP This chapter includes the following information The Surveillix App Overview Emergency Agent Overview Remote Software Overview Digital Verifier Backup Viewer ...

Page 86: ...ly monitors for a signal from the recorder When an alarm signal is detected the Emergency Agent Image Viewer window opens and starts playing the video from the camera associated to the alarm Configuring the Recorder To enable the Emergency Agent on the recorder follow these steps 1 In the Display screen click Setup 2 Click Recording Schedule 3 In the Alarm Options section select Sensor Event Motio...

Page 87: ...d select Setup 4 Confirm that the Network Port in the Setup window is set to the same number as the Emergency Port in Network Settings on the recorder If the numbers are different adjust the Network Port on the client PC to match the recorder 5 Click OK 6 Restart the Client PC Setup Window Network Port Indicates the port which the Emergency Agent uses to listen for incoming events This number shou...

Page 88: ...display filtered event listings Add Items to Alarm Confirm List 1 From the Option menu click Setup 2 Type the desired text in the box below the Alarm Confirmation List Note The items in the Alarm Confirmation List will be available on a list under Status Setting on the main Emergency Agent screen 3 Click Add 4 Click OK to save changes and close the window DVR List Video Display Thumbnails Event Li...

Page 89: ...trols to locate the desired video 3 Select the Continue Playing check box to watch all recorded events When cleared playback stops at the end of the alarm event 4 Select the Same Camera check box to watch all events recorded by a single camera 5 Click Apply after making any changes Export Video 1 Double click an event listing to open the Search Alarm window 2 Use the play controls to locate the de...

Page 90: ...mera Only one user is allowed to access setup or control a PTZ camera at any given time The pictures per second passed to the Remote Client vary greatly depending on the connection type and speed In order to log in to the recorder server a user account must be made for the user This ensures that only authorized personnel are allowed to log in In addition each user can be assigned different privile...

Page 91: ...veillix Remote Surveillix Remote Center The Surveillix Remote Software opens and the Local Connection window opens 2 Click New to open the Site Info window 3 Select the Site Type and enter a Site Name The Site Name will be the name displayed inside the connection box to help identify the unit 4 Enter the IP Address of the recorder 5 Enter the Center Port This setting is specified in the server sof...

Page 92: ...remote connections Time Out Value Specifies a value in seconds to wait for a signal from the Surveillix Remote Client If a signal is not received by that time the connection is dropped Center Port Used to transfer the connection data Image Port Used to transfer the image data Search Port Used to transfer the search data ...

Page 93: ...l Verifier option to begin installation 3 When the Welcome screen appears click Next 4 When the Setup Complete window appears click Finish Installation is complete Using the Digital Verifier 1 Open the Digital Verification program by selecting Start Programs Surveillix Digital Verifier Digital Signature Verifier 2 Click the Browse button to load the JPG image 3 Enter the Site Code of the recorder ...

Page 94: ...pt the terms of the license agreement Click Next 4 Select Yes to install the POS component or select No for a basic install Click Next Note The POS component is only necessary when connecting to a server running the POS Upgrade 5 When the Choose Destination Location window opens click Next This will install Backup Viewer in the default destination folder 6 Select the shortcuts to install or clear ...

Page 95: ...96 ADDITIONAL SOFTWARE This chapter includes the following information SCS Multi Site Management Software Upgrade ...

Page 96: ...ive Video on most computers Username and Password protected Easy to use graphical interface Basics In order to log in to the recorder server a user account must be made for each user This ensures that only authorized personnel are allowed to log in In addition each user can be assigned different privileges that allow them or deny them access to different functions Purchasing SCS Software Upgrade C...

Reviews: