


MULTI-CELL SYSTEM SETUP
Configure Level 2 (and Up) Base Stations
1-28
IP4100 Install Sept., 2013
4.
Go to the Multi-cell screen and set the Multi cell system field to
Enable
.
5.
Enter the System chain ID and select a Multi Cell debug setting only if
necessary.
6.
Click Save and reboot the base station.
7.
Allow several minutes for the base station to reboot, then go back to
Multi-cell screen and check the Base Station Group table.
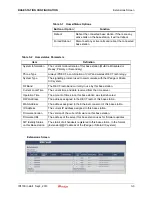
•
Select a synchronization source for this base station in the DECT
sync source list (usually, this is the base station with the strongest
signal). Wait until this base station locks onto the synchronization
source, then click
Save
.
•
In the DECT Chain, this base station will appear under its
synchronization source.
Figure 1-24 Base Station Group Table, Level 2 Added (Multi-cell Screen)
Important!
Always log into the primary base to view chain and signal
strength when initially configuring to avoid confusion with
lock and signal calculation. Reconfigure Dect to ensure
the best signal strength between bases. Check back after
a few minutes to ensure signal still good as signal can
fluctuate and you need a good connection.
8.
When the system has finished synchronizing, repeat this process for
each base station at Level 2.
9.
After you have configured all the base stations at Level 2, follow the
same procedure for the base stations at Level 3, Level 4, and so on,
until all base stations have been added to the system.


