
2
Document Number: 60910-000
7.
Install the Display Module into the Remote EOI assembly.
When installing the Display Module into the housing ensure that the left side of the display is
inserted first with the top and bottom catches securely in place (adjacent to the Phillips screws at
underside of display). This ensures the proper alignment and electrical connection of the CNX
connector of the Display Module PCB. Then gently hold the display in place while securing the
Phillips mounting screw.
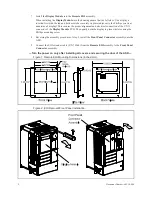
8.
Reversing the assembly procedure of step 5, install the Front Panel Connector assembly onto the
ASD.
9.
Connect the EOI extender cable (P/N 76268) from the Remote EOI assembly to the Front Panel
Connector assembly.
—Turn the power on only after installing all covers and securing the door of the ASD—
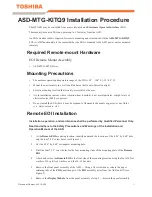
Figure 1. Remote EOI Mounting Dimensions (inches/mm).
Figure 2. EOI Removal/Front Panel Installation.


