background image

 !

-+74) 

 7)/ 6%1. '%3

 $"  $ !

-+ 

The hydraulic system is designed to operate on Mobil

424 hydraulic oil. The machine's 3 gallon reservoir is

filled at the factory with oil. However, check level of oil

before engine is first started and daily thereafter.

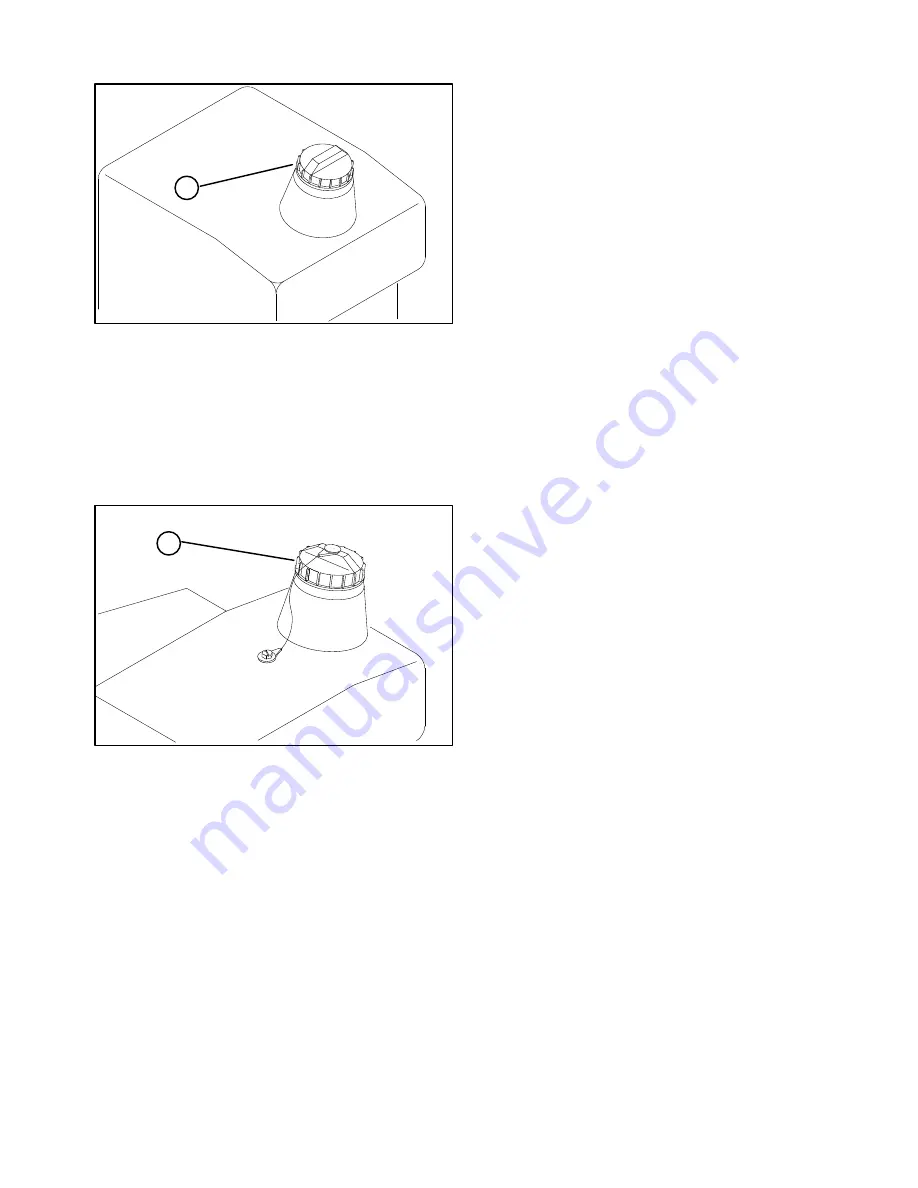
Remove cap from hydraulic oil reservoir.

-+74) 

 -/ 4)5)482-4 '%3


Check level of oil in reservoir. Oil level should be up

to top of cone point on tank screen.

If fluid level is low, slowly fill reservoir with

appropriate hydraulic fluid until level reaches bottom of

screen.

 ! #

4273  :(4%7/-' /7-( )'200)1()( *24

%0&-)16 6)03)4%674)5 '215-56)16/: &)/29 ; 

  6:3)  %16-9)%4 ,:(4%7/-' */7-(

Mobil

Mobil Fluid 424

Amoc

Amoco 1000

International Harvester

Hy-Tran

Texaco

TDH

Shell

Donax TD

Union OIl

Hydraulic/Tractor Fluid

Chevron

Tractor Hydraulic Fluid

BP Oil

BP HYD TF

Boron OIl

Eldoran UTH

Exxon

Torque Fluid

Conoco

Power-Tran 3

Kendall

Hyken 052

Phillips

HG Fluid

26)

The fluids within this group are interchangeable.

Install reservoir cap.

!!

To prevent system contamination, clean

top of hydraulic oil containers before puncturing.

Assure pour spout and funnel are clean.

 !   "

Check tire pressure before operating machine. Correct

air pressure in front and rear tires is 4-6 psi.

Summary of Contents for Sand Pro 3020

Page 1: ...1 7 4 2 38 03 4 0 1 1 3 6 3 01 4 3 3 2 22 3 3 3 8 4 1 8 3 1 0 1 3 1 3 1 4 123 3 3 32 3 2 4 1 3 2 5 1 23 13 8 0 13 4 1 33 3 3 3 3 8 3 2 28 2 38 13 28 2 1 9 0 12 2 38 2314 3 41 3 0 8 6 3 3 2314 3 8 1 24 3 0 12 418 ...

Page 2: ...never the triangle safety symbol appears it is followed by a safety message that must be read and understood For more details concerning safety read the safety instructions on pages 4 and 5 identifies special mechanical information and identifies general information worthy of special attention The engine exhaust from this product contains chemicals known to the State of California to cause cancer ...

Page 3: ...ean Up 14 Changing Engine Oil and Filter 17 Servicing Engine Air Cleaner 17 General Air Cleaner Maintenance 17 Servicing Remote Air Cleaner 17 Adjusting Throttle Control 18 Adjusting Choke Control 18 Replacing Spark Plugs 18 Cleaning Cylinder Head Fins 19 Changing Hydraulic System Oil and Filter 19 Charging Hydraulic System 19 Adjusting Steering Chain 20 Replacing Fuel Filter 20 Adjusting Traction...

Page 4: ... from fuel tank when engine is hot or running Do not smoke while handling gasoline Fill fuel tank outdoors and to about one inch below top of tank bottom of filler neck Do not overfill Wipe up any spilled gasoline 6 5 6 16 4 2 5 56 0 24 3423 4 23 4 6 21 4 4 62 3 6 59 6 5 27 0 71 6 21 4 3 6 59 6 24 23 4 6 1 0 1 6 4 8 4 692 45 4 3 6 16 4 2 59 6 1 6 5 6 5 56 0 9 6 4 6 5 924 1 3423 4 24 126 Exhaust fu...

Page 5: ...d To make sure entire machine is in good condition keep all nuts bolts and screws properly tightened If major repairs are ever needed or assistance is required contact an Authorized TORO Distributor To reduce potential fire hazard keep the engine area free of excessive grease grass leaves and accumulation of dirt If the engine must be running to perform a maintenance adjustment keep hands feet clo...

Page 6: ... 1 17 0 4 58 0 04536 5 10 4 3 045 10 5 0 08 1 13 3 2 5 2 35 06 34 3 45 17 0 0 5 2 354 5 1 3 3 3 2 054 31 8163 65 13 9 131 453 6513 35 1 35 1 35 1 35 1 35 1 35 1 ...

Page 7: ...dth w o implement 57 5 Width w rake model 08812 75 Height 45 Length w o rake 76 Net Weight wet 700 lb 3 04 3 Drag Mat Model No 08850 Rake Model No 08811 Edger Kit Model No 08822 Rake Mounting Kit Model No 08814 Tooth Rake Kit Model No 08812 Weeder Kit Model No 08815 Spring Rake Kit Model No 08813 Finish Grader Model No 08867 Spiker Model No 08856 Front Blade Kit Model No 08821 Cultivator Kit Model...

Page 8: ...eel onto steering shaft aligning mounting holes Secure steering wheel in place with roll pin 52 4 2 7 0 1 Secure seat to seat plate with 4 5 16 18 x 5 8 lg capscrews Fig 3 Move lever on right side of seat outward slide seat to desired position and release lever to lock seat into position 52 4 4 1 4 If Battery is not filled with electrolyte or activated bulk electrolyte with 1 260 specific gravity ...

Page 9: ...hich is the wire attached to the solenoid under the front shroud to the positive terminal with a capscrew and locknut 100 5 0 4 51 5 8310 2145 16 3 46 5 0 2 3410 0 63 0 13 51 5 53 4 45 463 55 3 13 4 1 015 05 3 3 13 36 10 0 17 0 13 15 2 354 Secure the negative cable black to the negative terminal of the battery with a capscrew and lock nut Coat the terminals and mounting fasteners with petroleum je...

Page 10: ...0 1 07 7 78 176 0 6 67 5 4 76 1 176 0 6 714 A 07 6 14 A 07 7 0 6 714 57 9 6 4A 0 6 6 16 1 78 16 5 4A A 7 1 A 76 1 176 1 Never Use Methanol Gasoline Containing Methanol Gasoline Containing More Than 10 Ethanol Gasoline Additives Premium Gasoline Or White Gas Because Engine Fuel System Damage Could Result Fuel tank capacity is approximately 4 25 gallons Clean area around fuel tank cap Remove fuel ta...

Page 11: ...aches bottom of screen 4273 4 7 7 200 1 24 0 16 6 03 4 674 5 215 56 16 29 6 3 16 9 4 4 7 7 Mobil Mobil Fluid 424 Amoc Amoco 1000 International Harvester Hy Tran Texaco TDH Shell Donax TD Union OIl Hydraulic Tractor Fluid Chevron Tractor Hydraulic Fluid BP Oil BP HYD TF Boron OIl Eldoran UTH Exxon Torque Fluid Conoco Power Tran 3 Kendall Hyken 052 Phillips HG Fluid 26 The fluids within this group a...

Page 12: ... 31 3 04 2 0 7 53 44 02 407 1 4 534 04 01 2 4 2 6 23 7 4 4 1 4 4 07 01 2 4 103 4 0 02 4 1 4 05 3 6 2 9 4 0 7 4 Fig 11 The ignition switch used to start and stop the engine has three positions OFF RUN and START Rotate key clockwise Ċ START position Ċ to engage starter motor Release key when engine starts The key will move automatically to the ON position To shut engine off rotate key counterclockwi...

Page 13: ... the choke to keep engine running smoothly 2 34 8 16 28 4 6 1 2 6 56 46 4 02624 2 126 1 56 46 4 21 4 6 1 5 21 5 6 4 5 21 5 2 216 17275 4 1 1 9 6 5 21 5 24 1 1 56 46 4 02624 1 When engine is started for the first time or after overhaul of the engine operate the machine in forward and reverse for one to two minutes Also operate the lift lever to be sure of proper operation of all parts To stop engin...

Page 14: ...me utility vehicles Two points to consider when operating the vehicle are transmission and engine speed To maintain somewhat constant engine rpm depress traction pedal slowly This allows the engine to keep up with ground speed of the vehicle By contrast pushing down quickly on the traction pedal will reduce engine rpm and as a result there will not be enough torque power to move the vehicle Theref...

Page 15: ... Air Filter Pre Cleaner Condition Clean Engine Cooling Fins n Unusual Engine Noises n Unusual Operating Noises n Hydraulic System Oil Level n Hydraulic Hoses for Damage n Fluid Leaks n Fuel Level n Tire Pressure n Instrument Operation Touch up Damaged Paint Inspection performed by_____________________________ Item Date Information 1 2 3 4 5 6 7 8 Check proper section of Operator s Manual for fluid...

Page 16: ...ngs and bushings that must be lubricated are Front Wheel Bearing Fig 14 Traction Control Linkage Fig 15 and Steering Shaft aaaand sprocket Fig 16 Wipe grease fitting clean so foreign matter cannot be forced into the bearing or bushing Pump grease into the bearing or bushing Wipe up excess grease We do not recommend lubricating the steering chain unless it becomes stiff because of rust If the chain...

Page 17: ...turn the engine off Pivot seat upward Remove knobs and air cleaner cover Remove filter and cover plate Inspect filter for cleanliness ruptures holes and tears Replace defective filter element With air cleaner disassembled check air cleaner components for damage Replace if necessary Make sure rubber breather tube in base plate is securely in place or severe engine damage may occur Also make sure ca...

Page 18: ...cover is positioned with TOP side up Proper throttle operation is dependent upon proper adjustment of throttle control Before adjusting the carburetor assure the throttle control is operating properly Pivot seat upward and remove engine shield Loosen cable clamp screw securing cable to engine Move remote throttle control lever forward to FAST position Pull firmly on throttle cable until back of sw...

Page 19: ... gasket Install filter by hand until gasket contacts mounting head then tighten filter an additional three fourths turn Fill the reservoir to proper level refer to Check Hydraulic System page 11 Place all controls in neutral or disengaged position and start engine Run engine at lowest possible RPM to purge the system of air Run engine until lift cylinder extends and retracts and forward and revers...

Page 20: ... direction stop engine and adjust the spring adjusting pin lock nut Adjust traction neutral position refer to Adjusting For Neutral Position In Traction Drive page 19 Check adjustment of traction interlock switch refer to Adjusting Traction Interlock Switch Install engine shield and lower seat Place the front wheel in the straight ahead position Adjust the locknuts until the chain is snug on both ...

Page 21: ...ition of neutral span Tighten locknut securing adjustment Stop the engine Install engine shield and lower seat Remove jack stands and lower the machine to the shop floor Test drive the machine to make sure it does not creep Adjust transmission for neutral refer to Adjusting Traction Drive For Neutral page 19 Activate the pump lever to assure all parts are operating freely and seated properly Rotat...

Page 22: ...lve shroud Move lever guide until cylinder moves freely when lift lever is in the detent position Tighten capscrews and locknuts locking adjustment 63 5 7 3 7 3 6 If the machine will be stored for more than 30 days remove the battery and charge it fully Either store it on the shelf or on the machine Leave the cables disconnected if stored on the machine Store the battery in a cool atmosphere to av...

Page 23: ...ative cable first and scrape clamps and terminals separately Reconnect cables positive cable first and coat terminals with petroleum jelly Check the electrolyte level every 25 operating hours or if machine is in storage every 30 days Maintain cell level with distilled or demineralized water Do not fill cells above the fill line T 2593 RED WHITE RED RED RED WHITE BLACK RED BLACK BLACK BLUE GRAY 1 O...

Page 24: ...ING FORWARD LEFT HYDROSTAT R1 R2 X X X X M2 M1 915 33 7 8 15 5 41 127 84 BARS 7 8 127 84 DISPLACEMENT PRESSURE COMPONENT P1 DISPLACEMENT FLOW RATE AND PRESSURE CHART P2 M1 M2 M3 5 0 81 97 in rev cm rev lbs in 2 3 3 FLOW RATE GPM LPM 12 48 4 5 47 2 17 FLOW RATE CALCULATED AT 3150 RPM FRONT M3 R1 R2 700 90 48 3 6 2 ...

Page 25: ...el Lug Nuts Change Hydraulic Oil Replace Hydraulic Oil Filter Replace Remote Air Filter Element Replace Engine Air Filter Element Replace Spark Plugs Replace Fuel Filter Decarbon Combustion Chamber Adjust Valves and Torque Head Check Engine RPM idle and full throttle Drain and Clean Fuel Tank Initial break in at 8 hours Replace Moving Hoses Replace Traction Safety Switch Every 25hrs Every 100hrs E...

Page 26: ... ...

Page 27: ...rning the unit supply the model and serial numbers to ensure correct information and replacement parts are obtained Do not order by reference number if a parts catalog is being used use the part number To order replacement parts from an authorized TORO Distributor supply the following information Model and serial numbers Part number description and quantity of parts desired ...

Page 28: ...rational hours whichever occurs first Product equipped with hour meter D This warranty does not apply to parts subject to consumption through use unless found to be defective Examples of parts which are consumed or used up during normal Product operation include but are not limited to blades reels bedknives tines spark plugs castor wheels tires filters belts etc D This warranty does not apply to f...

Reviews: