Toro A-SMRT-T Quick Reference & Setup Manual Download Page 8

8

Start Times

: It is possible to have up to four start 

times per schedule. 
• Activate a start time: Click the check box next to 

the desired start time. 

• 

Change a start time: Click the time field and 

adjust hours, minutes, and AM/PM with the up 

and down arrows.

Sensors

: Attach sensors, such as rain or soil, to 

the schedule. The sensor will then control when to 

let the irrigation program run or not.

MV/Pump Delay

: This sets a delay for the 

schedule to run after the master valve and/or pump 

has been activated. On systems with a pump or 

master valve, it can take a bit of time for proper 

pressure to be achieved in the irrigation system. 

Implementing a delay gives the system enough 

time to achieve the proper pressure for irrigation to 

occur.

Zone Delay

: Implementing a delay between zones 

can reduce or eliminate ‘water hammer’ as well 

as give the soil more time to absorb the irrigated 

water before the next zone begins.
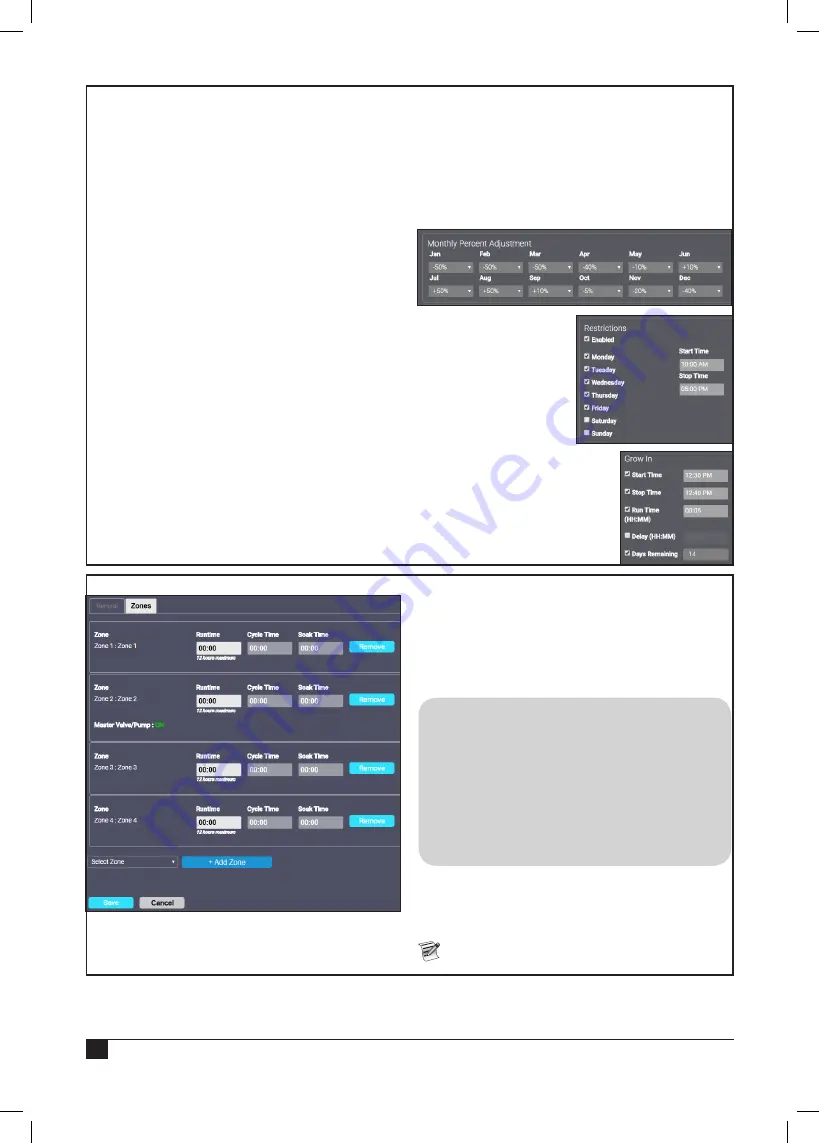
Advanced Settings:

• Monthly Percentage Adjustment

This allows the user to set water runtimes based 

on the zone runtime for the entire year. July 

is typically a hot month so setting the percent 

adjustment to 150% would adjust all run times 

accordingly. Similarly, runtimes can be reduced 

by setting negative percentage runtimes for the 

cooler, wetter months of winter and spring.

• Restrictions

: Allows 

the user to set up 

days and times when 

irrigation activity is 

not 

allowed

 to occur.

• Grow In

: Allows the 

user to set up extra 

watering times, in the case 

of planting new sod for 

example. The controller will 

automatically countdown the 

days left before reverting to 

the normally programmed 

schedule.

Zones Tab

Runtime

: Set runtimes for zones added to the 

schedule in hours and minutes.

Cycle Time

: How long a zone will be irrigated 

before halting for the specified Soak Time.

Soak Time

: How long to let the water soak into the 

soil before resuming irrigation.

Example

: A zone has a twenty minute 

runtime. Runoff from the soil occurs after 

only five minutes. The water takes roughly 

ten minutes to fully soak into the soil. So 

set the runtime to twenty minutes, the cycle 

time to five minutes, and the soak time to ten 

minutes. The zone will “cycle” four times then 

to achieve that twenty minute run time (5 x 4 

= 20) but will take 50 minutes to complete the 

zone irrigation.

Remove

: Click this button to remove a zone from 

the schedule.

Add Zone

: Select the desired zone from the 

dropdown list and click 

Add Zone

.

 Remember to press 

Save

 when done.

Summary of Contents for A-SMRT-T

Page 1: ...and from the controller Additional LED color related information can be found in the Troubleshooting section of this document Register 2 1 Next register your SMRT Logic Point browser to www smrtscape...

Page 2: ...Click Select Location Image 5 It is possible to add a SMRT Logic gateway a In the Smart ID field enter the 9 digit Smart ID found on the bottom of the gateway b In the Security Key field enter the 4...

Page 3: ...een Enter it into the field 5 Press Add The controller will be added with a default irrigation schedule already configured Schedules 1 Click the Schedules tab Click the white gear icon for the desired...

Page 4: ...k inside the Runtime field and click the up and down arrows to adjust the runtime for hours and minutes 4 zones added Zone runtimes have all been set to 10 minutes For Quick Start purposes we are done...

Page 5: ...Mark Read Mark the individual notification as read Close the Notifications dropdown by clicking the X button Manage Account To manage the account click the Locations tab then the gear icon next to the...

Page 6: ...ion which has the Gateway to be edited 2 On the Edit Location screen click the Gateway ID link 3 On the SMRTSCAPE popup modify the Gateway information as needed 4 Click Resync Gateway to resync the ga...

Page 7: ...at a location with one click if multiple controllers are used at one location for example Click the stop sign by the Stop Location Irrigation text A B C A Start Press the green Play button to manually...

Page 8: ...150 would adjust all run times accordingly Similarly runtimes can be reduced by setting negative percentage runtimes for the cooler wetter months of winter and spring Restrictions Allows the user to...

Page 9: ...s the gear icon to edit zone information It is possible to change the zone description add an image for the zone specify if the zone uses a master valve and or pump specify the Cycle and Soak times Cl...

Page 10: ...he gateway that you have replaced the controller s hardware Delete controller Delete the controller from the location Controller Preferences Adjust controller preferences such as language time format...

Page 11: ...From this screen it is possible to edit the scene Name edit the scene Description add a Scene Image if desired Program up to 2 schedules of scene programming In the screenshot below we have one sched...

Page 12: ...Click Yes at the confirmation prompt LPCU EVO AR Controller PIN Setup The SMRT Logic PIN must match the PIN entered in the EVOLUTION controller or Climate Logic device for the system to operate Use t...

Page 13: ...ogic unable to reach the internet Confirm there is a valid internet connection using the same Ethernet wire if possible SMRT Logic Troubleshooting How It Works SMRT Logic Specifications Model Name SMR...

Page 14: ...er 7 From the pull down menu select CL Mini Receiver Press the Activate discovery mode button on screen 8 At the KD2 controller open the controller and unplug the Mini Receiver 9 Plug the Mini Receive...

Page 15: ...15 Notes...

Page 16: ...with the maximum permissible gain and required antenna impedance for each antenna type indicated Antenna types not included in this list having a gain greater than the maximum gain indicated for that...

Reviews: