Toro A-SMRT-T Quick Reference & Setup Manual Download Page 6

6

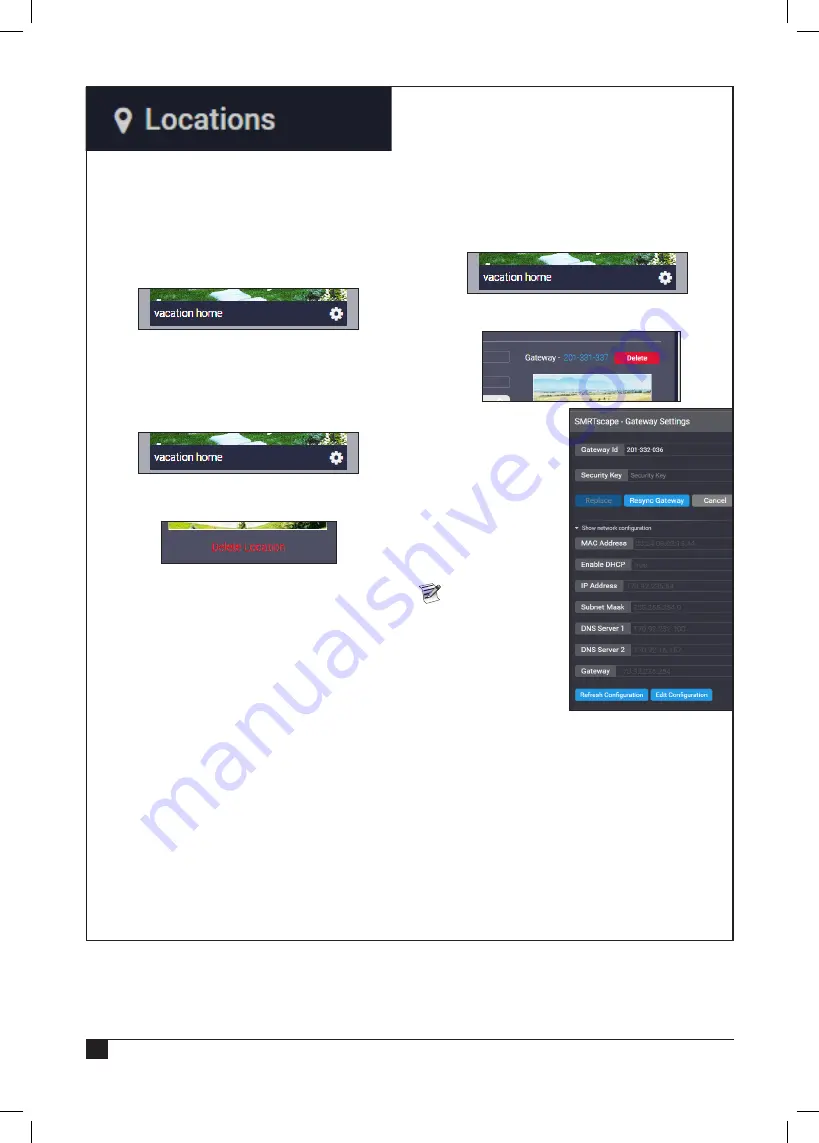
It is possible to add, edit, and delete Locations 

within your SMRT

SCAPE

 account.

Add Location

Adding a Location is detailed on page 2.

Edit Location

1.  Click the 

gear icon

 beneath the desired 

location. 

2. 

Edit the fields as described in 

Add Location

 on 

page 2.

Delete Location

1.  Click the 

gear icon

 beneath the desired 

location. 

2.  Click the 

Delete Location

 link below the 

location image and confirm.

Gateways

It is possible add, edit, and delete SMRT Logic 

gateways using the SMRT

SCAPE

 website / app.

Add a Gateway: 

Adding a gateway is detailed on page 2.

Edit a Gateway:

1.  Click the 

gear icon

 of the location which has the 

Gateway to be edited.

2.  On the 

Edit Location

 screen, click the 

Gateway 

ID

 link.

3.  On the SMRT

SCAPE


popup, modify the 

Gateway information 

as needed.

4.  Click 

Resync 

Gateway

 to resync 

the gateway. Click 

Replace Gateway

 if 

replacing the existing 

gateway with a new 

one. 

 Click 

Show 

network 

configuration


to edit the 

gateway’s network 

configuration. 

Toro does NOT 

recommend editing 

gateway network 

configuration 

settings. It is possible to disable the gateway 

from communicating with the Toro servers and 

would necessitate the return of the gateway to 

Toro.

Delete a Gateway

1.  Click the 

gear icon

 of the location which will 

have the gateway removed.

2.  On the 

Edit Location

 screen, click the red 

Delete

 button next to the Gateway ID


(see screenshot above). 

3.  Click 

Yes

 at the confirmation popup.

Summary of Contents for A-SMRT-T

Page 1: ...and from the controller Additional LED color related information can be found in the Troubleshooting section of this document Register 2 1 Next register your SMRT Logic Point browser to www smrtscape...

Page 2: ...Click Select Location Image 5 It is possible to add a SMRT Logic gateway a In the Smart ID field enter the 9 digit Smart ID found on the bottom of the gateway b In the Security Key field enter the 4...

Page 3: ...een Enter it into the field 5 Press Add The controller will be added with a default irrigation schedule already configured Schedules 1 Click the Schedules tab Click the white gear icon for the desired...

Page 4: ...k inside the Runtime field and click the up and down arrows to adjust the runtime for hours and minutes 4 zones added Zone runtimes have all been set to 10 minutes For Quick Start purposes we are done...

Page 5: ...Mark Read Mark the individual notification as read Close the Notifications dropdown by clicking the X button Manage Account To manage the account click the Locations tab then the gear icon next to the...

Page 6: ...ion which has the Gateway to be edited 2 On the Edit Location screen click the Gateway ID link 3 On the SMRTSCAPE popup modify the Gateway information as needed 4 Click Resync Gateway to resync the ga...

Page 7: ...at a location with one click if multiple controllers are used at one location for example Click the stop sign by the Stop Location Irrigation text A B C A Start Press the green Play button to manually...

Page 8: ...150 would adjust all run times accordingly Similarly runtimes can be reduced by setting negative percentage runtimes for the cooler wetter months of winter and spring Restrictions Allows the user to...

Page 9: ...s the gear icon to edit zone information It is possible to change the zone description add an image for the zone specify if the zone uses a master valve and or pump specify the Cycle and Soak times Cl...

Page 10: ...he gateway that you have replaced the controller s hardware Delete controller Delete the controller from the location Controller Preferences Adjust controller preferences such as language time format...

Page 11: ...From this screen it is possible to edit the scene Name edit the scene Description add a Scene Image if desired Program up to 2 schedules of scene programming In the screenshot below we have one sched...

Page 12: ...Click Yes at the confirmation prompt LPCU EVO AR Controller PIN Setup The SMRT Logic PIN must match the PIN entered in the EVOLUTION controller or Climate Logic device for the system to operate Use t...

Page 13: ...ogic unable to reach the internet Confirm there is a valid internet connection using the same Ethernet wire if possible SMRT Logic Troubleshooting How It Works SMRT Logic Specifications Model Name SMR...

Page 14: ...er 7 From the pull down menu select CL Mini Receiver Press the Activate discovery mode button on screen 8 At the KD2 controller open the controller and unplug the Mini Receiver 9 Plug the Mini Receive...

Page 15: ...15 Notes...

Page 16: ...with the maximum permissible gain and required antenna impedance for each antenna type indicated Antenna types not included in this list having a gain greater than the maximum gain indicated for that...

Reviews: