


c
1
c
6
c
5
c
4
c
3
c
2
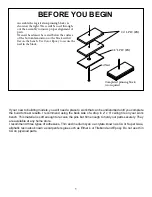
We will begin by building the wing since it will be needed to get the correct lofting of the aft fuselage
section. Place the plan on the building board and cover them with waxed paper or Parchment paper to
protect them from the glue. When a part is called for, refer to the parts locater in the back of this manual
for the sheet number it is on.
. With the wing plan on the building board
and protected with waxed paper, lay a
straight edge over the plans and align it
with the aft edge of the False Leading Edge
(FLE). Secure it there with pins to prevent it
from moving.
Note the standoffs on FLE, the one with the
line through it is the root end or inboard end.
Align this line with the alignment line noted
on the plans and secure it to the building
board by tack gluing pinning tabs to each
stand off and pinning it to the building board.
Make sure each standoff is flat on the build
-
ing board.
WING ASSEMBLY
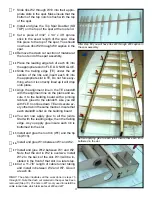
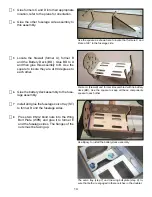
The alignment line cut into the first standoff on the root end
must be aligned with the alignment line indicated on the
planes to insure a straight assembly.
Alignment Line
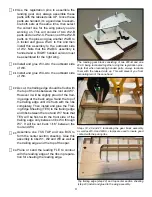
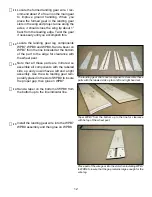
Locate and prepare the spar (SP) by remov-
ing it from the carrier sheet and make sure
all slots are clear. Note the dash cut section
at the root end. Leave that material in place
until directed to remove it. Locate the short
bottom spar doubler (SD BOT) and glue it to
the BOTTOM of the spar at the root end in
the recess provided.
SD-BOT has been installed onto the spar, next the 3/32” x
1/4” spruce will be added.
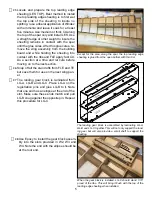
Locate a stick of 3/32” x 1/4” x 36” spruce
and cut a length to the exact length of the
spar. Glue this to the bottom of the spar.
Once again use a secure straight edge to in-
sure the spar is perfectly straight by pinning
it up against it while the glue cures.
Locate the trailing edge (TE) and remove it
from the carrier sheet and once again make
sure all slots are cleared of all material.
Locate and prepare ribs W1 through W10.
Remove any nubs left by the retainer breaks
with a light sanding. Make sure all slots are
clear of material.
The false leading edge (FLE) is secured to the plans with
pinning tabs tack glued to the standoffs
2


