background image

AL-2000 Biometer & Pachymeter

15

4

4..1

1    B

Biio

om

me

ettrryy  M

Mo

od

de

e  S

Se

ettu

up

p

4

4..1

1..3

3    S

Se

ettttiin

ng

g  tth

he

e  m

me

ea

assu

urre

em

me

en

ntt  cco

on

nd

diittiio

on

nss

Before measuring axial length, the following measurement conditions should be set:

• Patient name, patient ID and physician name
• Eye (right/left)
• Eye type
• Gain
• Measurement mode
• Retinal waveform

a

a))  P

Pa

attiie

en

ntt  n

na

am

me

e,,  p

pa

attiie

en

ntt  IID

D n

nu

um

mb

be

err  a

an

nd

d  p

ph

hyyssiicciia

an

n  n

na

am

me

e

b

b))  S

Se

ettttiin

ng

g  tth

he

e  e

eyye

e  tto

o  b

be

e  m

me

ea

assu

urre

ed

d

S

Stto

orre

ed

d   d

da

atta

a   a

arre

e   cco

on

nttrro

olllle

ed

d   b

byy   IID

D n

nu

um

mb

be

errss..   IIff   yyo

ou

u   p

plla

an

n   tto

o

sstto

orre

e  d

da

atta

a  o

on

n  tth

he

e  m

me

em

mo

orryy  cca

arrd

d,,  yyo

ou

u  m

mu

usstt  e

en

ntte

err  a

a  p

pa

attiie

en

ntt  IID

D

n

nu

um

mb

be

err..

Up to 10 letters can be entered for each
item.

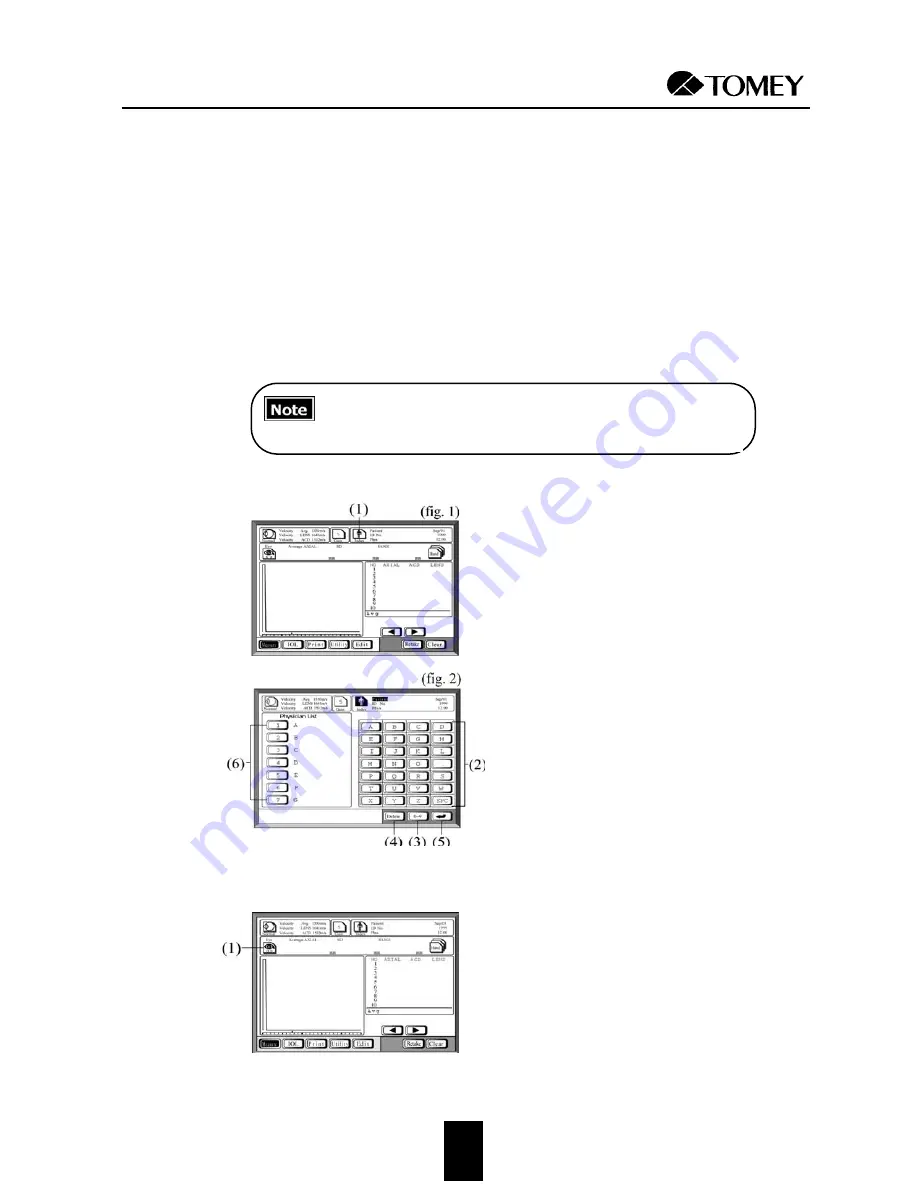
1. Touch the IIn

nd

de

ex

x key (1) on the measure-

ment window (fig. 1) to display the
Name/ID entry window (fig. 2). 

2. Touch the number keys and the alphabet-

ic character keys (2) to enter the patient’s
name, ID number and physician’s name.
If the physician’s name is already regis-
tered in the Physician List, it can be
selected by pressing the corresponding
number (6).
To switch between letters and numbers,
use the switch-over key (3). In the event
of an erroneous entry, touch the D

De

elle

ette

e

key (4).

3. To set the entered value and advance to

the next entry, touch the R

Re

ettu

urrn

n key (5).

The cursor location indicates the catego-
ry of the next entry.

4. Touch the IIn

nd

de

ex

x key (1) again to return to

the measurement window (fig. 1).

Touch the E

Eyye

e key (1) to select the eye you

wish to measure (right or left).

The right eye (OD) or the left eye (OS) is
selected alternately each time the E

Eyye

e key

is touched.

Summary of Contents for AL-2000

Page 1: ...O OP PE ER RA AT TO OR R M MA AN NU UA AL L A AL L 2 20 00 00 0 B Bi io om me et te er r P Pa ac ch hy ym me et te er r...

Page 2: ...e s su ub bj je ec ct te ed d t to o d di ir re ec ct t h hi ig gh h v vo ol lt ta ag ge e A AL LW WA AY YS S u us se e a a c cl le ea an n p pr ro ob be e f fo or r e ey ye e m me ea as su ur re em...

Page 3: ...ee ed de ed d m ma ay y c ca au us se e a a h ha az za ar rd do ou us s s si it tu ua at ti io on n w wh he er re e t th he er re e i is s t th he e p po os ss si ib bi il li it ty y o of f s se er r...

Page 4: ...10 4 BIOMETRY AXIAL LENGTH MEASUREMENT 13 4 1 Biometry mode setup 11 4 1 1 Turning on the power and initial adjustments 11 4 1 2 Description of windows 12 a Measurement window 12 b Measurement review...

Page 5: ...nstants Aconst SF ACD 29 e Creating the IOL data list 30 4 3 5 IOL power calculation 30 a Automatic calculation 30 b Registration of the model name of the IOL 30 c Entering IOL power 30 4 3 6 Storing...

Page 6: ...ILITIES 53 7 1 Accessing the Utility window 53 7 1 1 From the biometry mode 53 7 1 2 From the pachymetry mode 54 7 2 Description of Utility windows 55 7 2 1 Utility window for biometry mode 55 7 2 2 U...

Page 7: ...N 81 9 1 IOL calculation formulae 81 9 1 1 SRK II 81 9 1 2 SRK T 82 9 1 3 Holladay 84 9 1 4 Hoffer Q 86 9 1 5 Haigis standard 88 9 1 6 Haigis optimized 90 9 2 Ultrasound velocity used in axial length...

Page 8: ...103 13 1 Specifications 103 13 1 1 Biometry IOL power calculation 103 13 1 2 Pachymetry 104 13 1 3 Main unit 104 13 1 4 Power Supply 104 13 2 Ultrasound energy 105 13 2 1 Acoustic output reporting ta...

Page 9: ...AL 2000 Biometer Pachymeter...

Page 10: ...y dust sulfur or salt Ascertain that any adverse factors such as excessive slope vibration and impact will not endanger the instrument includ ing during transportation Do not install the instrument in...

Page 11: ...ument for a considerable period of time refer to Section 10 4 for storage instructions I In n c ca as se e o of f a a m ma al lf fu un nc ct ti io on n d do o n no ot t a at tt te em mp pt t t to o r...

Page 12: ...ocity The time from the echo for the corneal epithelium to the echo for a measuring object is measured The length of a biological object is calculated using a set conversion value for the speed of sou...

Page 13: ...AL 2000 Biometer Pachymeter 4...

Page 14: ...holders The upper holder is for the pachyme try probe The lower holder is for the biometry probe T Te er rm mi in na al l f fo or r P Pa ac ch hy ym me et tr ry y P Pr ro ob be e The probe for cornea...

Page 15: ...switch to turn on the power Press the O side to turn if off C Co on nt tr ra as st t a ad dj ju us st te er r Controls the contrast of the screen T Ti il lt t s st ta an nd d Tilts the instrument to...

Page 16: ...t o on n a a h hu um ma an n e ey ye e s se ee e s se ec ct ti io on n 1 10 0 2 2 1 1 N NE EV VE ER R u us se e t th he e p pr ro ob be e i if f t th he er re e i is s a an ny y v vi is si ib bl le e...

Page 17: ...in ng g t th he e p po ow we er r c co or rd d 1 Insert the protruding rectangular tabs 1 on the probe holder into the holes 2 on the right side of the instrument 2 Push inward on the center of the p...

Page 18: ...rd da an nc ce e w wi it th h t th he e I In ns st tr ru uc ct ti io on n M Ma an nu ua al l f fo or r M Me em mo or ry y C Ca ar rd d l lo oc ca at te ed d i in n t th he e b bo ox x t th ha at t c...

Page 19: ...the top portion 1 Grasp the slider 1 on both sides to immo bilize it 2 From the operator s side carefully insert the biometry probe into the slider until it locks into place Be careful not to damage...

Page 20: ...biometry probe is not detected i e no probe or pachyme try probe connected the message Probe Check NG no good will be presented 2 Adjust the contrast of the screen with the contrast adjuster 2 3 Tilt...

Page 21: ...ent modes are available G Ga ai in n Displays the gain Press to change 8 levels E Ey ye e R R L L Displays the eye to be measured right or left R Re et ti in na al l w wa av ve ef fo or rm m c cu ur r...

Page 22: ...ia al l l le en ng gt th h Mean of the axial length measurements A A m mo od de e w wa av ve ef fo or rm m A mode waveform is displayed in real time during measurement M Me ea as su ur re ed d d da at...

Page 23: ...the measure ment data are acquired only when there are crests rising above the cursor level M Me em mo or ry y K Ke ey y Press to store data on the memory card S Se el le ec ct ti io on n k ke ey ys s...

Page 24: ...yo ou u m mu us st t e en nt te er r a a p pa at ti ie en nt t I ID D n nu um mb be er r Up to 10 letters can be entered for each item 1 Touch the I In nd de ex x key 1 on the measure ment window fig...

Page 25: ...the selected eye type fig 3 4 Enter the converted velocity using the number keys 4 See range of convert ed velocities below In the event of an erroneous entry touch the D De el le et te e key 5 5 Pres...

Page 26: ...be 1 Touch the G Ga ai in n key 1 on the measure ment window fig 1 to display the win dow shown in fig 2 2 Touch one of the Gain level keys 2 to set the gain level The screen will return to the measu...

Page 27: ...um me en nt t I It t c ca an nn no ot t b be e u us se ed d f fo or r d de et te er rm mi in ni in ng g t th he e p pr re ec ci is si io on n o of f t th he e i in ns st tr ru um me en nt t o or r f...

Page 28: ...u uc ch h u us se e m ma ay y c ca au us se e a an n i in nc co or rr re ec ct t m me ea as su ur re em me en nt t a an nd d o or r d da am ma ag ge e t to o t th he e c co or rn ne ea a A AL LW WA AY...

Page 29: ...ERROR is displayed d Using the chin rest method measurements are taken until 10 measure ments within 0 1 mm of the average value are obtained e When data acquisition is complete a higher pitched beep...

Page 30: ...pressing the up and down arrow keys 2 The selected data will be highlighted and the correspon ding waveform will be displayed 3 Touch the M Me ea as su ur re e key to return to the measurement window...

Page 31: ...eturn to the measurement window A A r re ea ad di in ng g d di is sp pl la ay ye ed d i in n t th he e c ca al li ip pe er r m mo od de e i is s a an n a ap pp pr ro ox xi im ma at ti io on n a an nd...

Page 32: ...s currently acquired data from the screen it does not delete stored data from the memory card To delete data from the memory card see section 7 3 4d B Be ef fo or re e s st to or ri in ng g d da at ta...

Page 33: ...rests rise above the level cursor Normal The crests of the back and front of the lens and of the retina Dense cataract The crest of the front of the lens and of the retina Aphakic The crest of the ret...

Page 34: ...e er r c ca al lc cu ul la at ti io on n m mo od de e a a F Fr ro om m t th he e B Bi io om me et tr ry y m mo od de e b b F Fr ro om m t th he e U Ut ti il li it ty y m mo od de e If you wish to calc...

Page 35: ...on formula P Pa at ti ie en nt t P Ph hy ys si ic ci ia an n D Da at te e T Ti im me e Displays the patient s name and ID number the physician s name and the date and time N Nu um mb be er r k ke ey y...

Page 36: ...t th he e e ey ye e t to o b be e c ca al lc cu ul la at te ed d I IO OL L d da at ta a s se el le ec ct ti io on n k ke ey y Selects the desired IOL data I IO OL L d da at ta a Lists entered IOL mod...

Page 37: ...ial length measurement has not been performed using the AL 2000 follow these steps to enter axial length 1 Prepare to enter axial length by touching the A Ax xi ia al l key 1 The databox will be rever...

Page 38: ...ir re ed d R Re ef f key 1 To enter values on the IOL calculation window 1 Prepare to enter values by touching the L Le en ns s A A key 1 the L Le en ns s B B key 2 or the L Le en ns s C C key 3 The...

Page 39: ...m mu ul la as s a an n i im ma ag gi in na ar ry y n nu um mb be er r m ma ay y b be e g ge en ne er ra at te ed d d du ue e t to o s sq qu ua ar re e r ro oo ot t c ca al lc cu ul la at ti io on ns s...

Page 40: ...in ng g d da at ta a m ma ak ke e s su ur re e t th ha at t a a m me em mo or ry y c ca ar rd d i is s i in ns se er rt te ed d i in n t th he e s sl lo ot t s se ee e s se ec ct ti io on n 3 3 2 2 2...

Page 41: ...AL 2000 Biometer Pachymeter 32 4 4 3 3 I IO OL L P Po ow we er r C Ca al lc cu ul la at ti io on n...

Page 42: ...of the probe If the pachymetry probe is not detected i e no probe or bio metry probe connected the message Probe Check NG no good will be pre sented 2 Adjust the contrast of the screen with the contr...

Page 43: ...ur ri in ng g r ra an ng ge e Displays the meas urement range M Me et th ho od d o of f d da at ta a p pr re es se en nt ta at ti io on n Indicates whether the value is an actual value or a biased va...

Page 44: ...ar rd d d de ev vi ia at ti io on n Displays the standard devation of the pachymetry measurements D De el le et te e k ke ey y Deletes the selected measurement M Me em mo or ry y n nu um mb be er r D...

Page 45: ...t th he e m me em mo or ry y c ca ar rd d y yo ou u m mu us st t e en nt te er r a a p pa at ti ie en nt t I ID D n nu um mb be er r Up to 10 letters can be entered for each item 1 Touch the I In nd...

Page 46: ...try touch the D De el le et te e key 3 3 Touch the R Re et tu ur rn n key 4 to set the entered value 4 Select either percent bias or plus minus bias m at the bottom of the window 5 5 When setting perc...

Page 47: ...1 to select the desired measurement mode Automatic mode and manual mode are alternately set each time the key is touched There are two measurement modes Map mode fig 1 Measurements are acquired from...

Page 48: ...t recently acquired measure ment at each point Minimum The minimum of all measurements taken at each point Average The mean of all measurements taken at each point Set the value to be displayed as fol...

Page 49: ...TE E The expected results are for an ambient room temperature of 24 degrees C 75 degrees F Compensate for higher lower temperature by adding subtracting as follows D1 1 m per degree D2 2 m per degree...

Page 50: ...vo oi id d c co or rn ne ea al l i in nj ju ur ry y T Th he e c co on nv ve er rt te ed d v ve el lo oc ci it ty y d di ir re ec ct tl ly y a af ff fe ec ct ts s t th he e m me ea as su ur re em me e...

Page 51: ...ch series of values will be displayed in each data slot 5 If you would like to replace any of the meas urements touch the data slot on the screen to reverse highlight it and re acquire meas urements 1...

Page 52: ...he next location and repeat the above steps 5 Repeat the above procedure up to 10 times 6 If you would like to re test any location touch the data slot on the screen to reverse highlight it and re acq...

Page 53: ...I ID D n nu um mb be er r b be ef fo or re e s st to or ri in ng g d da at ta a s se ee e s se ec ct ti io on n 5 5 1 1 3 3a a T Th he e P PC C m me em mo or ry y c ca ar rd d u us se ed d w wi it th...

Page 54: ...des standard and simple Sample printouts are shown in Section 6 3 See Section 7 5 5 to select the desired mode Standard Includes date patient name and ID number physician name and all data Simple Incl...

Page 55: ...Eye Right Left 6 Measurement mode 7 Eye type 8 Average axial length velocity 9 Lens velocity 10 ACD velocity 11 Gain 12 Average axial length 13 Standard deviation of axial length data 14 Difference b...

Page 56: ...S St ta an nd da ar rd d m mo od de e 1 Time Date 2 Patient name 3 Patient ID number 4 Physician name 5 Eye Right Left 6 IOL calculation formula 7 Axial length 8 Keratometry values 9 Desired postopera...

Page 57: ...ocity 10 ACD velocity 11 Gain 12 Average axial length 13 Standard deviation of axial length data 14 Difference between mini mum and maximum axial length 15 Average ACD 16 Average lens thickness 17 Mem...

Page 58: ...AL 2000 Biometer Pachymeter 49 6 6 3 3 S Sa am mp pl le e P Pr ri in nt to ou ut ts s b b S Si im mp pl le e m mo od de e...

Page 59: ...o on nd di in ng g s su ur rg ge eo on n f fa ac ct to or r v va al lu ue es s a a S St ta an nd da ar rd d m mo od de e 1 Time Date 2 Patient name 3 Patient ID number 4 Physician name 5 Eye Right Lef...

Page 60: ...p m mo od de e a a S St ta an nd da ar rd d m mo od de e 1 Time Date 2 Patient name 3 Patient ID number 4 Physician name 5 Eye Right Left 6 Converted ultrasound veloc ity 7 Measurement mode 8 Data pr...

Page 61: ...mo od de e 1 Time Date 2 Patient name 3 Patient ID number 4 Physician name 5 Eye Right Left 6 Converted ultrasound veloc ity 7 Measurement mode 8 Data acquisition method 9 Actual corneal thickness at...

Page 62: ...y y w wi in nd do ow w f fr ro om m b bi io om me et tr ry y m mo od de e 1 Touch the U Ut ti il li it ty y key 1 on the Biometry measurement window fig 1 or on the IOL calculation window fig 2 to dis...

Page 63: ...om m p pa ac ch hy ym me et tr ry y m mo od de e 1 Touch the U Ut ti il li it ty y key 1 on the Pachymetry map mode measurement window fig 1 or on the Pachymetry single mode measurement window fig 2...

Page 64: ...co or rr re es sp po on nd di in ng g v va al lu ue e Calculate personal lens con stants R RS S 2 23 32 2C C Set data communi cation parameters S So ou un nd d s se et t Control sound P Pr ri in nt t...

Page 65: ...fe ee ed d Adjust printer paper A AL L Switch to Biometry IOL calculation mode P Ph hy ys si ic ci ia an n d da at ta a e en nt tr ry y Enter physicians names S So ou un nd d s se et t Control sound...

Page 66: ...racter keys and the number keys by touching the S Sw wi it tc ch ho ov ve er r key 5 4 The following information may be entered Company Up to 10 letters or numbers Model No Up to 10 letters or numbers...

Page 67: ...om the IOL power calculation window see section 4 3 4 After making your selections touch the I IO OL L F Fo or rm mu ul la a key 3 to return to the Biometry Utility screen fig 1 To set a1 and a2 for t...

Page 68: ...ected databox will be reverse high lighted black In the event of an erroneous entry press the D De el le et te e key 5 4 Touch either the R Re et tu ur rn n key 6 or touch the databox 3 again to regis...

Page 69: ...se ec ct ti io on n 8 8 4 4 To display stored axial length data 1 Touch the P Pa at ti ie en nt t d da at ta a key 1 on the biom etry Utility screen to display the Patient Data list fig 2 2 Touch the...

Page 70: ...ns M Mo od de el l and C Co om mp pa an ny y names 8 will be reverse high lighted 5 Touch the model manufacturer of the selected IOL to enter it in the I Im mp pl la an nt te ed d I IO OL L M Mo od de...

Page 71: ...n this screen To enter values see sections 4 3 4 4 3 5 and 7 3 3 3 To obtain a printout touch the P Pr ri in nt t key 3 4 To display personal lens constant data for the patient s other eye touch the E...

Page 72: ...s constants 1 Insert the memory card as instructed in section 3 2 2f 2 Touch the D Da at ta a M Ma an na ag ge em me en nt t key 1 on the biometry Utility screen fig 1 to display the Graph screen figs...

Page 73: ...To select the biometry probe mode 1 Touch the C Co on nt ta ac ct t I Im mm me er rs si io on n key 1 on the biometry Utility screen fig 1 to display the Contact Immersion screen fig 2 2 Touch the C C...

Page 74: ...ted 3 To delete the pre set map touch the A A C Cl le ea ar r key 3 In the event that you have accidently deleted or wish to stop delet ing touch the C Ca an nc ce el l key 4 to restore the previous m...

Page 75: ...asurement values The data display option can be changed after the measurements have been taken To select the desired data display option 1 Touch the D Da at ta a S Se el le ec ct ti io on n key 1 on t...

Page 76: ...a as s d de es sc cr ri ib be ed d i in n s se ec ct ti io on n 8 8 4 4 To display stored pachymetry data 1 Touch the P Pa at ti ie en nt t d da at ta a key 1 on the pachymetry Utility screen to displ...

Page 77: ...the a ar rr ro ow w keys 2 to select the patient whose pachymetry data you want to display If necessary change the page using the F Fo or rw wa ar rd d key 3 or B Ba ac ck k key 4 If you wish to retur...

Page 78: ...display the Physician List fig 3 2 Touch a number 2 to activate that slot in the list The selected number will be reverse high lighted 3 Enter the physician s name using the letter keys 3 To switch fr...

Page 79: ...ry Utility screen fig 2 to display the Date Time Setup screen fig 3 2 Touch each item key 2 to prepare to enter information for that item The selected item will be reverse highlighted 3 Enter the info...

Page 80: ...g the screws 2 Connect the RS 232C communication cable 3 to the adapter and secure the connection by tightening the screws Accessory equipment connected to the RS 232C interface must be certified acco...

Page 81: ...d fig 4 respectively 2 Touch the S Se et tu up p key 2 to display the RS 232C Setup screen fig 5 3 Select the parameter to be set using the up down arrow keys 3 The options for the selected parameter...

Page 82: ...play the appropriate RS 232C Data Communication screen 2 After the communication conditions have been set as described in section 7 3 5b touch the S Se en nd d key 1 on the biometry RS 232C screen fig...

Page 83: ...fig 1 2 After the communication conditions have been set as described in section 7 5 3b touch the R Re ec ce ei iv ve e key 1 on the biometry Data Communication screen fig 1 The instrument is ready f...

Page 84: ...1 on the biometry Utility screen fig 1 or the pachymetry Utility screen fig 2 to display the Sound Adjustment window fig 3 2 Touch the V Vo ol lu um me e keys 2 to adjust the sound level The options a...

Page 85: ...ludes no identifying informa tion and for some printouts provides an abbreviated version of the data 1 Touch the P Pr ri in nt t M Mo od de e key 1 on the biometry Utility screen fig 1 or the pachymet...

Page 86: ...low B Bi io om me et tr ry y m me ea as su ur re em me en nt ts s I IO OL L d da at ta a a an nd d p pa ac ch hy ym me et tr ry y m me ea as su ur re em me en nt ts s c ca an n b be e s st to or re ed...

Page 87: ...creen fig 1 or the pachymetry Utility screen fig 2 to display the Patient Data screen 2 If the memory card has not been formatted the message Memory card is is not formatted will be displayed fig 3 3...

Page 88: ...ows Explorer and view the contents of the Memory Card removable drive You will find two directories Axialdt Stores biometry and IOL data Pachydt Stores pachymetry data 3 Each of the data files may be...

Page 89: ...AL 2000 Biometer Pachymeter 80 8 8 M Me em mo or ry y C Ca ar rd d...

Page 90: ...c c I IO OL L p po ow we er r D D b b A Am me et tr ro op pi ic c I IO OL L p po ow we er r D D c c D De es si ir re ed d p po os st to op pe er ra at ti iv ve e r re ef fr ra ac ct ti io on n Where i...

Page 91: ...if L 24 2 then LC 3 446 1 716L 0 0237L L W Corneal thickness by calculation mm 5 41 0 58412LC 0 098K H Height of the corneal dome mm r SQRT r r W W 4 Ofst Calculated distance between the iris surface...

Page 92: ...OL implant D S Spherical index D C Cylindrical index D AREF Postoperative refraction equivalent to the spherical index D S C 2 RF Refractive factor if P 16 then RF 1 25 if P 16 then RF 1 L Axial lengt...

Page 93: ...nc Refractive index of cornea 4 0 3 0 L Measured axial length mm r Average corneal radius of curvature mm 337 5 K K Average corneal refractive power K1 K2 2 D SF Surgeon factor Distance between iris s...

Page 94: ...m 337 5 K K Average corneal refractive power K1 K2 2 D V Vertex distance mm 12 P Power of IOL implant D L2 Modified axial length mm L 0 2 mm S Spherical index D C Cylindrical index D AREF Postoperativ...

Page 95: ...to op pe er ra at ti iv ve e r re ef fr ra ac ct ti io on n b by y s sp pe ec ct ta ac cl le e D D Where C X Y X C1 0 3 L 23 5 tan K 2 Y 0 1M 23 5 L 2 tan 0 1 G L 2 0 99166 if L 23 0 then M 1 G 28 0 i...

Page 96: ...ve e a an nt te er ri io or r c ch ha am mb be er r d de ep pt th h A AC CD D Where X C1 0 3 L 23 5 tan K 2 Y 0 1 M 23 5 L 2 tan 0 1 G L 2 0 99166 if L 23 0 then M 1 G 28 0 if L 23 0 then M 1 G 23 5...

Page 97: ...p pe er ra at ti iv ve e r re ef fr ra ac ct ti iv ve e p po ow we er r D D Where na Refractive index of aqueous and vitreous 1 336 nc Refractive index of cornea 1 3315 r Average corneal radius of cur...

Page 98: ...e e c c P Pe er rs so on na al l A A c co on ns st ta an nt t Where na Refractive index of aqueous and vitreous 1 336 K Average corneal refractive power D L Axial length mm ACD Anterior chamber depth...

Page 99: ...e r re ef fr ra ac ct ti iv ve e p po ow we er r D D Where na Refractive index of aqueous and vitreous 1 336 nc Refractive index of cornea 1 3315 RC Average corneal radius of curvature mm DC Average...

Page 100: ...ity in the lens 1 629 m s Average ultrasound velocity in the anterior chamber 1 532 m s Axial length is calculated using the same formula as for the normal lens 9 9 2 2 3 3 A Ap ph ha ak ki ic c Avera...

Page 101: ...amber depth measured V a Average ultrasound velocity default 1 550 m s V lens Velocity in lens default 1 641 m s V ac Velocity in anterior chamber default 1 532 m s V sil Velocity in silicone oil prov...

Page 102: ...er and the holder will pop out 3 Check both fuses and replace them if necesssary A good fuse will have a thin strip of metal from one end to the other without any noticeable breaks A blown fuse will h...

Page 103: ...mild detergent on a soft cloth Then rinse and remove excess mois ture with a dry cloth The procedure for cleaning the probe handle and cord is as follows 1 Wipe the probe handle with a soapy or alcoho...

Page 104: ...g ge en ne er ra at te ed d A As sc ce er rt ta ai in n t th ha at t f fa ac ct to or rs s s su uc ch h a as s e ex xc ce es ss si iv ve e s sl lo op pe e v vi ib br ra at ti io on n a an nd d i im mp...

Page 105: ...whose serial number or batch number is removed altered or effaced THIS WARRANTY IS EXPRESSLY IN LIEU OF ANY AND ALL OTHER WARRANTIES EXPRESS OR IMPLIED INCLUDING SPECIFICALLY WITHOUT LIMITING THE GEN...

Page 106: ...ted See section 4 1 1 Cannot obtain printout Is the printer paper loaded properly See section 10 3 Is there any paper left Is Is the correct type of printer paper used 1 11 1 2 2 B Bi io om me et tr r...

Page 107: ...cessive amount of corneal protective agent being used Is too much pressure being applied to the cornea Is the biometry probe applied to the cornea at a right angle Does the waveshape appear to be corr...

Page 108: ...measurement data are not accurate Is the pachymetry probe securely connected See section 3 2 2c Is the biometry probe connected to the terminal labeled PACHY Is the tip of the pachymetry probe damage...

Page 109: ...r ry y C Ca ar rd d Data stored on the memory card cannot be read on a computer Was the memory card properly inserted See Section 3 2 2f Is the memory card write protected See back of card Was the Con...

Page 110: ...T TS S To order spare parts and or optional parts contact your local Tomey representative or distrib utor When ordering be sure to specify that your order is for the AL 2000 1 12 2 1 1 S Sp pa ar re e...

Page 111: ...AL 2000 Biometer Pachymeter...

Page 112: ...ngth Normal 1 550 m s 1 500 1 600 m s Dense cataract 1 548 m s 1 500 1 600 m s Aphakic 1 532 m s 1 430 1 630 m s Lens velocity Normal 1 641 m s 1 540 1 740 m s Dense cataract 1 629 m s 1 540 1 740 m s...

Page 113: ...y setting 1 640 m s Range 1 400 2 000 m s Pachymetry probe Type solid state Transducer frequency 20 MHz 10 Tip radius 1 5 mm with an angle of 45 flat Dimensions weight 8 8 mm x 90 mm 40 g 1 13 3 1 1 3...

Page 114: ...T Ta ab bl le e Symbols used in the table are described below ISPTA 3 Derated spatial peak temporal average intensity milliwatts per square cen timeter ISPPA 3 Derated spatial peak pulse average inten...

Page 115: ...ise to the reported value of the respective parameter EBD Entrance beam dimensions for the azimuthal and elevational planes cen timeters 1 13 3 2 2 2 2 A Ac co ou us st ti ic c O Ou ut tp pu ut t E Ev...

Page 116: ...One sided T test Formula L X Ks Where L Limit X Mean of measured values s Standard deviation of measured values K Factor described in T Ta ab bl le e A A 1 12 2d d p 315 S St ta at ti is st ti ic ca...

Page 117: ...0 00 0 1 13 3 3 3 S So ou un nd ds s g ge en ne er ra at te ed d b by y t th he e A AL L 2 20 00 00 0 The instrument emits monitoring sounds on the following occasions When the power is turned on When...

Page 118: ...AL 2000 Biometer Pachymeter 109...

Page 119: ......

Reviews: