TLS-BocaSystems Lemur-X Operator'S Manual Download Page 25


24 

APPENDIX A 

–ETHERNET PARAMETERS 


General


Each Boca Ethernet Printer is assigned a unique MAC address based in part on the printer's serial number.  All Boca 
printers are factory configured in DHCP enabled mode.  (Exceptions may be made by special request.)  If the printer is 
unable to get a dynamic IP address from the customer's network in the allotted time period (about one minute), it will 
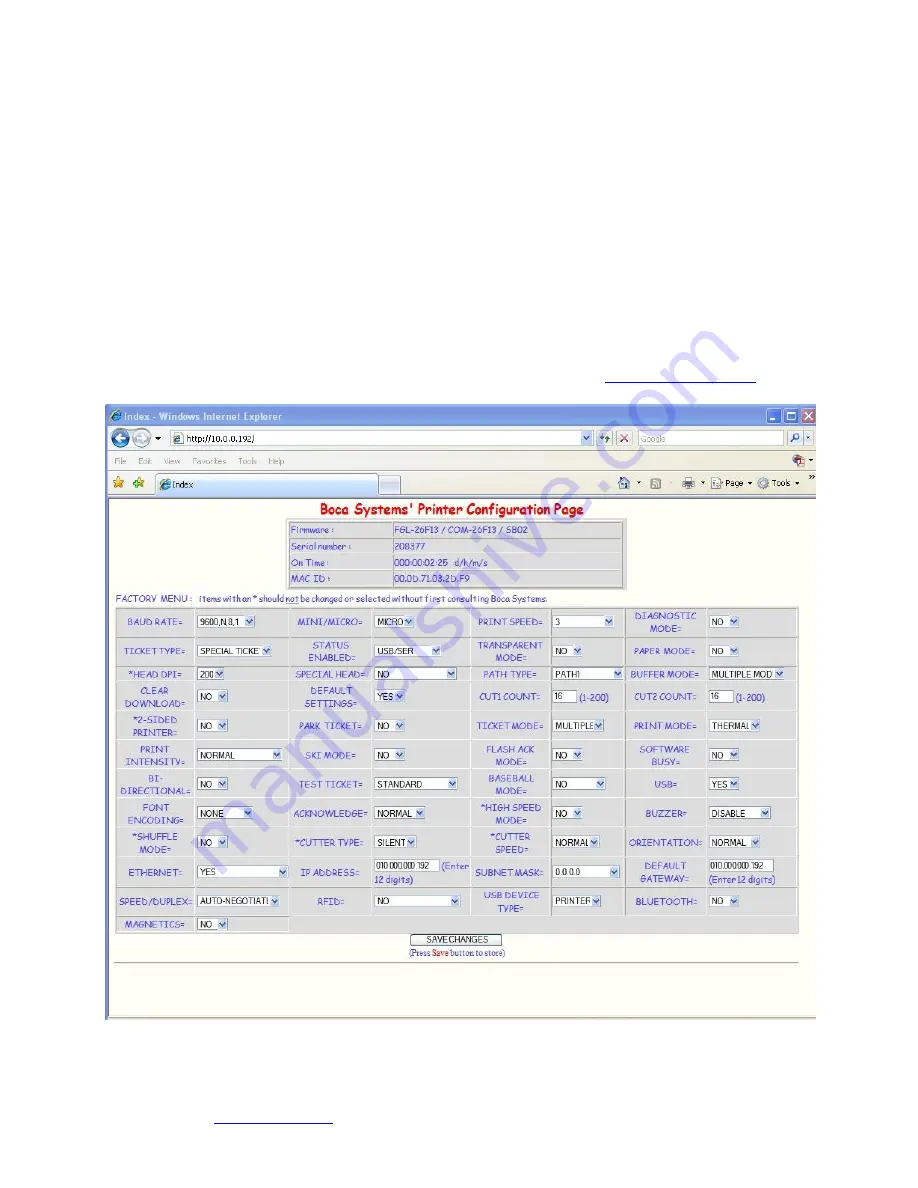
default to the 10.0.0.192 address.  You can select a different fixed IP address either via a Web Browser (see below) or the 
printer’s control panel if your printer has an optional LCD display. 
 

ETHERNET 

– Quick Installation Guide


Connect the printer to your network (the IP address will be automatically assigned by your DHCP server)  


Load tickets into the printer  


Wait one minute to allow assignment of IP address  


Print a test ticket to identify the printer's IP address  


Ping the printer  


Open your web browser and type the printer’s IP address to review its configuration page (see below image). 


If you are going to set a static IP address then you will need to change the ETHERNET setting to YES. 


If you experience any problems, please refer to the Ethernet section of our 

FGL Programming Guide


Click here to return to > 

Table of Contents


Summary of Contents for Lemur-X

Page 1: ...Lemur Z Lemur X Manual www tls bocasystems com Lemur Z Lemur X Kiosk Ticket Printers Operator s Manual Rev 17 01 17...

Page 2: ...stment 15 6 0 Standard Interface Pinouts 16 7 0 Thermal Paper Theory Specifications 17 8 0 Maintenance 18 8 1 SQ Optical Sensors 18 8 2 Thermal Print Head 19 8 3 Platen 20 8 4 Cutter Assembly 21 9 0 T...

Page 3: ...t stock improper operating conditions etc are excluded from this warranty Warranties for printers are 1 year from date of shipment NOTE The print head is a consumable part and is warranted for 90 days...

Page 4: ...8 9600 Fax 561 998 9609 The following items should be in the box A Lemur Z or X Printer B 24VDC power supply C AC cord D May come with one or both of the below listed items depending on what was order...

Page 5: ...designed for use with 2 50 8mm to 3 25 82 5mm rolled receipt stock or fan folded stock with black timing mark using direct thermal printing The following is a link to the black timing mark specs www b...

Page 6: ...NT It handles documents of various lengths by storing the printed paper in a loop CUT It holds the printout until fully printed and cut before presenting the completed printout to the customer PRESENT...

Page 7: ...Contents DATA No data received Data received CHECK PAPER Has paper No paper PAPER JAM No paper jam Paper jam Self test button Black timing mark sensor Ticket load sensor Head of form Exit sensor Prese...

Page 8: ...rolled receipt stock or fan folded stock with black timing mark using direct thermal printing The following is a link to the black timing mark specs www bocasystems com ticket_specs10 html The printer...

Page 9: ...0V configuration United Kingdom only The supply plug must comply with BS1363 3 pin 13 amp and be fitted with a 5A fuse which complies with BS1362 The mains cord must be HAR or BASEC marked and be of t...

Page 10: ...ss the center TEST button located on the control panel to print a test ticket When the Lemur Z leaves the factory it is configured for us with receipt rolled stock stock with no black timing mark If y...

Page 11: ...ur Z via four mounting location 2 Install the paper guide on the back of the printer and align the mounting holes to the above referenced installation location Install the four Philip 3 16 Hex head sc...

Page 12: ...rm may differ than what is shown in the photo 1 Attach the spindle onto the roll holder arm using the two Philip Hex head screws included with kit 2 The Philip 3 16 Hex head screw shown in the photo b...

Page 13: ...a full turn of the paper from the new paper roll Caution This is important as the outer end of the paper is usually secured to the roll with glue or other adhesive substance that may cause paper jam o...

Page 14: ...est with the position the roll holder arm will be installed at see Appendix J for the different positions 2 Insert the screw into the countersink side of the arm 3 Attach the sensor flat washer and nu...

Page 15: ...per guide Lemur X 3 The printer will feed the stock forward toward the front of the printer and then reverse it back to the print idle position For use with fan folder stock with black timing mark the...

Page 16: ...er guide Adjust the slider bar down to the proper ticket width making sure the bar is not too tight against the ticket The ticket should move freely in the paper guide Lemur Z with paper guide Lemur X...

Page 17: ...TS USB USB 2 0 compliant devices ETHERNET Optional is a standard RJ45 Ethernet cable connection Low Paper Port used in conjunction with the roll holder with low paper sensor See section 4 2 1 Receipt...

Page 18: ...eratures will increase the theoretical life expectancy while slight temperature increases will seriously exponentially degrade the head life The thermal paper can affect the electrical head life in tw...

Page 19: ...from the printer Following any procedure requiring the removal of covers and or doors please verify that they have been properly attached and fastened prior to operating the printer Routine maintenan...

Page 20: ...head by push back on the Print Head lock cutter guard to unlock the print head Photo A 4 Lift up on the head mounting assembly thermal head and tilt back Photo B 5 Clean the thermal print head surface...

Page 21: ...ver and remove head mounting assembly thermal head Refer to section 8 1 2 Thermal Print Head 3 Apply a small amount of Isopropyl alcohol onto a paper towel to clean the rubber roller 4 Clean only the...

Page 22: ...printer after power up During this time the cutter knife will move up and down If ticket stock is fed into the printer before five seconds a ticket jam could occur The cutter area should be blown out...

Page 23: ...will reset at this time e Contact your system provider or BOCA for further assistance 3 POWER IS ON BUT TICKET WILL NOT LOAD a See 2 b Make sure the print head cam lock assembly is fully locked in th...

Page 24: ...uality of black mark on the ticket stock b If using the paper guide then make sure the slider bar is properly adjusted for the width stock being used Consult 5 1 Ticket Width Adjustment section c Clea...

Page 25: ...printer s control panel if your printer has an optional LCD display ETHERNET Quick Installation Guide Connect the printer to your network the IP address will be automatically assigned by your DHCP se...

Page 26: ...heck off Run the program as an administrator box Click on the OK button The following steps will guide you through using this program once it has been installed on your host computer 1 Hook the BOCA p...

Page 27: ...9 6 PRINT DRIVER You will need to select the FGL Driver mode you want default is Spool Uni If you are not sure then leave in the default mode If your ticketing application is not designed for this con...

Page 28: ...tions This is the default mode the configure and test program will come up in 2 Direct BiDi Bidirectional Direct mode BIDI support is ON and Spooler is OFF This mode is used by ticketing systems that...

Page 29: ...If you are not able to get a self test ticket refer to the user s manual to make sure you have the printer properly setup 2 Go to your download folder and you will see the customer program you chose...

Page 30: ...Test Ticket Driver program Without Driver program 7 You may also print more than one ticket by changing the number of tickets you want to printer See next page for sample printouts Your sample printo...

Page 31: ...echanism Presenter Can be run in Ticket mode will auto load and measure ticket size Can be run in Paper mode will auto load paper to top of form Can be run in Receipt mode will auto load paper to top...

Page 32: ...set no loop BIT1 NAK BIT clear no NAK set NAK on trashed ticket BIT2 MOTOR BIT clear small platen motor set larger platen motor For factory use only BIT3 EJECT BIT clear present ticket to be pulled o...

Page 33: ...A print driver installed start at step 1 to uninstall it first If this is the first time installing the BOCA driver onto the host computer then start at step 4 On the host computer you are installing...

Page 34: ...nd Extract Files click on the Extract button 6 The file folder that was extracted will automatically pop up Double click on the BocaPrintDrivers folder to open it up Right click on boca bat and click...

Page 35: ...TO PAGE 38 The below steps are for Windows 7 operating system only 1 Connect the USB cable to the host computer and power on the printer If you are connecting to the printer via Ethernet or Wi Fi the...

Page 36: ...on Create a new port choose Standard TCP IP Port Click on the Next button 8 Type in the IP address that is shown on the self test ticket in the Hostname or IP address field When typing in the address...

Page 37: ...d aid in determining the correct driver to select 11 When the version driver menu comes up click on the Next button Driver DPI Firmware PCL listed Boca BIDI FGL 22 42 200 DPI 200 22 or 42 NO Boca BIDI...

Page 38: ...Printer Sharing menu comes up you may choose to share this printer or not Click on the Next button 14 On the last menu you have the option to choose if you want to make the BOCA your default printer...

Page 39: ...r is not able to print a self test ticket then consult the 4 0 Installation section of the user manual www bocasystems com documents lemur_manual pdf 1 Go to the Devices and Printers page 2 When the D...

Page 40: ...for reference only and your test page may look different Above is from a 200DPI FGL printer with 2 x 5 5 stock Above is from a 300DPI FGL printer with 3 25 x 6 5 stock If you were not able to install...

Page 41: ...B Printing Support and drivers will automatically install The image below is of a 300dpi driver being installed The driver name may vary due to the printer s DPI and logic board level Go to page 41 to...

Page 42: ...in the address don t include the leading zeroes If IP 189 010 000 002 then type in 189 10 0 2 You also have the option of typing in a specific Port name or leave as the IP address Uncheck the Query th...

Page 43: ...13 When the below menu comes up click on next Your name may vary from what is shown below Driver DPI Firmware PCL listed Boca BIDI FGL 22 42 200 DPI 200 22 or 42 NO Boca BIDI FGL 24 44 200 DPI 200 24...

Page 44: ...On the last page click on the Print a test page button and a windows test page should be printed by the printer This indicates the driver is communicating with the printer Click on the Close button a...

Page 45: ...t then consult the 4 0 Installation section of the user manual www bocasystems com documents lemur_manual pdf 14 Below is one of many ways to get to the devices and printers menu 1 Right click the bot...

Page 46: ...t driver is communicating with the printer Below are some samples printouts for reference only and your test page may look different Above is from a 200DPI FGL printer with 2 x 5 5 stock Above is from...

Page 47: ...nters and drivers dialog and attach it to the support form located at www bocasystems com onlinesupportform html 1 The BOCA MAC print drivers are designed only for FGL protocol printers They will not...

Page 48: ...ected then the below dialog box will appear Enter in the appropriate Name and Password click on OK button 10 Click on the Close button 11 Click on the System Preferences icon that is located on your t...

Page 49: ...ol choose HP Jetdirect Socket d Name you may keep the default name or change it e Use choose Select Printer Software f In the Printer Software menu type boca in the search area g Choose the driver tha...

Page 50: ...user manual www bocasystems com documents lemur_manual pdf 21 Double Click on the BOCA print driver icon to open up the print queue On the very top of the desktop screen clink on the Printer and then...

Page 51: ...d This service will become available one week after the platinum plan begins The following items are not covered by the service plans Preventative Maintenance the customer is responsible to provide a...

Page 52: ...for covered printers at BOCA s sole discretion as needed Email support for non warranty non contract printers is billable at 100 00 per incident However BOCA may at its sole discretion choose to waiv...

Page 53: ...52 APPENDIX H LEMUR X REFERENCE DRAWING...

Page 54: ...53 APPENDIX I LEMUR Z REFERENCE DRAWING...

Page 55: ...54 APPENDIX J REFERENCE DRAWING...

Reviews: