background image

20

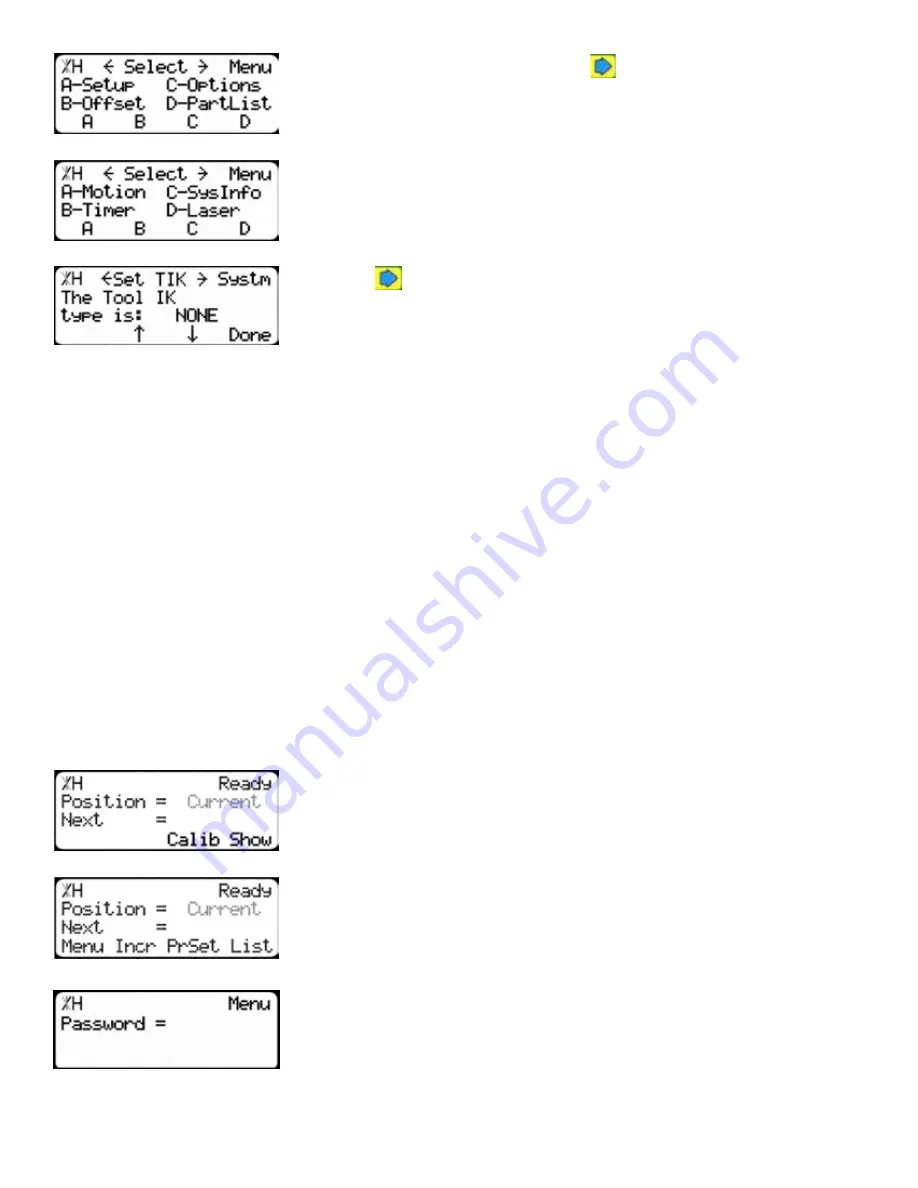
4.  At the Menu Select screen, press 

.

5.  Press the [SysInfo] soft key to access the System Information menu.

6.  Press 

 to scroll through the settings. Stop when you get to the Set 

TIK setting.

Set TIK has four settings:

None

 - No interconnect is installed.

Standard

 - The standard interconnect kit is installed.

Advanced

 - The advanced interconnect kit is installed, but working in semi-automatic.

Full Auto

 - The advanced interconnect kit is installed and working in full automatic mode.

To change Set TIK...

1.  Press [C].

2.  Enter your TigerRack password and press [=].

Note: By default, the TigerRack password is set to the serial number.

3.  Press [C] to toggle the setting.

4.  Press the [Done] soft key to save the parameter.

Set Brake Type

If your TigerRack is equipped with brakes, you must set the Brake Type setting to tell TigerRack how you 

want the brakes to function.

1.  From the Ready Screen, press the [Show] soft key to show the menu 

options.

2.  Press the [Menu] soft key to display the Menu Select screen.

3.  TigerRack requires a password to access all menu options. Enter 

your TigerRack password and press [=].

Note: By default, the TigerRack password is set to the serial number.

Summary of Contents for TigerRack

Page 1: ...1 Made In America 2017 TigerStop LLC Installation Guide Installation Guide TigerRack February 2017 Mk1 Register warranty and enable TigerRack Optimizer BEFORE installation See Page 15 ...

Page 2: ...2 Standard Interconnect Kit Quick Reference Cards Nut Pack Power Cable Controller Cable Controller Stand Controller I O Panel Universal Bracket Pusher Attachment Serial Number ...

Page 3: ...UCT WARNING TigerStop Products must be installed in accordance with all local state and federal regulations Only personnel properly trained in the safe design and installation of automation machinery and related power equipment should install TigerStop Products onto other equipment to ensure a safe and proper work station TigerStop Products should not be operated without proper training both in th...

Page 4: ... footwear safety glasses ear protection and a dust mask Use only 3 wire extension cords that have 3 prong grounding type plugs and 3 pole receptacles that accept the tools plug for 120VAC Use only 5 wire cords and plugs when using 3 phase DO NOT operate this or any machine under the influence of drugs or alcohol Do not open motor compartment or controller keypad DC Voltage with potentially FATAL am...

Page 5: ...nnect Kit Final Connections Grounding TigerRack Enable Code 15 Enabling Dynamic Optimization First Power Up 16 Calibration Settings Find the End Limits Calibrate TigerRack Set Kerf Set Units Set Interconnect Type Set Brake Type Set Optimizer Settings Basic TigerRack Functions 23 Entering Decimals Entering Fractions Calculator Mode Jog Increment PreSet Quick Calibration Working with Part Lists 28 M...

Page 6: ... a slight twist or other deformation in the beam This will result in inaccurate measurement and premature failure of the drive or other componets NEVER open TigerRack Amplifier Box The amplifier compartment contains DC voltage with potentially FATAL amperage NEVER attempt any unauthorized actions inside the amplifier box 208 VAC 20 Amps 240 VAC 20 Amps TigerRack Power Requirements TigerRack must h...

Page 7: ...op Mounting Slots Underside Amplifier Box Brakes Optional Cable Track Rack Motor Box Pinion Inside TigerRack Serial Number Installation 1 Each TigerRack comes with an appropriate number of Universal Mounting Brackets UBR Mount these to the back of the mounting surface Note Space mounting brackets approximately 3 feet apart ...

Page 8: ... forklift equipped with a lifting beam 1 Attach the lifting beam to each eye bolt in a way that ensures even tension on all eye bolts 2 Ensure that the tension on the eye bolt is straight up Do not apply side tension to the lifting bolts Note Proper tension on each eye bolt is essential Failure to do so could result in damage to TigerRack during lifting Lifting TigerRack Lifting Plate Lifting Plat...

Page 9: ...nt 2 Place Pusher Attachment on the flip away stop and insert the bolt and washer from the top as shown 2 Mounting Points 2 Mounting Points Align the Rack The rack is separated into sections on the back of TigerRack The rack must remain properly aligned to maintain accuracy It is important to adjust the rack during installation To align the rack 1 Loosen the rack section to be aligned 2 TigerRack ...

Page 10: ...box cover 3 Lower the pinion gear by hand 4 Insert a piece of paper between the pinion and the rack 5 Slowly release the pinion and allow it to push the paper into the rack 6 Remove the paper The paper should be embossed by the rack but not ripped or torn 7 If the paper is not embossed or if its torn you will need to adjust the pinion To adjust the pinion Note Ensure TigerRack is powered down befo...

Page 11: ... Install Controller Stand The TigerRack controller stand will hold the TigerRack controller at a comfortable angle and height during Backboard Defecting Optimizing The stand can be adjusted for a straight base or any angle up to 90 degrees ...

Page 12: ...ial waste when performing Backboard Defecting Optimizing using TigerStop s Dynamic Optimization upgrade WARNING Using a TigerStop Standard Interconnect Kit does NOT relieve you of the responsibility for making sure your saw or other tool has all the necessary safety equipment in place Install Standard Interconnect Kit The TigerStop Standard Interconnect Kit has two components that integrate into y...

Page 13: ...ce TigerRack and all TigerRack accessories are installed its time to make the final connections 1 Connect one TigerRack Controller Cable from the controller to the I O panel plug marked Controller Note The TigerStop Controller Cable is a proprietary cable DO NOT use an off the shelf cable Doing so can cause damage to TigerRack 2 Connect the other TigerRack Controller cable from the amplifier box t...

Page 14: ...e air pressure Air pressure should be at 80 PSI Grounding TigerRack TigerRack is supplied with a ground wire The wire is connected to the grounding lug on the cable track A Grounding Wire B Grounding Lug Ensure the ground is good before using TigerRack Ensure the table TigerRack is mounted to is also grounded Ensure the ground is a bus ground and not a serpentine or other ground style Note TigerSt...

Page 15: ...ou by phone to give you the enable code within the hour during regular business hours Monday through Friday 6 00 am 4 00 pm PST 2 When you have received your enable code power up TigerRack using the power switch on the amplifier box 3 TigerRack will ask you to enter your enable code Enter the code received from TigerStop and press Your TigerRack has now been enabled Enabling Dynamic Optimization T...

Page 16: ...he starting point for all TigerRack functions Let s take a look at the screen line by line Line 1 displays the heartbeat The heartbeat is a line that rotates and lets you know that TigerRack is functioning normally The letter next to the heartbeat is the drive indicator This tells you what the motor is doing Drive Indicator Meaning H Holding Still A Accelerating C Moving at Constant Speed D Decele...

Page 17: ... the End Limits 1 From the Ready Screen press the Show soft key to show the menu options 2 Press the Menu soft key to display the Menu Select screen 3 TigerRack requires a password to access all menu options Enter your TigerRack password and press Note By default the TigerRack password is set to the serial number 4 At the Menu Select screen press the Setup soft key to access the Setup Menu 5 Press...

Page 18: ...Menu Select screen 3 TigerRack requires a password to access all menu options Enter your password and press Note By default the TigerRack password is set to the serial number 4 At the Menu Select screen press the Setup soft key to access the Setup menu 5 Press to scroll through the settings Stop when you get to the Kerf setting To measure kerf 1 Cut a sample piece and measure it with a caliper Rec...

Page 19: ...sword is set to the serial number 4 At the Menu Select screen press the Options soft key to access the Options menu 5 Press to scroll through the settings Stop when you get to Units 6 Press B to toggle between inches and metric 7 Press the Done soft key when finished Set Interconnect Type 1 From the Ready Screen press the Show soft key to show the menu options 2 Press the Menu soft key to display ...

Page 20: ...de To change Set TIK 1 Press C 2 Enter your TigerRack password and press Note By default the TigerRack password is set to the serial number 3 Press C to toggle the setting 4 Press the Done soft key to save the parameter Set Brake Type If your TigerRack is equipped with brakes you must set the Brake Type setting to tell TigerRack how you want the brakes to function 1 From the Ready Screen press the...

Page 21: ...ting The Brake setting has two options Pusher The brakes will engage after the tool has started its cycle Note Pusher brake mode is only available when using a standard or advanced interconnect kit Setpoint The brakes will engage as soon as TigerRack has stopped moving To change Brake 1 Press B or C to toggle the brake setting 2 Press the Done soft key to save the parameter Set Optimizer Settings ...

Page 22: ... so A higher Opt Score setting will give you a faster solution but it may give you a lower material yield To change Opt Score 1 Enter the new Opt Score setting 2 Press to save the parameter 6 Press to scroll through the settings until you get to the Opt Time setting The Optimizer Time setting sets the amount of time the TigerStop Optimizer has to find a solution If it takes longer than this time T...

Page 23: ... to suit your exact application Basic TigerRack Functions Basic TigerRack Functions Manual Movement To manually move TigerRack to a position you must enter the length you want TigerRack to go to This length can be entered as a decimal or a fractional value Entering Decimals 1 Start at the Ready Screen 2 Enter a length at the controller Example To enter 24 1 2 as a decimal enter 2 4 5 3 Press Start...

Page 24: ... on the current position Example I want to subtract 1 5 inches from my current position of 42 inches 1 Press 1 5 The answer will appear in the Next field 2 Press Start and TigerRack will move Jog 1 Start at the Ready Screen 2 At the top of the TigerRack controller you have a and a To jog press and hold one of these buttons Note If the jog buttons move TigerRack in the wrong direction you can use t...

Page 25: ...ement of 2 inches 5 The current position is 42 If that is where you want to start press Start to begin incrementing If you need to move TigerRack to load your stock enter the position and press Start TigerRack will move to position Load your stock and press Start to begin incrementing 6 When you are finished press Stop to return to the Ready Screen PreSet The PreSet function is a set of 100 progra...

Page 26: ... now set 7 Press Stop to go back to the Ready Screen Using the PreSet 1 Start at the Ready Screen 2 Press the PrSet soft key to access the PreSet menu 3 Enter the PreSet number you wish to use and press Start 4 TigerRack will move to the PreSet position Deleting PreSets 1 Start at the Ready Screen 2 Press the PrSet soft key to access the PreSet menu 3 Enter the PreSet number you wish to delete and...

Page 27: ...s allows more advanced TigerRack users to quickly calibrate 1 Start at the Ready Screen Note if you viewing the expanded options press Cancel 2 Measure how far the TigerRack is from your tool s zero point Enter this measurement and press the Done soft key 3 TigerRack is now calibrated ...

Page 28: ...length you enter as an absolute value from your zero point Set point lists can be optimized if you have the TigerStop Dynamic Optimizing upgrade Pattern A pattern list will tell TigerRack to process one stock lengths worth of parts in a push feed fashion It will run the same pattern of parts over and over until its told to stop Pattern lists cannot be optimized Pull A pull list works just like a p...

Page 29: ...ll tell TigerRack that I want 5 parts 9 You will now be taken to line 2 Repeat steps 7 and 8 until you have entered all the parts you want to precess Note You can also download all the parts straight from your design file Downloading is a faster way of importing parts for use with TigerStop s Dynamic Optimization 10 Press the Done soft key when all parts are entered 11 The list has now been saved ...

Page 30: ...p to the quantity Enter how many parts you want followed by In this example I will tell TigerRack that I want 5 parts 8 You will now be taken to line 2 Repeat steps 6 and 7 until you have entered all the parts you want to process Note You can also download all the parts straight from a design file Downloading is a faster way of importing parts for use with TigerStop Dynamic Optimization 9 Press th...

Page 31: ... of the material as possible 7 Continue in this fashion until the entire stock is used If you have more parts to cut start at step 1 with a new piece of material Why Use BackBoard Defecting Optimizing Dynamic Optimization determines the best use of material so the operator unskilled worker or pro fabricator only has to focus on feeding parts and cutting TigerRack moves to the correct position up t...

Page 32: ...k Pinion Gear Rack 2 Check all cables for damage 3 Check calibration if necessary Quarterly Every 3 Months 1 Check rack to ensure that the sections are tight and aligned properly see page 9 2 Check the pinion gear to ensure that it is properly tensioned see page 10 3 Run a motor drive test and record the data in th maintenance log If drive numbers are above 12000 check contact TigerStop Customer S...

Page 33: ...d more brakes to TigerRack in the field 1 Power down TigerRack 2 Open the TigerRack motor box Note TigerRack brakes attach to the motor box under the flip away stop 3 Identify the brake mounting holes on the motor box 4 Attach the brake to the motor box using the supplied hardware as shown Mounting Holes Bolt Spacer Nut ...

Page 34: ...34 Date Maintenance Performed Drive Test Results Maintenance Log Maintenance Log ...

Page 35: ...35 ...

Page 36: ...36 12909 NE 95th Stree t Vancouver WA 98682 2426 1 360 254 0661 sales tigerstop com TigerStop B V Holland 31 546 575 171 info tigerstop nl www tigerstop com FIND US ONLINE AT ...

Reviews: