background image

2

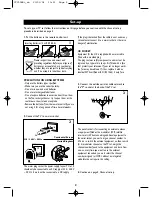
1. Put the batteries in the remote control unit.

PRECAUTIONS ON USING BATTERIES
- Only use the battery types specified.
- Make sure you use the correct polarity.
- Do not mix new and used batteries.
- Do not use rechargeable batteries.
- Do not expose batteries to excessive heat, throw them

on the fire, recharge them or try to open them, as this
could cause them to leak or explode.

- Remove the batteries from the remote control if you are

not using it for a long period of time (several weeks).

2. Connect the TV to a mains socket.

The mains plug carries the power supply to your TV set. It
should only be connected to an AC supply at 220 - 240 V
~ 50 Hz. It must not be connected to a DC supply.

If the plug is detached from the cable, do not under any
circumstances connect it to a mains socket as there is a
danger of electrocution.

UK SOCKET:
Equipment for the UK is supplied with a mains cable
fitted with a moulded plug.
The plug contains safety components and must not be
replaced by a type sold in shops. It is fitted with a fuse
that protects your television. If your set no longer works,
the fuse may have blown. If it has, replace it with an
identical ASTA certified or BSI (BS 1362) 5 amp fuse.

3. Connect the outside aerial or cable network to
the 

g

socket at the back of the TV set.

The aerial socket is for connecting an external antenna
or equipment fitted with a modulator (VCR, satellite
receiver, etc.).When connecting additional equipment to
the aerial socket, you must assign a channel number to
it.To do so, switch the external equipment on, then search
for its modulator channel on the TV set, assign the
channel number found to the equipment and store. From
now on, every time you want to use the external
equipment connected, you must select the channel
number assigned to it.VCR’s without an integrated
modulator do not require this setting.

4. Continue on page 4, Channel set-up.

Continental Europe

5A

United Kingdom

Inserting batteries (2 x LR 03-AAA).

2

1

3

Please respect the environment and
prevailing regulations. Before you dispose of
batteries or accumulators, ask your dealer
whether they are subject to special recycling
and if he accepts to take them back.

220 / 240 V~ 50Hz

Set-up

To set up your TV set, follow the instructions on this page before you continue with the channel set-up
procedure described on page 4.

_en  23/01/04  13:21  Page 2

Summary of Contents for ITC008B+

Page 1: ...ug the mains plug The mains plug must be easily accessible In the following cases we recommend that you pull out the mains connector 1 During a thunderstorm In such a case it is advisable that you also disconnect the TV set from the aerial socket 2 When odour or smoke emanates from the set Never attempt to open yourTV set yourself Further information The TV set shielding is sufficient to prevent X...

Page 2: ...orks the fuse may have blown If it has replace it with an identical ASTA certified or BSI BS 1362 5 amp fuse 3 Connect the outside aerial or cable network to the g socket at the back of theTV set The aerial socket is for connecting an external antenna or equipment fitted with a modulator VCR satellite receiver etc When connecting additional equipment to the aerial socket you must assign a channel ...

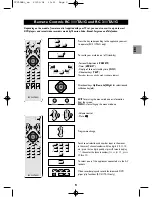
Page 3: ...n also be used to operate teletext Directional keys Up Down Left Right for selection and validation key ok Volume control Mute Programme change For channel selection and number input in the menus In the case of channel numbers with two digits 10 11 12 etc press the two digits quickly or press 0 twice to display then enter the channel number for ex for 12 press 00 then 12 Video recorder play and re...

Page 4: ... frequency and programme number on which each new channel found is memorised Wait a few minutes until the ORGANISER menu appears Channels Organisation The PR line is selected How to change the channel number Use a TV programme magazine to help you identify the channels 1 Use the key PR and PR to select the channel number you wish to change 2 Press the new channel number compulsorily 2 digits for e...

Page 5: ...abic 6 Ukrainian 7 Belarussian Select the number of the character set using the table on page 7 Adjusting the Picture Display the PICTURE menu by pressing MENU on the remote control unit Once for mono TV sets Twice for stereo TV sets Through the Up Down keys select the function you want to adjust Brightness Colour Contrast Sharpness Tint Adjust with the Left Right keys Adjustment of tone is only p...

Page 6: ...he INFO key display the channel number type of sound and format and if you want it the time left before programmed timer switch off How to recall the preferred settings Press on the red key to recall the sound and picture settings you previously stored see page 5 PREF is displayed at the bottom of the screen How to programme a switch off Press on the Green ZZZ LIST key then using the Left Right ke...

Page 7: ...display Videotext display The blue key enables you to superpose a videotext page on the standard TV picture and to switch back to the standard TV picture Fastext When videotext pages are broadcast as per the Fastext standard you can use the corresponding colour keys to select one out of the 4 headings displayed in the footer Selection of a given heading may have the effect to display further headi...

Page 8: ...llow you to connect aVHS or 8 mm camcorder The Audio S Video sockets allow you to connect aVHS or Hi 8 camcorder To view images produced by an appliance connected To the AV1 peritel socket press the AV key to select AV1 or AV1S in the case of an S Video appliance To the AV2 peritel socket press the AV key to select AV2 or AV2S in the case of an S Video appliance To the Audio Video S Video sockets ...

Reviews: