


Premier Elite Series Installation Manual
UDL & Digi Options
INS176-15
105
Numbers
(
A
shown on screen)are on, Use the
n
/
button
to toggle each option on or off.
•
Press
y
/
Initialise a Test Call
•
Press
N
/
then
y
/
(Start Test Call)
•
Press
to start the test call. All communication devices on
the system will carry out a test call.
Once completed and if successful you will receive a notification from
the Control Panel to the app.
Do not exit Engineers mode yet. Please read below:
Optional Additional Panel Settings
Due to the nature of routers and services provided by the ISP,
devices of all types can just "drop off" a network, certain
circumstance may cause an ATS Failure to be displayed to the end
user. The panel will automatically recover itself once the network is
available. However to avoid this potential inconvenience please see
below.
EN50131 System
With an EN50131 installed system, the warning about an ATS
Failure will only be visible to the User when they enter their code
and the fault is still present. In the case of this type of system the
chances of a User actually seeing the fault will be minimal. It is also
a requirement of systems with additional communication devices
that signal to an ARC or other response authority to report these
faults.
Non-EN50131 System
If the system is installed and configured to NOT comply with
EN50131 and has no additional communication devices signaling to
an ARC or response authority, then an ATS failure will be displayed
immediately on the keypad at the time the fault occurs. Again no
action is actually required by the user as the panel will recover of its
own accord. However if the Users WiFi connection has a tendency
to drop devices, this could be a source of frustration. Two options
are available as detailed below.
Setting an ATS Fault delay
•
Enter Engineers Mode
•
Press
then
y
/
(
Global Options
)
•
Press
y
/
(
System Timers
)
•
Use
and scroll to
ATS Fault Delay
•
Press
n
/
, then enter 005 to set a five minute delay
•
Press
y
/
•
Exit Engineers Mode
Disabling ATS failed messages
To stop the keypad displaying the ATS Failed message in this
scenario do the following;
•
Enter Engineers Mode
•
Press
then
y
/
(
Global Options
) Press
then
y
/
again (
Monitor Hardware
)
•
Press
n
/
Press
n
/
again to toggle ATS Path Faults
OFF Press
y
/
•
Press
N
/
twice, then
,
y
/
•
Press
,
y
/
a and
to ATS Path Faults
•
Press
n
/
,
,
y
/
to turn off
•
Exit Engineers Mode
If the
ComIP
misses its polling in a 1 hour time window,
the server will send notification directly to the app.
Do NOT do this on an EN50131 system, or on a system
that has additional communication that signals to an ARC
or other response authority.
Checking IP Updates
Now do the following to confirm that the setup is correct.
•
Login to the app
•
Connect To Site
, you should now be online with the system
•
Go back to
My Sites
•
Go to
Edit Site
and click
IP Details
•
The IP address will have changed. The address now being
shown is provided by the ISP and will match the WAN IP
address shown in the router.
If for some reason this has not worked please see details below to
troubleshoot the installation.
Premier Elite ComWiFi
Initial Module Setup
These steps
MUST
be carried out
FIRST
.
•
Connect the
ComWiFi
onto the comport of the control panel
using the lead provided.
•
Using a Wi-Fi enabled computer, tablet or mobile device scan
for new wireless networks.
•
Select the
'Com WiFi'
network.
•
Enter the network key password
texecom2015
and press
connect.
•
On the same device open the Web browser and type the IP
address
10.10.100.254
into the address bar.
•
You will need to enter the user name as
master
and the
password as
123456.
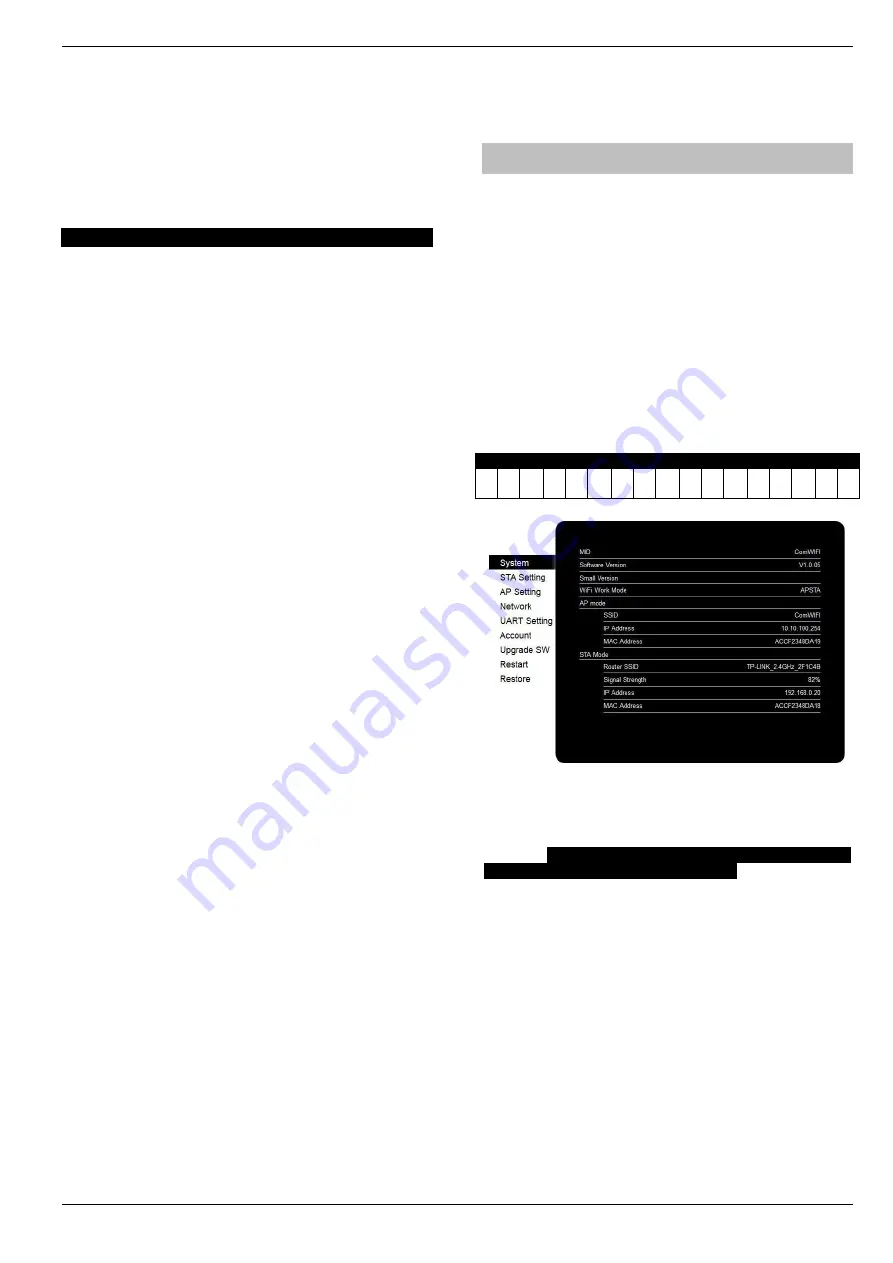
•
You are now online with the
ComWiFi
module, and should see
the system image shown on the following page.
•
Take a note of the STA Mode MAC Address.
STA Mode MAC Address
: : : : :
Change Password & User Name
Before proceeding it is important to change the
User Name
and
Password
in order to keep the
ComWiFi
secure. Click on
Account
on the left side of the screen and then enter a new
User Name
and
Password
Alphanumeric characters Latin A-Z and Roman 0 - 9
ONLY
. Special characters must not be used
. Followed by
Save
.
You will be prompted to
Restart
the unit. Setup the unit as
described on page 45 and then allow it to restart.
Please note it is NOT possible to retrieve the User Name & Password once it has
been changed. You will have NO access to the device without it. It is not possible to
default the unit without the User Name & Password.


