background image


15 


6. Chain lubrication 


The chainsaw is equipped with an automatic 
lubrication system, which ensures the chain is always 
lubricated optimally. However, the system depends 
on chain oil in oil tank and regular cleaning.


The chainsaw is not supplied filled with oil. It is 
essential to fill with oil before use. Never 
operate the chainsaw without chain oil or at an 
empty oil tank level, as this will result in 
extensive damage to the product. 
 

Chain life and cutting capacity depend on optimum 
lubrication. Therefore, the chain is automatically oiled 
during operation via oil outlet. 
 

Filling chain oil in tank


1.  Set chainsaw on any suitable surface with oil filler 

cap facing upward.  

2.  Clean area around the oil filler cap with cloth and 

unscrew cap.  

3.  Do not remove filter insert during filling.  
4.  Add chainsaw oil until reservoir is full.  
5.  Avoid dirt or debris entering oil tank, refit oil filler 

cap and tighten 


To allow venting of the oil reservoir, small 
breather channels are provided between the oil 
filler cap and the strainer. To prevent leakage, 
ensure machine is left in a horizontal position 
(oil filler cap facing up) when not in use 

 
Use only the recommended chain oil (ALCO SAE 30 or 
similar with viscosity 120) to avoid damage to the 
chainsaw. Never use recycled/old oil.  
Use of non-approved oil will invalidate the warranty. 
 
Check oil level prior to starting and regularly during 
operation. Refill oil when oil level is low. 


To test the oil lubrication, apply half speed on chain. 
Check that the chain oil sprays out as shown in 
the illustration (

See Fig. 4

). If no oil comes out, check 

that there is oil in oil tank and make sure the guide bar 
groove and holes are free from dirt. Also clean around 
the oil outlet behind the bar on machine.


7. Use 


See Fig. 5 

Before use, make sure that the battery is fitted properly 
with the battery lock in place. 
 
To start the machine first press the main switch (1), so 
the power indicator (2) lights green. Then hold the 
safety switch (3) and activate the trigger switch (4). 
 
Stop the machine by releasing the trigger switch (4). 
 

Automatic switch off function 

The machine is equipped with a switch off function that 
deactivated the machine if not used within approx. 60 
seconds. The green power indicator light will switch off 
too. Press the main switch (1) to restart. 


8. Clothing 

 
When using the machine, wear tight-fitting work clothes, 
strong working gloves, hearing protectors, eye 
protection, safety boots with non-skid soles and 
protective trousers. 


9. Tips and advices 


This tool is used for cutting smaller branches 
off from trees. Do not try to cut trees with it. 
Only branches. Always be careful when 
working above head height, as falling branches 
might hit you. 


See Fig. 6A 

Always hold the machine with both hands. Hold the 
machine on the right side of the body. Use the belt 
strap. 
 

See Fig. 6B 

Whenever possible, try position yourself so that you can 
make the cut in right angles to the branches. 
 

See Fig. 6C 

Cut large branches in sections, so that you have better 
control over where they fall. You should also pay 
attention to the fact that falling branches can bounce in 
the direction of the user after hitting the ground. 
 

See Fig. 6D 

Never cut through the swelling at the roof of the branch 
as this will slow down healing and increase the risk of 
fungal attack.  


The hedge trimmer is not suitable for cutting 
grass! 


See Fig. 6E 

Use the stop at the base of the cutting head to provide 
support during cutting. This will help prevent the 
cutting attachment from ”jumping” on the branch. 
 

See Fig. 6F 

Make an initial cut on the underside of the branch 
before cutting through the branch. This will prevent 
tearing of the bark, which could lead to slow healing 
and cause permanent damage to the tree. The cut 
should not be deeper than 1/3 of the branch thickness 
to prevent jamming. Keep the chain running while you 
withdraw the cutting attachment from the branch to 
prevent it from jamming. 
 

10. Maintenance 


Before any service and maintenance is done, 
the power must be disconnected, it means the 
battery removed from the tool. 


Remove the battery before you clean and store the 
machine. 


For obtaining the best cutting results the chain and 
guide bar must be cleaned and oiled regularly. 
Remove dirt with a brush and oil lightly. 


Use biodegradable oil. 


Clean the housing and other parts with a mild 
cleanser and a moist cloth. Never use aggressive 
cleansers or solvents. 


Prevent water from getting into the machine. 

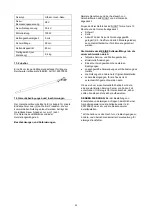
Summary of Contents for PCZ 5800

Page 1: ...PCZ 5800 Texas A S Knullen 22 DK 5260 Odense S Denmark Version 20 1 Tel 45 6395 5555 www texas dk post texas dk DK Betjeningsvejledning GB User manual DE Bedienungsanleitung ...

Page 2: ...æt ikke udstyret for regn vand og opbevar det indendørs Do not expose the equipment to rain water and store it indoor Das Equipment keinem Regen Wasser aussetzen und im Gebäude lagern Udsæt ikke for temperaturer over 45 grader Do not expose to temperatures above 45 degrees C Keinen Temperaturen über 45 C aussetzen Skal genbruges Must be recycled Ist zu recyceln Udsæt ikke udstyret for ekstrem varm...

Page 3: ...3 Illustrationer Illustrations Abbildungen Illustrationer Illustrations Abbildungen Fig 1 Fig 2 ...

Page 4: ...4 Fig 3 ...

Page 5: ...5 Fig 4 Fig 5 ...

Page 6: ...6 Fig 6 ...

Page 7: ...7 Fig 7 ...

Page 8: ...nsvar fraskrives ved ulykke eller anden skade som forårsages pga montering af uoriginale dele Før maskinen tages i brug bør forhandleren eller anden fagkyndig instruere dig i brugen Kontroller altid før anvendelse at bolte og møtrikker er spændte at de bevægelige dele fungerer korrekt samt at beskyttelsesanordninger er intakte og korrekt monteret Få beskadigede dele repareret inden maskinen tages ...

Page 9: ...nker Batteriet er tomt Oplad batteriet Bemærk Indikator lysene er kun vejledende indikationer og ikke helt præcise power angivelser Vigtigt For at beskytte batteriet mod total afladning vil maskinen standse når batteriet næsten er fladt Maskinen må ikke startes igen efter automatisk standsning da det kan beskadige batteriet Batteriet skal oplades inden arbejdet fortsættes For yderligere oplysninge...

Page 10: ...ykkes ind Stop ved at slippe aktiveringsknappen 4 Automatisk sluk funktion Ved inaktivitet vil maskinen selv lukke ned efter ca 60 sekunder og det grønne lys i hovedafbryderen vil slukke Tryk på hovedafbryderen 1 for at starte igen 8 Beklædning Ved arbejde med maskinen er tætsiddende arbejdstøj solide arbejdshandsker høreværn beskyttelsesbriller sikkerhedsstøvler med skridsikre såler og skærebukse...

Page 11: ...tovægt uden batteri 5 4 kg 13 Tilbehør Forlængerstang på 94 cm for ekstra lang rækkevidde kan tilkøbes Varenr 90070055 14 Reklamationsretten og generelle betingelser Reklamationsperioden regnes fra købsdatoen og er gældende i 2 år for private i Danmark og i EU Maskiner solgt til erhvervsbenyttelse har 1 års garanti Reklamationen dækker mangelfuld udførelse dvs fabrikationsfejl eller materiale og f...

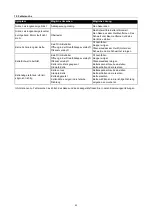
Page 12: ...ieudgangen på maskinen bag sværdet og rens rillen i sværdet Kæde sværd bliver varmt Ingen olie i olietanken Kanaler i tanklåget er tilstoppet Oliepassage er blokeret Kæden er for stram Uskarp slidt kæde Påfyld kædeolie Rengør tanklåg og gevind Rengør olieudgangen på maskinen bag sværdet Juster kædestrammerskrue Slib eller udskift kæde Kædesav vibrerer eller saver ikke ordentligt Kæden er for løs U...

Page 13: ...ved parts may lead to increased risk and are therefore not legal Any liability is renounced for accidents or other damage that has happened due to the use of unauthorised parts Before using the machine the dealer or other qualified person should instruct you in the use of the machine Minors may not work the machine The machine may only be lent to people who know how to work the machine This manual...

Page 14: ...he battery Note The indicator lighs is only indicative indications and is not accurate power indications Important To protect the battery from total discharge the machine will stop when the battery is nearly empty The machine must not be started up again after automatic shutdown as it can damage the battery The battery must be recharges before the work can continue For further information see the ...

Page 15: ...with a switch off function that deactivated the machine if not used within approx 60 seconds The green power indicator light will switch off too Press the main switch 1 to restart 8 Clothing When using the machine wear tight fitting work clothes strong working gloves hearing protectors eye protection safety boots with non skid soles and protective trousers 9 Tips and advices This tool is used for ...

Page 16: ...ltage 58V Battery rated voltage 50 4V Motor power 700W Chain speed 5 m s Guide bar length 20 cm Chain oil capacity 80 ml Net weight tool only 5 4 kg 13 Accessory Extension pole 94 cm for longer reach can be purchased seperately Art no 90070055 14 Warranty terms and conditions The warranty period is 2 years for private end users in EU countries Products sold for commercial use only have a warranty ...

Page 17: ...il passage outlet on machine behind guide bar and clean the guide bar groove Chain guide bar overheats No oil in reservoir Vent in oil filler cap clogged Oil passage clogged Chain is over tensioned Dull chain Refill oil Clean cap Clean oil passage outlet Adjust chain tension screw Sharpen chain or replace Chainsaw rips vibrates does not saw properly Chain tension too loose Dull chain Chain worn ou...

Page 18: ...en Dieses Gerät ist ein elektrisches Produkt Es ist daher wichtig dass es niemals in Kontakt mit Wasser kommt oder in nasser Umgebung verwendet wird Verwendung und Wartung des Produkts Dieses Gerät darf nur für die in dieser Bedienungsanleitung beschriebenen Arbeiten verwendet werden Verwenden Sie nur Original Ersatzteile Die Montage nicht genehmigter Teile kann zu einem erhöhten Risiko führen und...

Page 19: ...ttenrad Schutzabdeckung an und ziehen Sie den Schwertknopf fest Spannen der Kette Zum Spannen der Kette lösen Sie die Mutter A stellen Sie die Kettenspannschraube C ein und ziehen Sie die Mutter wieder fest Verwenden Sie dazu das mitgelieferte Werkzeug 4 Akku Dieses Produkt wird ohne Akku und Ladegerät geliefert Diese sind separat erhältlich Warnung Versuchen Sie nicht den Akku zu zerlegen oder ku...

Page 20: ...ben Sie dann die Kappe ab 3 Entfernen Sie nicht den Filtereinsatz während des Einfüllens 4 Füllen Sie Kettensägenöl ein bis der Tank voll ist 5 Achten Sie darauf dass keine Schmutzpartikel oder Fremdkörper in den Öltank gelangen Schrauben Sie die Öleinfüllkappe wieder auf und fest Zur Entlüftung des Öltanks befinden sich schmale Entlüftungskanäle zwischen der Öleinfüllkappe und dem Filter Um ein A...

Page 21: ...ernt werden Entfernen Sie den Akku vor der Reinigung und Lagerung des Geräts Um bestmögliche Schneidergebnisse zu erzielen müssen die Kette und das Schwert regelmäßig gereinigt und geschmiert werden Entfernen Sie etwaige Schmutzpartikel mit einer Bürste und ölen Sie sie leicht ein Verwenden Sie biologisch abbaubares Öl Reinigen Sie das Gehäuse und andere Teile mit einem milden Reinigungsmittel und...

Page 22: ...chwert Kette Akku Wird der Akku nicht ordnungsgemäß gelagert d h frostfrei und alle 3 Monate geladen kann die Haltbarkeit nur für 6 Monate garantiert werden Die Garantie deckt KEINE Schäden Mängel ab die verursacht wurden durch fehlende Service und Wartungsarbeiten strukturelle Änderungen Einsatz unter ungewöhnlichen externen Bedingungen unsachgemäße Verwendung oder Überlastung des Geräts die Nutz...

Page 23: ...inter dem Schwert und die Schwertnut reinigen Kette Schwert überhitzt Kein Öl im Behälter Öffnung in der Öleinfüllkappe verstopft Ölkanal verstopft Kette ist zu stark gespannt Stumpfe Kette Öl nachfüllen Kappe reinigen Ölkanalauslass reinigen Kettenspannschraube einstellen Kette schärfen oder ersetzen Kettensäge reißt aus vibriert sägt nicht richtig Kette zu lose Stumpfe Kette Kette abgenutzt Kett...

Page 24: ...ubsequent modifications den Spezifikationen der Geräterichtlinie und nachfolgenden Abänderungen entspricht 2006 42 EC 2014 30 EU 2000 14 EC amended by 2005 88 EC Materiellet er udført i overensstemmelse med følgende standarder Conforms with the following standards den folgenden Normen entspricht EN 60745 1 2009 A11 EN ISO 11680 1 2011 EN ISO 12100 2010 AfPS GS 2014 01 EN 55014 1 2006 A1 A2 EN 5501...

Reviews: