


14
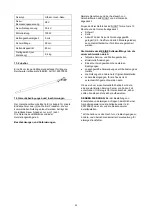
Mounting of shaft. See Fig. 2
Connect the two shaft-tubes. Push if in until the lock
“clicks”. Push the lock and pull tubes apart to separate.
Always wear gloves, when working with the
chain.
Chain and guide bar assembly. See Fig. 3.
1. Remove battery.
2. Place the saw head on any suitable flat surface
with the bar knob facing upwards.
3. Remove the sprocket cover plate by loosening the
bar knob (A).
4. Fit the chain onto the drive sprocket at the tip of the
bar. Make sure the teeth are pointing forwards
towards the tip of the guide bar.
5. Fix the chain around the drive sprocket (B) and
mount the guide bar on the saw head, so that the
plast part fit into the keyway of the guide bar.
6. Adjust the chain tension screw (C), so the pin (D) is
matching the hole in the bar. Use the chain tension
screw to get the correct tension in the chain.
7. Ensure that the chain sits precisely on the guide
bar. The chain is correctly tensioned when it is still
possible to raise it by 2-4 mm
8. Fit sprocket cover and tighten the bar knob.
Chain tensioning
.
For future chain tensioning, loosen the nut (A), adjust
the chain tension screw (C) and tighten the nut again.
Use the included tool.
4. Battery
This product is delivered without battery and charger. It
is sold separately.
Warning:
Do not try to disassemble, short circuit or put
it to extreme heat or fire, as it can cause serious inquiry
and permanent damage to the battery!
The battery pack is only about 30% charged when
delivered.
Charging
•
Only use the original charger with
art. no. 90070054
•
Before the battery is being used the first time, it is
recommended to fully charge it first.
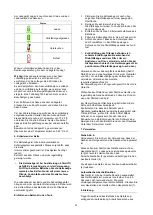
LED lights
Battery Pack
All LEDs are lit
Fully charged (75-100%).
LED 1, LED 2, LED 3
are lit.
The battery pack is
50%-75% charged
LED 1, LED 2
are lit.
The battery pack is
25%-50% charged.
LED 1 are lit
The battery pack is
0%-25% charged
LED 1 flashes
The battery pack is empty.
Charge the battery.
Note:
The indicator lighs is only indicative indications,
and is not accurate power indications.
Important:
To protect the battery from total
discharge, the machine will stop, when the battery is
nearly empty.
The machine must not be started up again after
automatic shutdown, as it can damage the battery.
The battery must be recharges before the work can
continue.
For further information, see the user manual which is
included with the battery.
5. Charger
A full charge takes around 60 min for 2.0 Ah batteri and
120 min for 4.0 Ah battery.
•
Only use the original charger, which is included
with the product.
•
Do not try to charge other type of batteries in the
charger, other than the original batteries with art.
no. 90070051 (2.0 Ah) or 90070052 (4.0 Ah).
•
Keep the charger in a dry and warm environment
(10-25 degrees C) and only use it indoor. It should
be connected to a normal 230V AC socket.
•
Before the battery is being used the first time, it is
recommended to charge it fully.
•
The surface of the battery can become warm
during charging. This is normal.
•
Do not cover battery or charger during charging.
Allow free ventilation of air.
Insert the battery into the slots of the charger and
slide it into place until it locks.
There are 4 lights on the charger indicating the status
and state of charge of the battery
Status
Charging
Fully charged
Evaluate
Defective
For further information, see the user manual which is
included with the charger.
Important:
The charger will stop, when the battery is
full. However, it is not recommended to leave the
battery in charger for more than 24 hours.
It is recommended to drain the battery completely and
fully charge it whenever possible, as it can increase
the health of the battery. But partial charge will not
damage the battery.
To remove the battery from the charger, hold the
button down and pull the battery out.
Before winter storage, the battery should be fully
charged and kept warm at 10-20 degrees C. Charge it
every 3 months. Make sure to keep ventilation holes
clean and free from dirt.
Store the charger indoor between 5-25 degrees C.


