64
Handbuch / ManuHandbuch / ManuHandbuch / ManuHandbuch / ManuHandbuch / Manu
alalalalal
Connecting a CD-ROM drive
The
SoundSystem Maestro32/96
has a 40-contact connector strip for connecting an ATAPI-
(or enhanced) IDE CD-ROM drive. Virtually all CD-ROM drives which are available nowadays
meet this standard. The various types of drive range from double-speed to eight-speed drives.
Before you connect a CD-ROM drive to the soundcard, please establish whether an enhanced-
IDE controller is already installed in your system. If this is the case, it is better for this controller
to be used. Please also establish what type of CD-ROM drive you have.
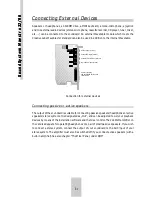
CD-ROM Data connector
PIN 1
E
n
h
a
n
ce
d
I
D
E
The IDE interface on the soundcard always considers the CD-ROM drive to be a secondary
device, and uses the interrupt 15 and the address 170H. If no drive is connected to this interface
it is automatically disabled and thus does not use any ressources.
Connect the data cable to the CD-ROM drive and the pin strip CN5 on the soundcard. Ensure
that the coloured strip of the ribbon cable is aligned with pin 1 (identified by a small triangle on
the board).
Then connect the audio cable to the drive and one of the audio sockets of the soundcard. These
cables are usually 3-pin cables in which the centre pole is the ground connection. The connector
for connecting the soundcard is usually a Mitsumi- or Panasonic-compatible connector.
However, always consult the manual of your CD-ROM drive to determine the pin assignment of
the audio connector. The three audio sockets on the soundcard have the following assignments:
CD-ROM Audio Port
Left
Right
Ground
Ground
Panasonic/IDE
Panasonic/IDE
Sony
Sony
Mitsumi
Mitsumi
mgN
mgO
mgP
Right
Right
Left
Left
Ground
Ground
Ground
Ground
Enter the corresponding driver of your drive in the installation program. If your drive is not in
the selection, please use the driver supplied with your drive.
Summary of Contents for Maestro 3296
Page 1: ...SoundSystem Maestro3296 Handbuch Manual...
Page 80: ......


